With servis.ai integration with SendGrid, you can create and send personalized Email Campaigns. You can also receive Effectiveness Reports that provide valuable insights into the success of your Email Campaigns.
User Permissions: Only the Admins can use this feature.
Requirements: In order to create an Email Campaign you need an active SendGrid account that has been integrated with servis.ai. For more information on integrating SendGrid with servis.ai, refer to our SendGrid Integration article.

Navigate to Email Campaigns
From the Navigation Menu, go to Activities > Emails > Email Campaigns.

Create a New Email Campaign
From the Email Campaigns page, click the Add Email Campaign button. You will have the option to create a new Sales Template or Marketing Template.

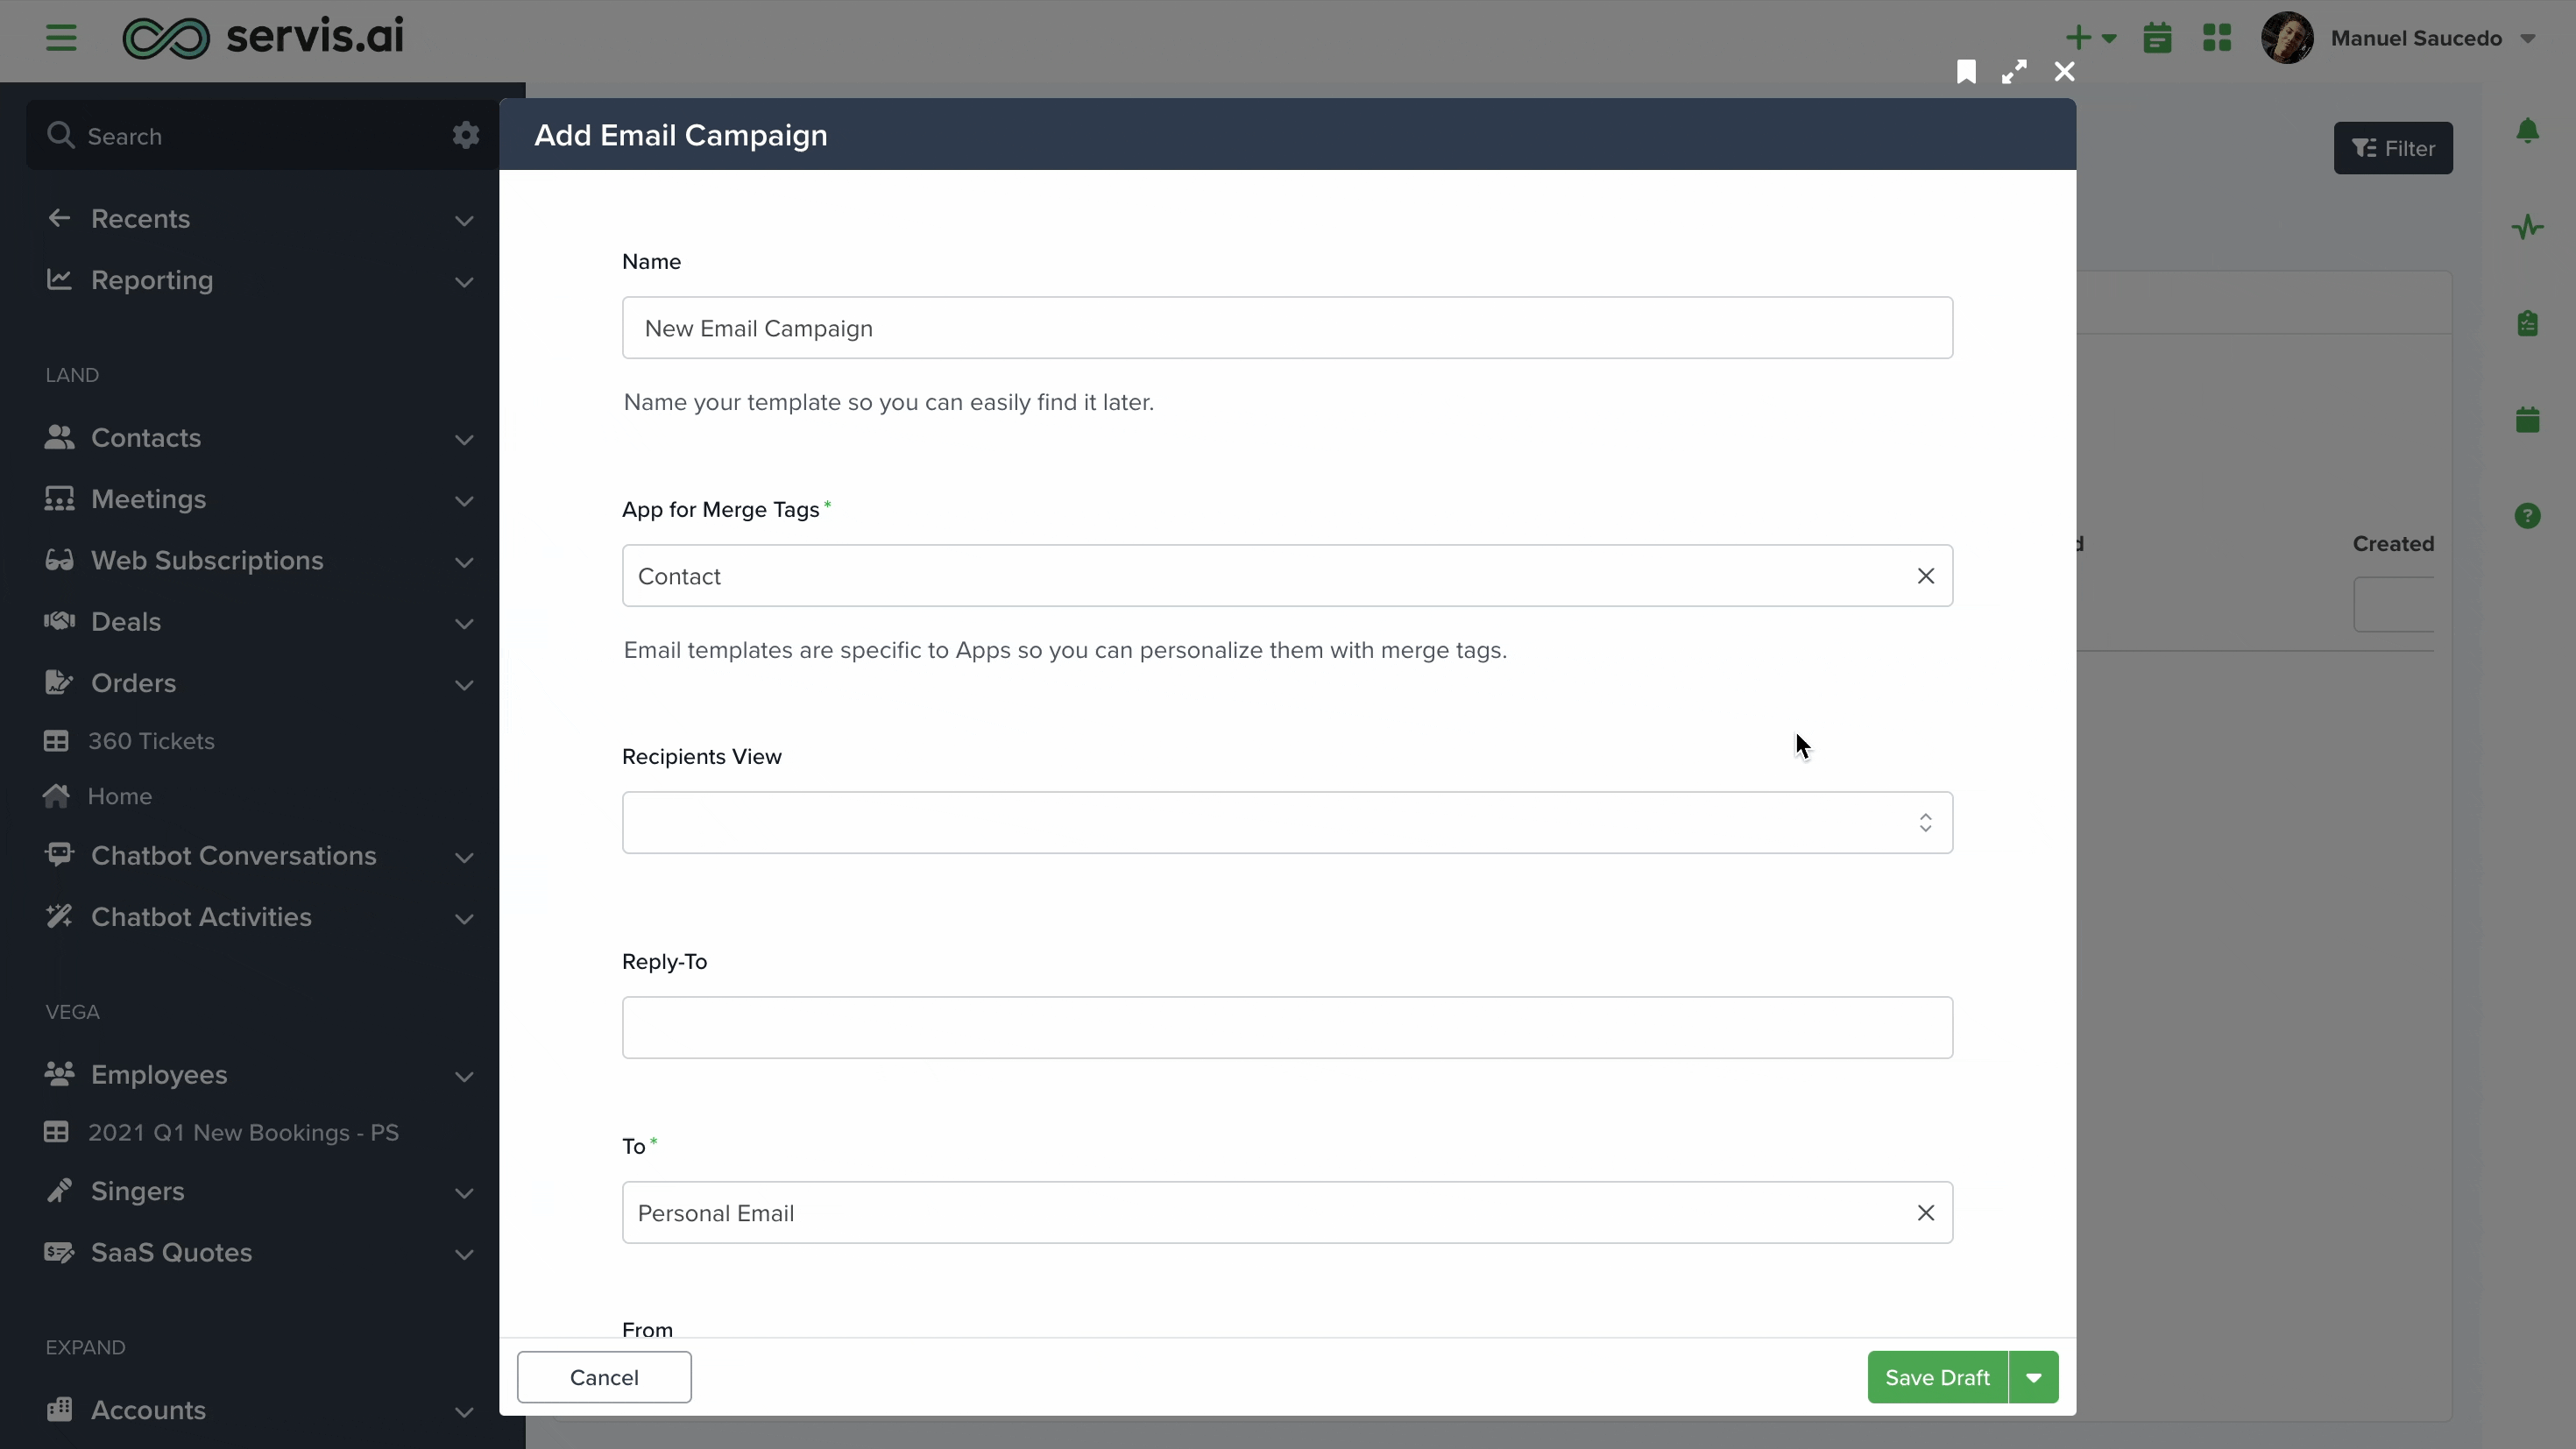
After you choose your template the Add Email Campaign form will open.

Name
The Name field allows you to name the Email Campaign.
The name of the Email Campaign should be simple and informative, telling you who and what the Email Campaign is for.
This is a required field (*).
App for Merge Tags
Merge Tags are a powerful way to pull information from your applications for use in your email templates. Here’s how they work.
You can use Static Values for Merge Tags as fallback options, to learn everything about it dive into this article.
Note: The Contacts App may have a different name in your servis.ai instance.
Recipients View
The Recipients View field allows you to choose who you would like to send the Email Campaign to. The options available are presented in a dropdown menu populated with your Saved Views in servis.ai.
If you have specific contacts you’re trying to target you should create a new Saved View that lists only those contacts. For more information on creating Saved Views, refer to our Saved Views article.
From
The From field allows you to choose who you would like the Email Campaign to be sent from. The options available are presented in a dropdown menu populated with your servis.ai Users.

This is especially relevant for teams that send multiple emails and need to maintain consistency by using the same sender address across all communications.
Note: If the “From” field is empty, indicating that the drop-down menu does not display any values, it means that not all users have paired their email addresses in servis.ai. To solve this issue, all users need to link their email addresses from the Preferences section in their profiles and then click on “Pair Email”.
Note: If the Reply-To field is left blank, replies will be sent to the User designated in the From field.
To
In this field, you can choose whether emails will be sent to a contact’s work email or personal email in the Contacts App.
Reply-To
The Reply-To field allows you to choose who you would like replies to the Email Campaign to be sent to. Enter the email address you would like the replies to be sent to.
Note: If the Reply-To field is left blank, replies will be sent to the User designated in the From field.
Seed List
Here, you can start typing any email address that users have paired to include them as recipients for testing and confirmation. After entering the email, press the comma ( , ) key to add it to the list.
It does not work with Batch Sending.
Note: If you want to add a personal or custom email, simply type the address and press the comma ( , ) key to include it.
Subject
The Subject field allows you to create the subject of your email campaign.

You can use merge tags in here.
Content
You have two options for creating the content for an Email Campaign.
You can use merge tags in here.
Edit
To manually input the content for your Email Campaign, click the Edit button to the right hand side of the Content field to open the Content window.

Press the Continue button at the bottom right hand corner of the Content window to close the Content window.

Note: If you choose this option your template will not be saved to servis.ai for later use.
Import From Template
Click the Import From Template button to the right hand side of the Content field to open the Email Template Selector menu.
You can choose any template that you have created or templates that have been shared by your team.
For more information on how to create and use email templates, check this article.
Preview Text
The Preview Text field allows you to provide a short description of what your email contains. This text appears underneath the subject line in some email readers and is a good opportunity to hook the recipient and boost your open rates.
Attachments
The Attachments field allows you to attach files to your Email Campaign.
Note: Attachments may hurt email deliverability when sending in bulk. We recommend using links instead wherever possible.
Enable Multi Language
This dropdown lets you enable multilingual support for your email campaigns, allowing you to tailor content based on your audience’s language preferences.
How this Works
Select Yes from the dropdown to generate the configuration below it.

Click the + Add to add a new template configuration.

- Click the gear icon to choose the language you want to configure.
- A settings window will open.
- Enter the translated text in the appropriate fields, such as Subject and Email Content.
- Multi-language support appears as buttons within the email body.
- When clicked, these buttons open a new browser tab.
- The tab displays a email preview with the translated version of the text configured for that language.
Send Test
From here you can state if this campaign can send test emails targeting the emails you placed in the Seed List field.
Enable Batch Sending
When you click select Yes, three new fields will appear below.

1.- Number of Batches
Imagine you have 300 Contact Records you want to send a campaign to, but your SendGrid plan only allows 100 emails per day.
- With Batch Sending, you can automate this process by setting the batch number to 3.
- The system will then automatically calculate and send 100 emails per batch.
2.- Hour Intervals Between Batches
This field allows you to set the number of hours between each batch of emails being sent.
- The system uses your device’s current time when you click “Send Now.”
- If you set the interval to 24 hours (you write 24), and you click “Send Now” the first batch will be sent at 4:28 PM, the next batch will automatically be sent at 4:28 PM of the next day.
- Simply enter the number of hours that best fits your sending schedule.
3.- Exclude Weekends
The system automatically detects whether the next scheduled batch falls on a weekday or a weekend.
- You can choose to pause sending on weekends and have the system resume from where it left off on Monday.
- If enabled, any batches scheduled for Saturday or Sunday will be held and sent at the next available time on Monday.
Save/Send Your Email Campaign
The Save Draft button is located in the bottom right hand side of the Add Email Campaign form.

The arrow on the right hand side of the Save Draft button has options to Send Now, Send Later or Send Test.

Save Draft
The Save Draft button allows you to save the Email Campaign as a draft.
Note: Saved drafts can be accessed using the Status column on the Email Campaigns page.
Send Now
The Send Now button allows you to send the Email Campaign to the chosen recipients immediately.
Send Later
The Send Later button allows you to send the Email Campaign to the chosen recipients at a later date. When you click the Send Later button the Schedule Email Campaign Send form will appear.

Select the date and type you would like the Email Campaign to send.
Send Test
Send Test is directly linked to the Seed List field, ensuring that emails are sent to the addresses specified in the Seed List.
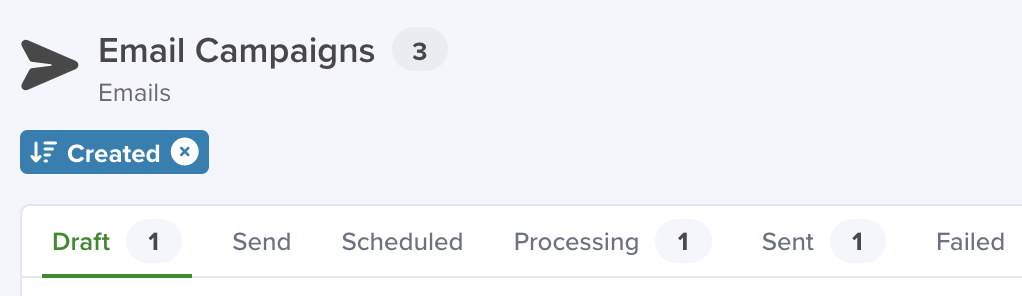
Managing Email Campaigns
From the Email Campaigns page you can manage all your Email Campaigns. The Options menu at the top of the Email Campaigns page has 6 tabs that organize your Email Campaigns by status.

Draft
All Email Campaigns you have saved as drafts can be accessed and edited from here.
Send
All Email Campaigns you have scheduled to Send Later can be accessed and edited from here.
Scheduled
All Email Campaigns you have scheduled to be sent on a specific date can be accessed and edited from here.
Processing
Larger Email Campaigns may take time to process before being sent out.
If you enabled Batch Sending the campaign will remain here until all the batches are successfully sent.
You can monitor the progress of each individual batch as well as the whole campaign here using the Effectiveness Report.

Sent
All Email Campaigns that have been sent and processed can be accessed and edited from here.
Failed
If for some reason a problem occurred and an Email Campaign did not send it can be accessed and edited from here.
Email Metrics & Engagement
After an Email Campaign has been successfully sent or currently processing, you can see how well it performed. To do so, navigate to the Sent or Processing tab and click on View Effectiveness Report.
For an exhaustive insight on this topic, please read this article.
Email Campaign Effectiveness Report
Once an Email Campaign has been sent or is still processing, you can track its performance. Simply go to the Sent or Processing tab and select View Effectiveness Report to review the results.

The Effectiveness Report window offers a concise overview of your email campaigns and their respective batches, focusing on key system-related performance metrics. It presents counts for:
- Sent: Total emails dispatched.
- Delivered: Number of emails successfully reaching recipients’ inboxes.
- Bounced: Emails that failed to deliver.
- Clicks: Instances where recipients clicked on links within the email.
This streamlined view enables quick assessment of your email campaign’s performance.

Email Unsubscribes
You can track Email Unsubscribes on the Email Unsubscribes page. To do so, navigate to
Activities > Emails > Email Unsubscribes.

This will pull up a complete list of everyone that has unsubscribed from your Email Campaigns.

To know more about how to enable Unsubscribes check this SendGrid article.
Tracking Unsubscribes by Contact
To monitor unsubscribes effectively, you can set up tracking directly within your Contacts App. Simply create the following two fields:
- Opt-out Email – to identify who unsubscribed.
- Opt-out Email Date – to record the exact moment the unsubscribe occurred.

Note: Make sure the field names are exactly as shown. The system relies on these names to identify the event and update the record correctly.
This will appear in the Email Unsubscribes view. Under the Contact tab, you’ll see the exact record from the Contacts App that unsubscribed.
