You can automatically generate documents such as quotes or proposals right from within servis.ai using Document Templates. You can personalize the format and style of these templates to fit your brand.
User Permissions: Only Administrators and App Admins can create new Document Templates.
FAQs
What is a Document Template?
A document template is a preformatted document used to generate various types of documents in servis.ai such as quotes and orders.
What is an App field?
An App field is a specific piece of information or data that is collected, stored, and managed in a servis.ai App record.
What is a Line?
A line contains the details of individual products or services, including specific attributes related to those items such as price and quantity.
Can I use information from a line in a Document Template?
Yes. See Pulling Information from a Line.
Can I use dot.walking in a Document Template?
Yes, but the format is slightly different.
Instead of writing it as Account.Contact, you should write it as:
AccountContact
Docmosis Documentation
If you haven’t used Docmosis before, we would recommend reviewing the Docmosis Cloud Template Guide. Cloud (DWS3) – Template Guide and here.
Creating a DOCX Template
The first step in creating a Document Template for servis.ai is creating a DOCX version in Microsoft Word or LibreOffice Writer. This version should include all the style and brand elements you want in the Document Template as well as all the information you want the document to contain.
DOCX Template Example: Sales Quote- Header
Let’s take a look at an example. We will make a Sales Quote DOCX template, starting with the Header.

As you can see, we have added our logo and address to the top left corner of the template Header. We have also chosen our preferred fonts and colors.
On the right-hand side, we have named the template (Sales Quote) and designated a place to display the Sales Quote ID# and Issued Date.
Next, we need to identify our placeholder elements.
Placeholder Elements
While some of the information in a Document Template will remain consistent from document to document, most of the information will need to be updated based on the specific details of each individual document.
For example, in our Sales Quote template Header, the Koda Company logo, address elements, and the document name will all remain the same from quote to quote.
The Sales Quote ID# and the Issued Date elements, however, will need to be updated each time a new Sales Quote is created. Elements that need to be updated like this are called placeholder elements.
Here we have outlined the placeholder elements in green.

Next, we need to replace those placeholder elements with Tags.
Tags
Tags designate an existing field within a servis.ai App. Information from the designated field will be used to populate the placeholder element that contains the Tag.
Copy in CamelCase
The Copy in CamelCase feature lets you easily copy a field name in the correct format to your clipboard. This ensures it’s ready to be used in document tags without any manual formatting.
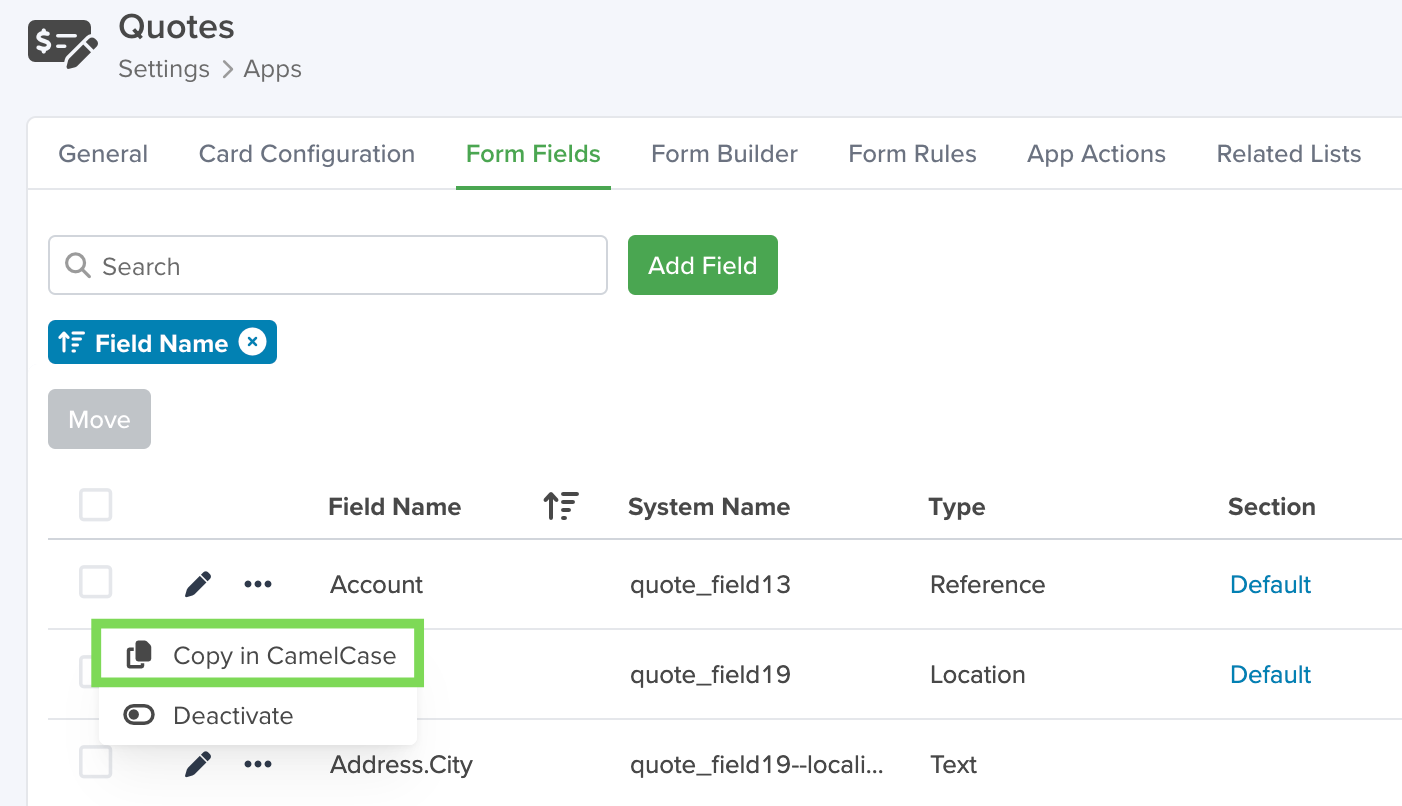
Tags are formatted as follows: <<fieldname>>. For example, a Tag for the Account field in the Quotes App would look like this: <<account>>.
For fields that have multiple words, the first word is spelled out in lowercase letters, and the next word begins with a capital. There are no spaces between the words. For example, a Tag for the Contact Name field in the Quotes App would look like this: <<contactName>>.
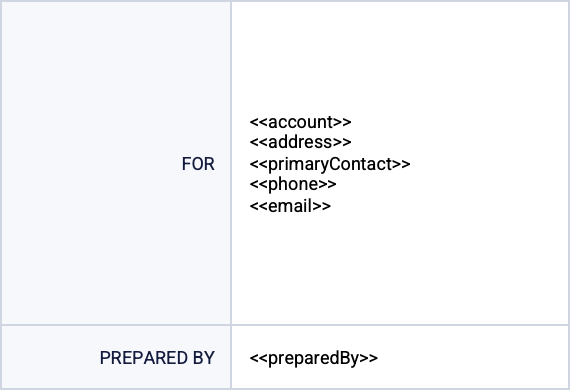
Here’s what our Sales Quote template example looks like with the Tags entered. You can see we replaced the placeholder elements we identified with Tags that correspond to the fields in our servis.ai Quotes App that contain the information we want to populate those placeholder elements with.

Note: The name of available fields will vary based on your servis.ai configuration.
Adding your Logo
DOCX Template Example: Sales Quote- Body
Let’s move on to the body of our Sales Quote template. First, when designing the body of a Document Template, it is best to create separate tables that contain similar types of information.
For example, all of the account-specific information for our Sales Quote template could be contained in a single table that includes the account name, address, primary contact, and the primary contact’s phone number and email. 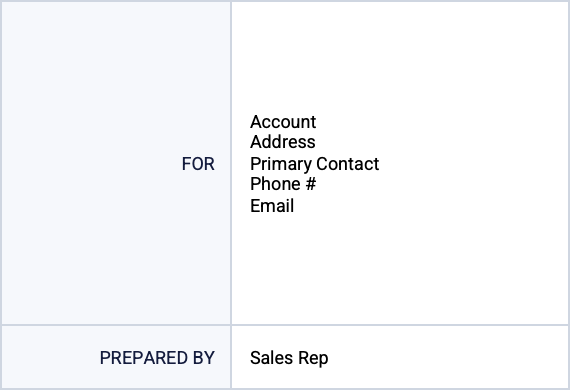
In this example we have included a “Prepared By” section as well. Deciding what information you want in a template, as well as how to organize it, is not a science and will require you to play around a little bit to find the right fit for you and your brand.
Next, we identify our placeholder items and then replace them with Tags.
Pulling Information from a Line
If you need a Document Template to pull information from a Line, rather than a field, you can do so.
First, we recommend that each Line have its own table. This allows you to create rows in the table with commands that tell servis.ai to pull the information from a Line in the App and not a field in the App. Those commands are:
- <<rr_appLines>> This command tells servis.ai that the information that comes after this row is to be pulled from a Line in an App, not a field.
- <<er_appLines>> This command tells servis.ai to stop pulling information from that Line.
These rows act as a closed loop that allows you to select several elements from a Line to be displayed together.
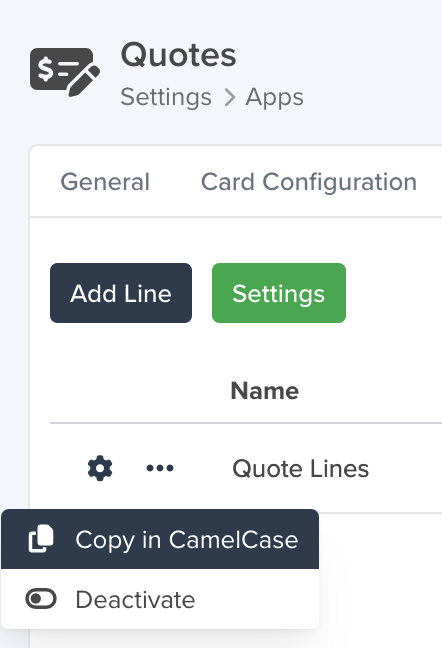
Copy in CamelCase
The Copy in CamelCase feature lets you easily copy a Line name in the correct format to your clipboard. This ensures it’s ready to be used in the corresponding table without any manual formatting.
Note: Replace “app” in the command with the name of the App you are using for your Document Template.
Let’s take a look at an example from our Sales Quote template.
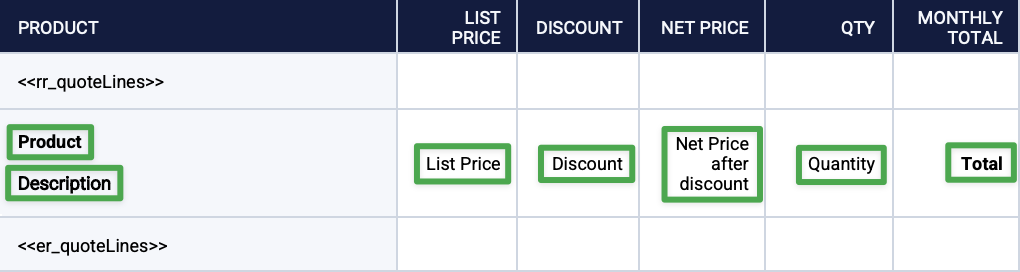
As you can see, we have created a new table in our DOCX document for the Line. We started by creating a header row that indicates what information from the Line each column will hold (product info, List Price, Discount, etc.).
Next, we created a row for our first command and replaced the word “app” with “quote” because we want to pull information from a Line in the Quotes App. The command now looks like this: <<rr_quoteLines>>.
After that, we created a row for the placeholder elements in each column that we will replace with Tags and outlined those placeholder elements in green.
Lastly, we created a row for our second command (<<er_quoteLines>>).
Now we can replace our placeholder elements with Tags.

Upload a DOCX Template to servis.ai
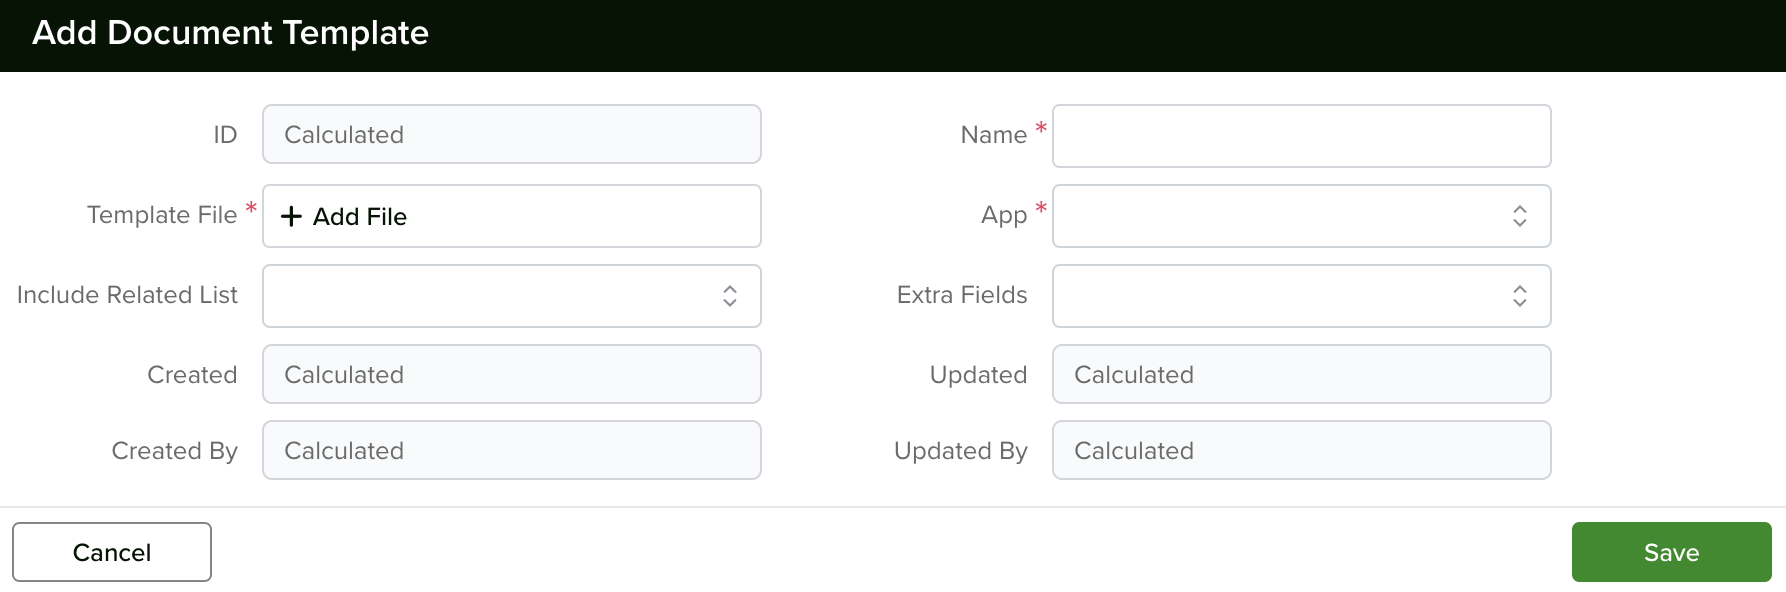
From the Navigation Menu, go to Settings > Advanced > Document Templates and click the Add Document Template button.
This will pull up the Add Document Template window. From here, you can name the template, select what App to associate the template with, and upload the DOCX template file.
Special Formats
Dates/Time/Numbers
| Date Formats | Result |
|
<<yourDateFieldFormatted>> |
Changes according to your date field configuration (if masks are applied) |
|
<<{dateFormat(effectiveDate, ‘MMM dd, yyyy’, ‘yyyy-MM-dd’)}>> |
25 May 2020 |
| Date Time Formats | Result |
|
<<{dateTimeFormat(yourDateTimeFieldName,‘MMM dd, yyyy hh:mm’)}>> |
Apr 06, 2020 12:40 |
|
<<{dateTimeFormat(yourDateTimeFieldName,‘MMM dd, yyyy hh:mm:ss’)}>> |
May 27, 2020 11:37:12 |
|
<<{dateFormat(yourDateTimeFieldName,‘MM/dd/yyyy HH:mm:aa’, ‘yyyy-MM-dd’T’HH:mm:ss’)}>> |
12/25/2021 – 12:00PM |
You can specify a different format in the bold section to print your preferred date and time.
| Format | Description |
| dd | for a two-digit day |
| yyyy | for a four-digit year |
| MM | is the Month in numeric format |
| MMM | is the Month abbreviated to the first three letters |
| MMMM | is the Month as a full word |
| mm | is for minutes |
| EEEE | the day expressed as a word |
| EEE | the day is abbreviated to the first three letters |
| hh | is for hours in 12-hour notation |
| HH | is for hours in 24-hour notation |
| aa | is for AM/PM |
| Number Formats | Result |
| <<{numFormat(yourField,‘0.0’)}>> | 12.3 |
| <<{numFormat(yourField,‘$0.00’)}>> |
$12.34 |
| <<{numFormat(yourField,‘###.##’)}>> |
12.34 |
| <<{numFormat(yourField, ‘¤#,###.00’, ‘USA’)}>> |
$1,234.50 |
| <<{numFormat(yourField, ‘¤#,###.00’, ‘GBR’)}>> | £1,234.50 |
| <<{numFormat(yourField, ‘ #.###,00¤’, ‘DE’)}>> | 1.234,50€ |
Referencing Different Field Types
Some Field types in servis.ai require different tags to produce results in your template.
| Field Type | Tag |
| <<fieldNameFormatted>> |
Configure Custom Code for Document Generation
Servis.ai supports document generation in the following formats: PDF, DOC, HTML, RTF, TXT, and ODT. These formats are controlled by API parameters and will require some simple coding to set up generation within your App Action.
To learn more about API, click here. For more information on setting up App Actions, click here. The following is a sample of the custom code required to configure your document generation preferences.
(async function(record, context){
try{
const entity = await context.clientAPI.getEntityIdFromName({entity_name:'leads'});
const response = await context.clientAPI.getPdfByTemplate({
fa_entity_id: entity.data.getEntityIdFromName.fa_entity_id,
instance_id: record.id,
template_id: 'DOC100001',
output_format: 'pdf',
show_activity: true,
output_file_name: 'Output File Name'
})
if (response.error) {
await context.clientAPI.showErrorMessage(response.error);
} else {
const url = response.data.getPdfByTemplate.attachment_url;
window.open(url, '_blank');
await context.clientAPI.showSuccessMessage("Generate Document Successfully!");
}
} catch(e){
await context.clientAPI.showErrorMessage(e);
}
}(record, context));
Refer to the table below to customize the code to your desired result. There are five parameters you will need to configure manually.
| Code Segment | User Modification |
| const entity = await context.clientAPI.getEntityIdFromName({entity_name:’leads‘}); | ‘leads‘ will be the name of the App you are configuring |
| template_id: ‘DOC100001‘, | This line is not included in the custom code by default. If you have multiple document templates, add ‘template_id:’ where ‘DOC100001‘ will specify your chosen template |
| output_format: ‘pdf‘, | This parameter dictates the output format. The available formats are ‘pdf‘ ‘doc‘ ‘html‘ ‘rtf‘ ‘txt‘ ‘odt‘ |
|
|
This code generates the automatic download within a pop-up window once the App Action button is clicked. Omit this code to stop automatic download, will still generate a document in the Activity timeline by default. See below |
| show_activity: true | This will dictate whether your download will show in the Activity timeline. Change to false to hide |
output_file_name: 'Output File Name' |
Name the file directly within the code, where ‘Output File Name‘ will dictate this. |
Using Related Lists
What Are Related Lists?
- Print a table of all line items on a quote or invoice
- List every issue or task associated with a project
- Include all notes, emails, or activities tied to a contact
- Display product details from a connected inventory App
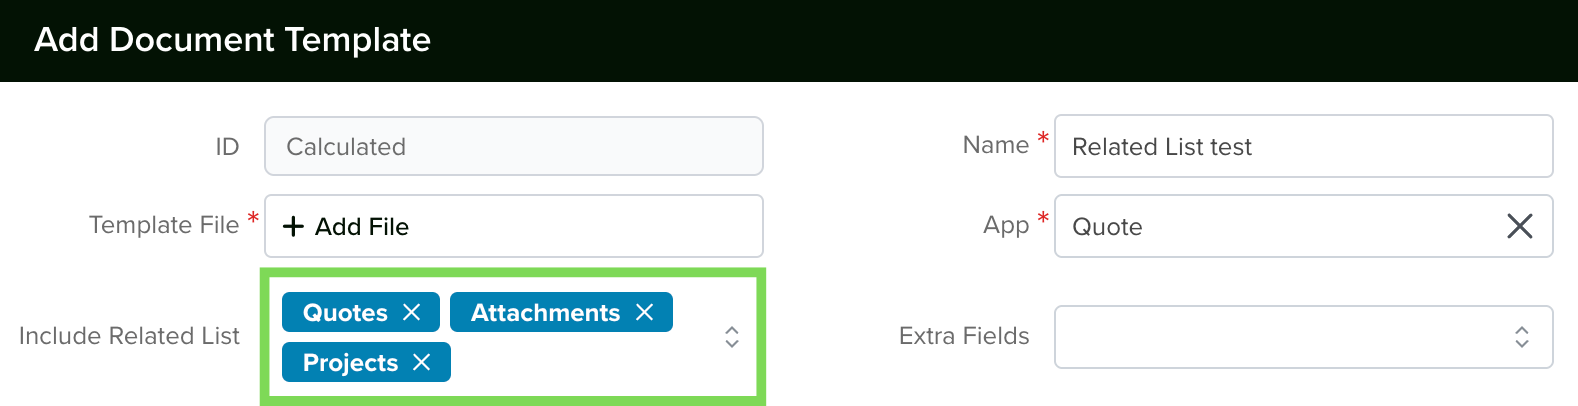
How to Set Up a Related List in Your Template
Step 1 – Open Your Document Template
- Go to Settings > Advanced > Document Templates.
- Click on the template you want ot edit, or click “Add New” to create one.
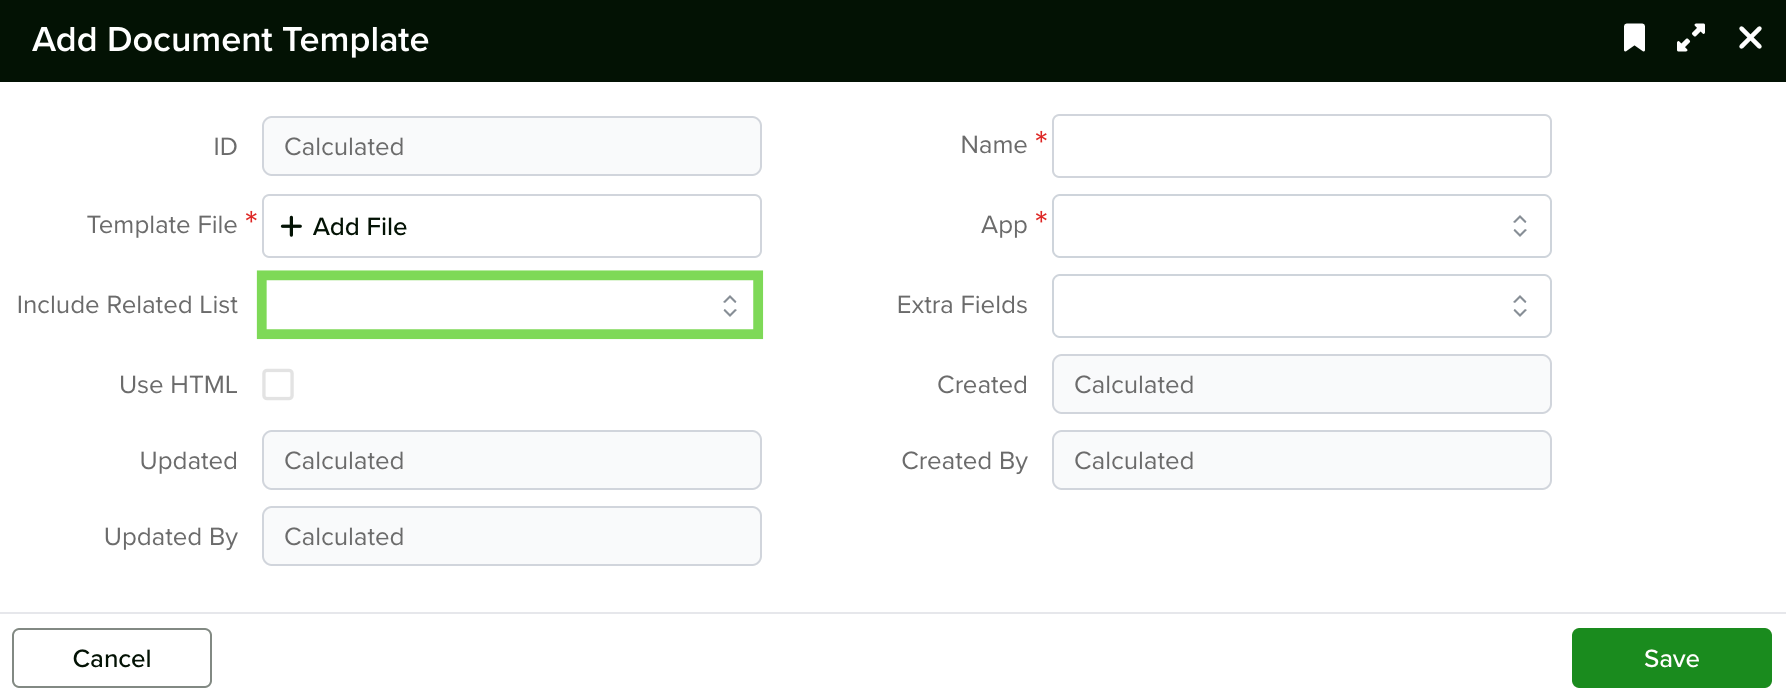
- In the template form, you’ll see fields for Name, App (the App this template is associated with), Template File (your .docx file), and a field called IncludeRelated List.
Step 2 – Select the Related List
Step 3 – Design Your Word Template
<<fieldName>>
Quotation #: <<id>>
|
Tag
|
What It Does
|
Example
|
|---|---|---|
|
<<rr_listName>>
|
Row Repeat Start — marks the beginning of the repeating section. Everything between this tag and the matching end tag is repeated for each related record.
|
<<rr_quoteLines>>or<<rr_issues_Related>>
|
|
<<fieldName>>
|
Field Placeholders — placed inside the repeating section. Each one is replaced with the corresponding field value from the current related record.
|
<<product>><<quantity>><<price>>
|
|
<<er_listName>>
|
End Repeat — marks the end of the repeating section.
|
<<er_quoteLines>>or<<er_issues_Related>>
|
Step 4 – Build the Repeating Table
- Create a table in Word with a header row and one data row.
- In the first cell of the data row, place the <<rr_listName>> tag.
- In the last cell of the data row (or in a final row below), place the <<er_listName>> tag,
Example – A Quote with Line Items:
|
Description
|
Quantity
|
Unit Price
|
Amount
|
|
|---|---|---|---|---|
|
<<rr_quoteLines>>
|
||||
|
<<product>>
|
<<product>>
|
<<quantity>>
|
<<price>>
|
<<netAmount>>
|
|
<<sectionHeader>>
|
||||
|
<<er_quoteLines>>
|
Step 5 – Upload and Test
- Save your .docx file and upload it to the Document Template record in servis.ai.
- Make sure the “App” field and the “Related List” field are correctly set.
- Open a record in the associated App and use the template to generate a document (typically through an App Action button).
- Check the generated PDF or Word file to confirm that the related records appear correctly.
How to Find the Correct Placeholder Names
- Open the related App (for example, “Quote Lines”) and look at the field labels visible in the record form or list view.
- Convert each label to camelCase. This means:
- Capitalize the first letter of each word except the first word.
- Remove all spaces and special characters.
- Example: “Unit Price” → “unitPrice”, “Net Amount” → “netAmount”.
|
Variant
|
Syntax
|
What It Contains
|
|---|---|---|
|
Display Value
|
<<fieldName>>
|
The value as displayed in the servis.ai UI (e.g., “$1,250.00”)
|
|
Formatted Value
|
<<fieldNameFormatted>>
|
A rich-text formatted version of the value
|
|
Raw Value Object
|
<<fieldNameValue>>
|
The underlying data object with all properties
|
Example: Project Report with Issues
Template Configuration
- App: Projects
- Related List: Issues (selected from the dropdown)
- Template File: your .docx file
Parent Record Fields (Projects)
|
Field Label
|
Placeholder
|
|---|---|
|
Project Name
|
<<projectName>>
|
|
Client Name
|
<<client>>
|
|
Project Manager
|
<<projectManager>>
|
|
Report Completion Date
|
<<reportCompletionDate>>
|
Related Record Fields (Issues) – used inside the repeating section:
|
Field Label
|
Placeholder
|
|---|---|
|
Description
|
<<description>>
|
|
Issue Status
|
<<issueStatus>>
|
|
Severity
|
<<severity>>
|
|
Rating
|
<<rating>>
|
|
Category
|
<<category>>
|
Your Word Template Table
|
Description
|
Issue Status
|
Severity
|
Rating
|
TC IN
|
TC OUT
|
Category
|
Sub-Category
|
|---|---|---|---|---|---|---|---|
|
<<rr_issues_Related>>
|
|||||||
|
<<cr_{relevant != false}>>
|
|||||||
|
<<description>>
|
<<issueStatus>>
|
<<severity>>
|
<<rating>>
|
<<timecodeIn>>
|
<<timecodeOut>>
|
<<category>>
|
<<subCategory>>
|
|
<<er_issues_Related>>
|
Filtering Records with Conditional Tags
Conditional Start Tag
<<cr_{condition}>>
Conditional End Tag
<<er_>>
Examples of Conditions
|
Condition
|
What It Does
|
|---|---|
|
<<cr_{relevant != false}>>
|
Only show records where “relevant” is not false
|
|
<<cr_{totalQuoteDiscount != 0}>>
|
Only show the Discount row when the discount is not zero
|
|
<<cr_{issueStatus=’Open’ }>>
|
Only show records where Issue Status equals “Open”
|
Related Lists Naming Convention
The Rule
|
Related List Plural Label
|
camelCase Conversion
|
Tag Name
|
|---|---|---|
|
Issues
|
issues
|
issues_Related
|
|
Quote Lines
|
quoteLines
|
quoteLines_Related
|
|
Notes
|
notes
|
notes_Related
|
|
Activities
|
activities
|
activities_Related
|
|
Phone Calls
|
phoneCalls
|
phoneCalls_Related
|
<<rr_issues_Related>>  ...  <<er_issues_Related>>

<<rr_quoteLines_Related>>  ...  <<er_quoteLines_Related>>
Tag Reference for Related Lists
|
Tag Type
|
Syntax
|
Description
|
|---|---|---|
|
Row Repeat Start
|
<<rr_listName>>
|
Begins a repeating section for the related list. Place in the first cell of a table row.
|
|
Row Repeat End
|
<<er_listName>>
|
Ends the repeating section. Place after the last field row.
|
|
Conditional Start
|
<<cr_{condition}>>
|
Shows the following row only when the condition is true.
|
|
Conditional End
|
<<er_>>
|
Ends a conditional section (short form).
|
|
Field (display)
|
<<fieldName>>
|
Shows the display value of a field from the related record.
|
|
Field (formatted)
|
<<fieldNameFormatted>>
|
Shows the rich-formatted value.
|
|
Number Format
|
<<{numFormat(field, format, locale)}>>
|
Formats a number or currency field.
|
|
Date Format
|
<<{dateFormat(field, pattern)}>>
|
Formats a date field.
|
Supported Fonts
Available Fonts on Docmosis Cloud (DWS3)
Sans-Serif Fonts
|
Font Family
|
Available Variants
|
|---|---|
|
Arial
|
—
|
|
Arial Black
|
—
|
|
Asap
|
—
|
|
Calibri
|
—
|
|
Candara
|
—
|
|
Carlito
|
—
|
|
DejaVu Sans
|
DejaVu Sans Condensed, DejaVu Sans Light
|
|
Droid Sans
|
—
|
|
Impact
|
—
|
|
Josefin Sans
|
Josefin Sans Light, Josefin Sans SemiBold, Josefin Sans Thin
|
|
Lato
|
Lato Black, Lato Hairline, Lato Heavy, Lato Light, Lato Medium, Lato Semibold, Lato Thin
|
|
Liberation Sans
|
—
|
|
Montserrat
|
Montserrat Black, Montserrat ExtraBold, Montserrat ExtraLight, Montserrat Light, Montserrat Medium, Montserrat SemiBold, Montserrat Thin
|
|
Montserrat Alternates
|
Montserrat Alternates Black, Montserrat Alternates ExLight, Montserrat Alternates ExtraBold, Montserrat Alternates Light, Montserrat Alternates Medium, Montserrat Alternates SemiBold, Montserrat Alternates Thin
|
|
Nixie One
|
—
|
|
Open Sans
|
Open Sans ExtraBold, Open Sans Light, Open Sans SemiBold
|
|
Open Sans Condensed
|
Open Sans Condensed Light
|
|
Oswald
|
—
|
|
Oswald Regular
|
—
|
|
Oswald Stencil
|
—
|
|
PT Sans
|
—
|
|
PT Sans Caption
|
—
|
|
PT Sans Narrow
|
—
|
|
Quicksand
|
Quicksand Dash
|
|
Raleway
|
Raleway Black, Raleway ExtraBold, Raleway ExtraLight, Raleway Light, Raleway Medium, Raleway SemiBold, Raleway Thin
|
|
Roboto
|
Roboto Black, Roboto Light, Roboto Medium, Roboto Thin
|
|
Roboto Condensed
|
Roboto Condensed Light
|
|
Sansation
|
—
|
|
Sansation Light
|
—
|
|
Source Sans Pro
|
Source Sans Pro Black, Source Sans Pro ExtraLight, Source Sans Pro Light, Source Sans Pro Semibold
|
|
Tahoma
|
—
|
|
Titillium
|
Titillium Bd, Titillium Lt, Titillium Up
|
|
Titillium Web
|
—
|
|
Titillium Web Black
|
—
|
|
Titillium Web ExtraLight
|
—
|
|
Titillium Web Light
|
—
|
|
Titillium Web SemiBold
|
—
|
|
Trebuchet MS
|
—
|
|
Verdana
|
—
|
|
Antonio
|
—
|
|
Bebas
|
—
|
|
Bebas Kai
|
—
|
|
Bebas Neue
|
Bebas Neue Book, Bebas Neue Light, Bebas Neue Thin
|
|
Caviar Dreams
|
—
|
|
Colaborate-Bold
|
—
|
|
ColaborateLight
|
—
|
|
Colaborate-Medium
|
—
|
|
Colaborate-Regular
|
—
|
|
Colaborate-Thin
|
—
|
|
Comic Sans MS
|
—
|
|
Corbel
|
—
|
|
FFF Tusj
|
—
|
|
Gravity
|
Gravity Book, Gravity Italic, Gravity Light, Gravity UltraLight
|
|
League Gothic
|
League Gothic Condensed, League Gothic Condensed Italic, League Gothic Italic
|
|
Lemon Tuesday
|
—
|
|
Ostrich Sans
|
Ostrich Sans Black, Ostrich Sans Bold, Ostrich Sans Heavy, Ostrich Sans Light, Ostrich Sans Medium
|
|
Ostrich Sans Dashed
|
Ostrich Sans Dashed Medium
|
|
Ostrich Sans Rounded
|
Ostrich Sans Rounded Medium
|
|
Alegre Sans
|
—
|
|
ChunkFive
|
ChunkFive Roman
|
Serif Fonts
|
Font Family
|
Available Variants
|
|---|---|
|
Bitstream Charter
|
—
|
|
Caladea
|
—
|
|
Cambria
|
—
|
|
Constantia
|
—
|
|
DejaVu Serif
|
DejaVu Serif Condensed
|
|
Georgia
|
—
|
|
Linux Libertine
|
—
|
|
Linux Libertine Capitals
|
—
|
|
Linux Libertine Display
|
—
|
|
Linux Libertine Display Capitals
|
—
|
|
Linux Libertine Initials
|
—
|
|
Linux Libertine Slanted
|
—
|
|
Liberation Serif
|
—
|
|
Playfair Display
|
Playfair Display Black
|
|
Playfair Display SC
|
Playfair Display SC Black
|
|
STIX
|
—
|
|
Times New Roman
|
—
|
|
Utopia
|
—
|
|
TeX Gyre Adventor
|
—
|
Monospace Fonts
|
Font Family
|
Available Variants
|
|---|---|
|
Andale Mono
|
—
|
|
Consolas
|
—
|
|
Courier 10 Pitch
|
—
|
|
Courier New
|
—
|
|
Cursor
|
—
|
|
Liberation Mono
|
—
|
|
spinwerad
|
—
|
|
spinweradC
|
—
|
Script & Handwriting Fonts
|
Font Family
|
Available Variants
|
|---|---|
|
Alex Brush
|
—
|
|
Allura
|
—
|
|
Amatic
|
—
|
|
Amatic SC
|
—
|
|
Arizonia
|
—
|
|
Black Jack
|
—
|
|
CAC Champagne
|
—
|
|
Dancing Script OT
|
—
|
|
Grand Hotel
|
—
|
|
Great Vibes
|
—
|
|
Kaushan Script
|
—
|
|
Lobster 1.3
|
—
|
|
Lobster 1.4
|
—
|
|
Lobster Two
|
—
|
|
Pacifico
|
—
|
|
Sofia
|
—
|
|
Tangerine
|
—
|
|
Windsong
|
—
|
Decorative & Dispplay Fonts
|
Font Family
|
Available Variants
|
|---|---|
|
Chalk Line
|
Chalk Line Outline
|
|
Walkway Black
|
—
|
|
Walkway Bold
|
—
|
|
Walkway Oblique
|
—
|
|
Walkway Oblique Black
|
—
|
|
Walkway Oblique Bold
|
—
|
|
Walkway Oblique SemiBold
|
—
|
|
Walkway Oblique UltraBold
|
—
|
|
Walkway SemiBold
|
—
|
|
Walkway UltraBold
|
—
|
|
Webdings
|
—
|
CJK Fonts
|
Font Family
|
Available Variants
|
|---|---|
|
AR PL UKai CN
|
—
|
|
AR PL UKai HK
|
—
|
|
AR PL UKai TW
|
—
|
|
AR PL UKai TW MBE
|
—
|
|
AR PL UMing CN
|
—
|
|
AR PL UMing HK
|
—
|
|
AR PL UMing TW
|
—
|
|
AR PL UMing TW MBE
|
—
|
|
SimSun
|
—
|
|
Znikomit
|
—
|
|
ZnikomitSC
|
—
|
Other Fonts
|
Font Family
|
Available Variants
|
|---|---|
|
odstemplik
|
—
|
Troubleshooting
If you have followed this tutorial, but nothing happens when you click on the PDF icon to download, then most likely there is something missing in your template. Some of the most common mistakes are:
- The file is missing some characters; it could be an initial < or a closing > or other characters like apostrophes (‘ or ‘) or curly brackets ({ or }).
- There is a tag <<field>> that either doesn’t exist in your App or in the lines of your App or is not following the naming convention fieldName.
If you have reviewed your template but are still having issues downloading your PDF, email the template to support@servis.ai or share it through the Support Portal!
