User Permissions: Only Administrators or App Admins can customize Apps.
Navigate to App Settings
There are two ways to access App Settings.
1. From the Navigation Menu, go to Settings > Apps and select the App you’d like to edit.
2. From the Apps Home Page, hover your cursor over an App icon and you’ll see the gear icon appear in the top right corner. Click on it to enter the App Settings.

Main Actions
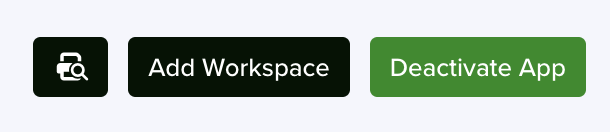
All apps include the following actions in their settings—available from any tab:
Deactivation doesn’t delete the app or its records—it simply turns them off. You can find and manage deactivated apps under Settings → Apps → Deactivated Apps.
General App Settings
When you enter App Settings, you will be presented with the General App Settings tab.

From here, you can edit the App’s look, name, and description, and set up access controls, privacy preferences, and more.
Let’s go through this tab section by section.
General
In the General section of the General Apps Settings tab, you can change the Name, App Icon, Color, and Description of the selected App.

Name
The Name field lets you set or update the name of your App.
- Choose a name that clearly describes the type of records the App will manage.
- Use the plural form to indicate it will hold multiple entries (e.g., Contacts, Accounts).
- This is a required field (*), so be sure to complete it before saving.
Singular Version of Name
The Singular Version of Name field defines what a single record within the App is called.
- Use the singular form of the App name for clarity and consistency (e.g., Contact for the Contacts App).
- This helps users understand the type of individual entries stored in the App.
- This is a required field (*), so make sure it’s filled out before saving.
App Icon
The App Icon field lets you select a visual icon to represent your App.
- When clicked, it opens a library of icons to choose from.
- Pick an icon that best reflects the type of records the App will manage—for example, a person icon for Contacts or a building for Organizations.
Using a relevant icon makes it easier to identify the App at a glance.
The icon you select will be visible in the Navigation Menu and the Apps Home Page. You can add it to the Web Card as well.
This is a required field (*).
Custom Color
The Custom Color field lets you assign a color to your App for better organization and branding.
- Choose from a set of default color options or enter a HEX code to match your brand’s exact color.
- The selected color will appear in the Navigation Menu and on the App’s Home Page.
- Use color coding to visually group Apps—for example:
- Primary brand color for Sales Apps like Contacts and Opportunities
- Secondary brand color for Activity Apps like Tasks, Emails, and Phone Calls

Description
The Description field allows you to provide general information about the type of records stored within the App.
This information will be displayed when you hover over the App icon on the Apps Home Page.
Note: App descriptions should be short, no more than a sentence or two.
Access Control
In the Access Control section of the General Apps Settings tab, you can set the Access Controls for the App.
Access Controls define who in your organization has access to a specific App, record, or field. Refer to the Users article in the servis.ai Knowledge Base to learn more.

Enforce Individual Access
If this option is enabled, users with an Individual Access Level can only see the records assigned to them.
This allows for fine-grained control over the information stored within the App. However, it adds administrative complexity and can impede collaboration between team members and departments.
Consider carefully what apps you choose to Enforce Individual Access.
UI Preferences
In the UI Preferences section of the General App Settings tab, you can customize how each record appears and behaves within the App:
- Title and Subtitle: Define which fields will display as the main title and subtitle for each record.
- Show Stage Progress: Toggle this on to display progress indicators for staged processes.
- Enable Features:
- Link Actions for quick navigation
- Quick Add to create records faster
- Speed to Lead reporting for tracking response times

Title Field
The Title Field lets you choose which field will serve as the main title for each record in the App.
- You can select from any existing field in the App using a drop-down menu.
- For example, in the Contacts App, you might use the Name, First Name, Last Name, or Title field to label each contact.
- The selected field will appear as the record title at the top of the record page.

Subtitles
The Subtitles field functions like the Title Field and allows you to designate a number of other fields to display next to the record’s title at the top of the record page.
To add a Subtitle, select the +Add Subtitle button and choose an option from the drop-down menu that will appear. You can choose up to 4 Subtitles.
Show Stage Progress
If an App uses a Stage field, you can enable this option to see a visual representation of the stage progress of a record in that App.
Here’s an example using a record from the Opportunities App. This Opportunity is in the Negotiation stage.
 This visualization will display the time that a record has been in each stage and if you hover over a stage, you will get a pop-up with even more detailed information regarding that stage history.
When enabling the Show Stage Progress field, you can designate stages as representative of a positive outcome or a negative outcome.

A positive outcome will be displayed as a green bar.

A negative outcome will be displayed as a red bar.

Enable Link Action
- When enabled, this option lets users link a record from the App to an existing record in a Related List.
- It helps streamline workflows by connecting records without duplicating data.
- By default, this setting is turned off to prevent unnecessary complexity and avoid cluttering your servis.ai instance with excessive links.
Note: For businesses that manage sensitive data such as PHI (Protected Health Information), restricting link actions is a security measure that can help prevent unauthorized access.
Enable Quick Add
- This feature lets users create a new record directly from the Related List of the App they’re viewing.
- For example, while viewing an Account record, users can add a new Contact from the Related List if Quick Add is enabled in the Contacts App.
- Once enabled, a “Fields for Smart Quick Add” menu appears, allowing you to choose which fields must be filled out when using Quick Add.

There is also a Quick Add Custom Code field you can use if you want to make custom fields required.

Note: To Quick Add an App record of a particular type, Enable Quick Add needs to be enabled in that App. For example, to be able to Quick Add a new Contact record, Enable Quick Add must be enabled in the Contacts App Settings.
Speed to Lead (only in the Contacts App)
Speed to lead is a KPI (Key Performance Indicator) that measures the time it takes a sales rep to respond to a lead.
If Speed to Lead is enabled in the Contacts App, the following additional fields will become available for use in a Contact record:
- Speed to Call
- Speed to Text
- Speed to Email
- Speed to Lead
- First Call
- First Text
- First Email
- First Response
These fields are populated automatically based on the last corresponding Activity in the Contact record. This enables new reporting options that can be added to your Saved Views.
Note: Speed to Lead is only available in the Contacts App.
Form Script
Form Script is an option that allows servis.ai admins to customize the Form Rules of the Form Fields within an App using Form Actions.
Note: It is generally easier to set up Form Rules in the Form Rules section of the App Settings. Form Script is for experienced and code-savvy servis.ai users who require a custom set of Form Rules for a specific function.
Form Actions and Code
While code is required to create Form Scripts, it is minimal and easy to set up. The following is a list of Form Actions and their corresponding code:
| FORM ACTION | CODE |
| Add Validation to a Field | addFieldValidation: (fieldName, validationCallback) |
| Change a Field | fieldChanged: (fieldName) |
| Make Fields Read Only | makeFieldsReadOnly: (fieldNames, value) |
| Make Fields Required | makeFieldsRequired: (fieldNames, value) |
| Make Fields Visible | makeFieldsVisible: (fieldNames, value) |
| Make Line Fields Read Only | makeLineFieldsReadOnly: (lineApp, fieldNames, value) |
|
Make Line Fields Required |
makeLineFieldsRequired: (lineApp, fieldNames, value) |
|
Make Line Fields Visible |
makeLineFieldsVisible: (lineApp,fieldNames, value) |
| Reset Fields | resetFields: (changedField, fieldNames) |
| Set a Field Value | setFieldValue: (changedField, fieldName, value) |
| Hide or Show Columns in Lines | makeLineFieldsVisible: (lineApp, fieldNames, value) |
| Make Columns Read Only in Lines | makeLineFieldsReadOnly: (lineApp, fieldNames, value) |
| Make Columns Required in Lines | makeLineFieldsRequired: (lineApp, fieldNames, value) |
Setting up Form Scripts
When Use Form Script is selected, the Form Scripts code window will appear.

Enter the custom code for your Form Script. You can compile all your chosen parameters in a single Form Script.
Save the Form Script before moving on.
Privacy Preferences
In the Privacy Preferences section of the General App Settings tab, you can set the privacy conditions for the App.
Allow Private Records
- Enabling this option lets you mark individual records as Private, restricting access to authorized users only.
- To use it, go to the App Settings of the relevant App and enable Allow Private Records, then click Save.
- After that, open the list view of the App, find the record you want to make private, and hover over the Inline App Actions button to set it as private.

You will now see options to Edit, Duplicate, Delete, Make Private, and Make Public. Select Make Private.
Note: In general, it is easier to manage information access through Access Control Lists. We recommend allowing private records only in Apps when a specific use case calls for it.
Default Privacy Setting
When Default Privacy Setting is set to Public, records from the App will be Public by default. If it is set to Private, records from the App will be Private by default.
Note: Unless Allow Private Records is enabled, all records are Public by default.
Sort
The Sort section of the General App Settings tab is where you set the default sorting rules for the App.

Sort By
The Sort By feature lets you organize records using a dropdown menu with sorting options based on the fields available in the App.
- In the Contacts App, for instance, you can sort records by fields like First Name, Last Name, or Contact Owner.
- To refine your list further, you can add multiple sort rules using the + Add Sort button. This helps in cases where several records share the same value—for example, if many contacts have the same first name, adding Last Name as a second rule ensures better organization.
- To remove a sort rule, simply click the trash icon next to the Sort By and Direction settings.
Direction
The Direction setting lets you choose how each sort rule is applied—either in Ascending or Descending order.
- Ascending: Sorts from A to Z or from lowest to highest.
- Descending: Sorts from Z to A or from highest to lowest.
For example, sorting the Contacts App by Last Name in ascending order will display contacts from A to Z. Choosing descending order will list them from Z to A.
Unique Fields
In the General App Settings, the Unique Fields section lets you mark specific fields as unique to prevent duplicate entries across your servis.ai Apps.

- Once a field is marked as unique, no record—whether created manually or imported—can use the same value for that field.
- To set a field as unique, click the Fields bar and select from the dropdown list of available fields.
- You can add multiple unique fields by repeating this step.
- To remove a field, click the X next to its name.
Note: When importing data, you can use the Unique field name rather than the field ID.
You can learn more about Importing using Unique Fields here.
If you want to know more about Managing Unique Fields, please read this article.
Search Preferences
The Search Preferences section in the General App Settings lets you control which fields are used when searching through the Global Search Bar in the Navigation Window.

- This helps streamline search results and improves performance by limiting the number of fields users need to search through.
- By default, each App comes with a set of fields already selected.
- To add more fields, click the Fields bar and choose from the dropdown list. Repeat as needed.
- To remove a field, simply click the X next to its name.
Recalculate Search Preferences
The Recalculate Search Preferences feature functions like a refresh button for your configured preferences.
- When you update records via Import or Bulk Edit in any App, the changes may not reflect immediately in your search results, this is expected behavior.
- To ensure that your searches return results based on the most recent field values (the ones you just updated), use the Recalculate Search Preferences button.
- This action updates the specified fields so the system can include the new values in your search logic.

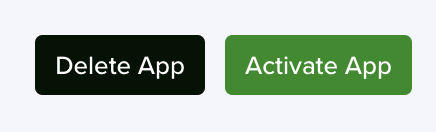
Deactivated Apps
This section lists all apps you’ve previously turned off. You’ll see the same settings tabs as when the app was active, but the app remains inactive until you restore it. Here you can perform the following actions:
-
Delete permanently: Remove the app.
Important: You must deactivate an app before you can delete it.
-
Activate: Turn the app back on to resume normal use.
Note: This also applies to custom apps.
