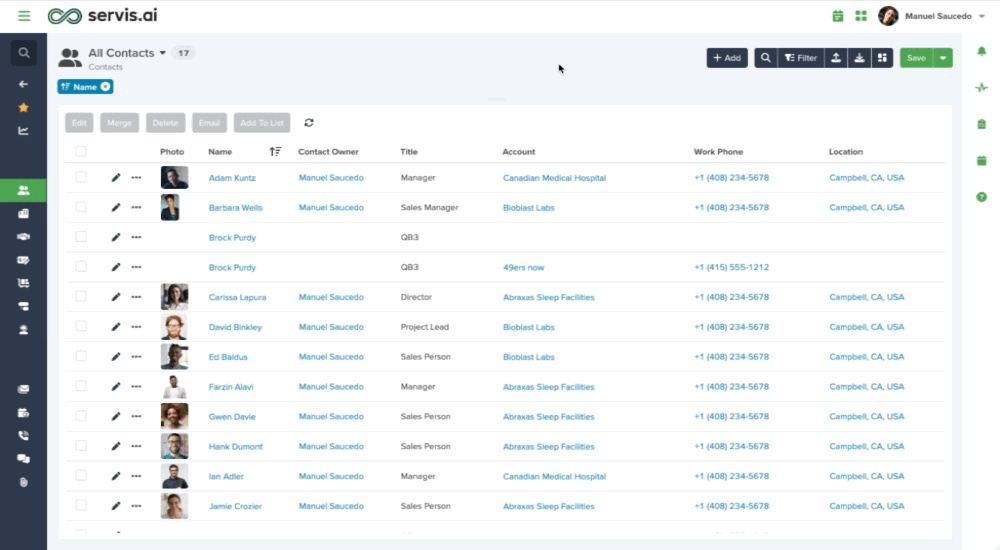
Apply filters, use the sorting options, group your data and, create useful calculations to improve your record productivity. You can combine all these options to create personalized views that you can then use to create powerful dashboards.
Filters

Filters are available in every details page across all Apps in servis.ai. To get started, click on the “Filter” button. Then make sure you are under ‘Filter’.
Here you will need to specify the Field you want to filter by. To do this you can select the Field from the dropdown list or start typing the Field’s name.
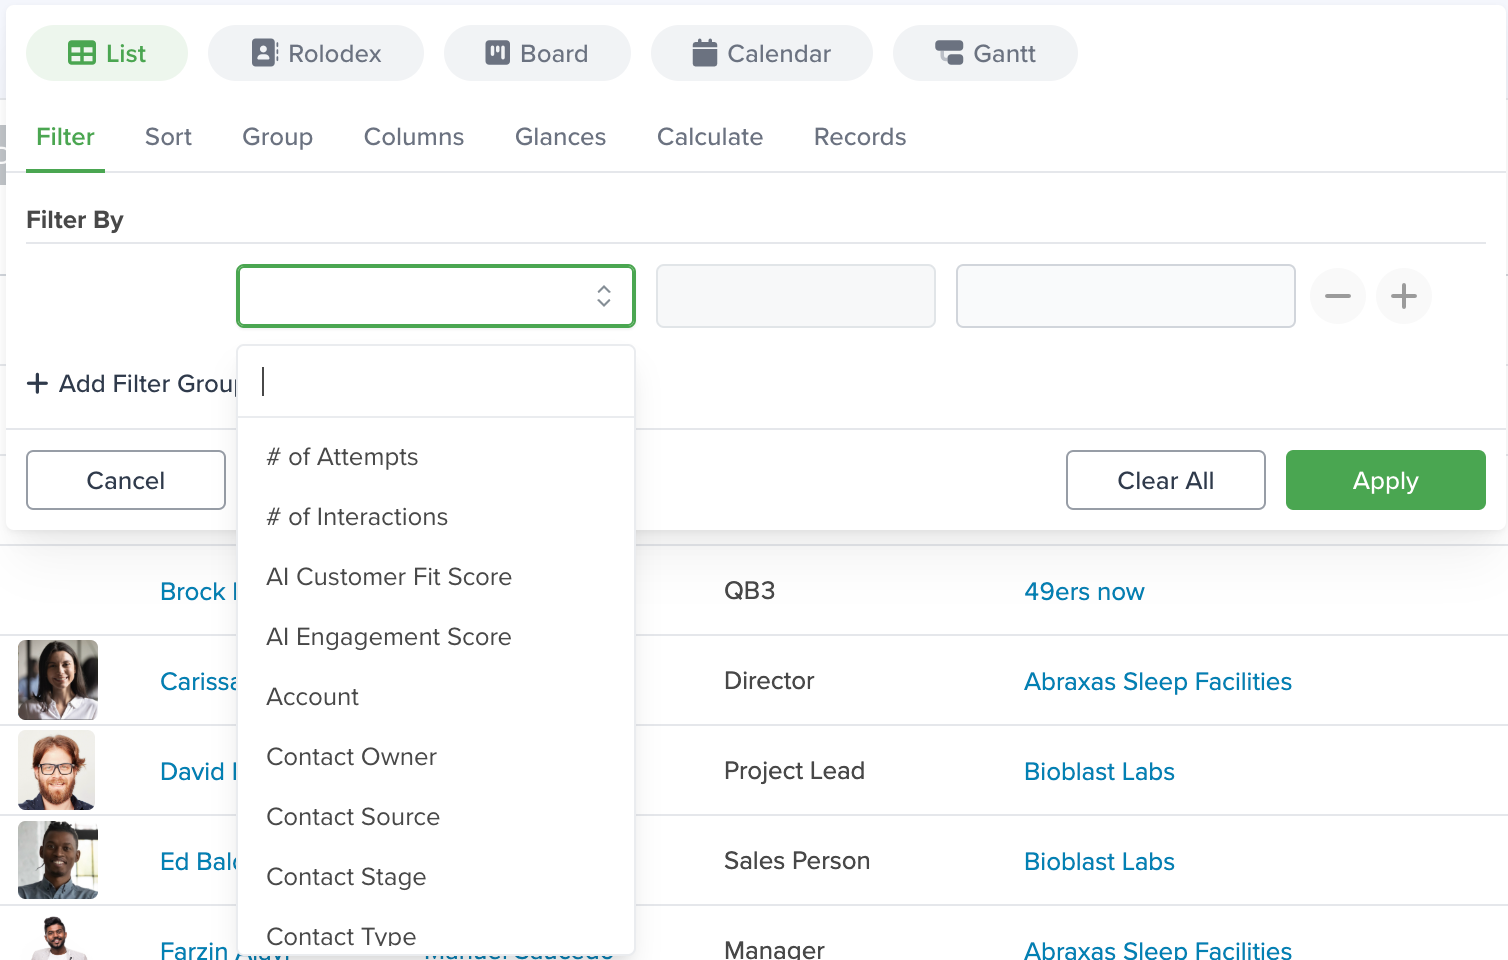
Now, either using the ‘Tab’ key or your mouse, select the Operator. The available Operators will vary according to the Field you previously selected. To learn more about each of the Operators, go to the ‘Using Filters Operators‘ section of this tutorial.
Next up, select the Value. Each field type will include different options for you to choose from. You have the option to select a single Value or multiple Values. For example, for the Contact Owner Field, you will be able to select from all the (active) members of your team. You also have the option to filter by ’empty’ values as well.
File Type Filter
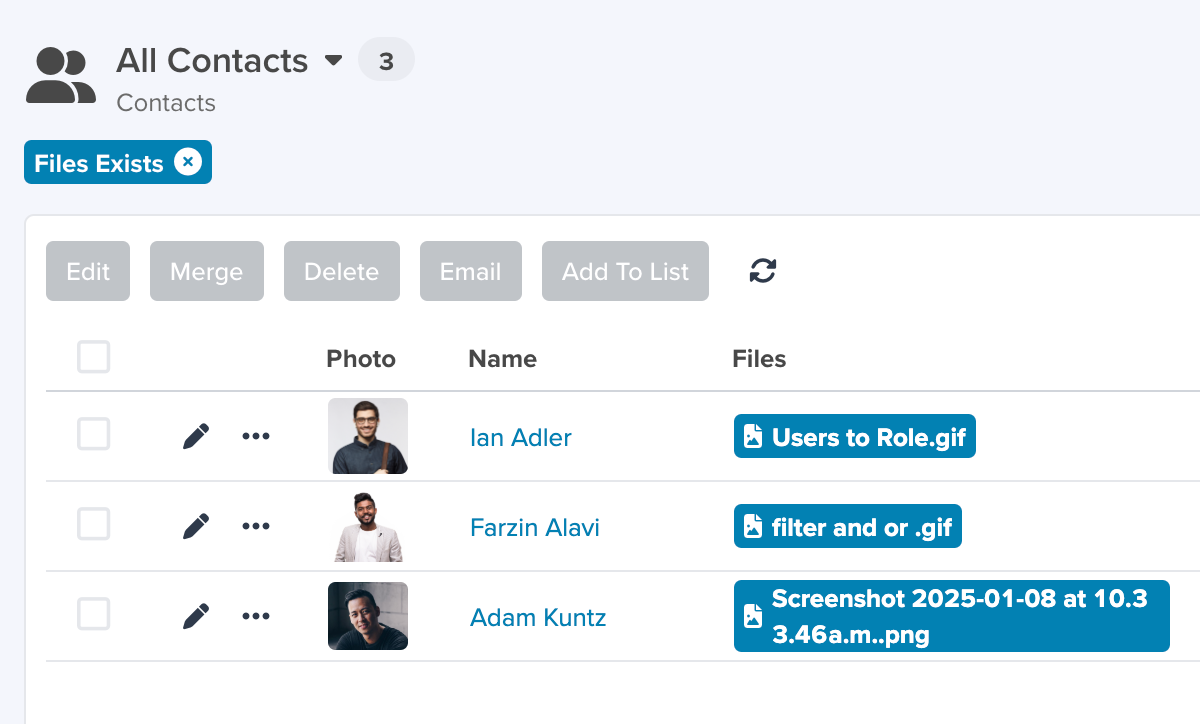
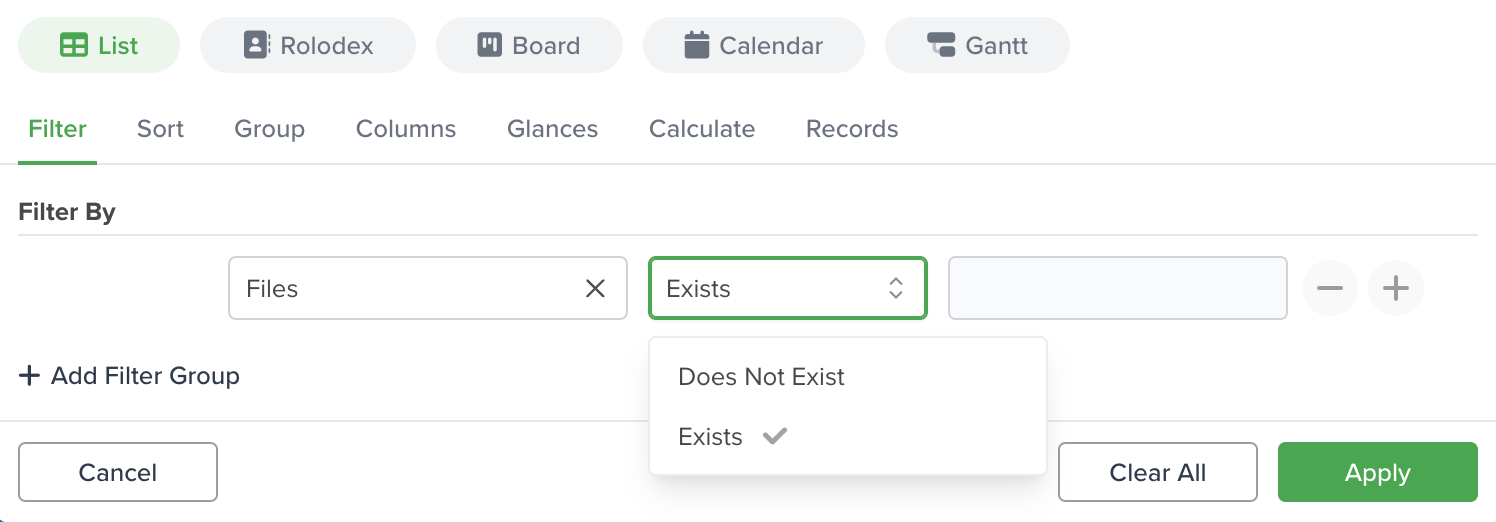
The File Type Filter allows you to filter records based on whether they have a file attached. This feature is particularly helpful for identifying records with attached files or isolating those without.
How to Use the File Field Filter
1.Ensure that the app you are working with has a File type Field enabled. You can add this field via the Form Fields tab under App Settings.
2.Go to the Filter section and open the Field dropdown list.
3.Locate and select the name of the File type Field from the dropdown.
Operators for File Field
The File type Field type includes two operators:
•Exists: Displays all records that include an uploaded file in the selected field.
•Does Not Exist: Displays all records where the selected File Field does not contain a file.
For example, if you are working in the Contacts app and want to filter for contacts with files uploaded in a specific field, select the corresponding File type Field from the dropdown and choose the desired operator. Click Apply to view the filtered results.
This feature simplifies data management by enabling quick and easy filtering of records with or without file attachments, making it easier to organize and analyze your data.
Add as many filters as you need. Just click “+” button to automatically create a new row and add more filters.
Once you have added all of the filters you want, click the “Apply” button. At this time, you will be able to see the data that falls within the parameters of your filter(s).
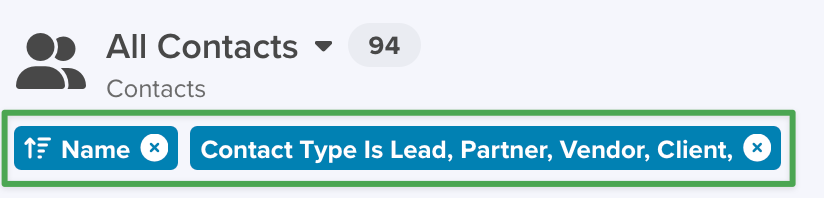
Additionally, you will see the filters you have currently applied in the form of pills. To remove one or all of them, click the ‘X’ next to the pill(s) name.
The filter pills are located at the top of the view. These represent the filters that are currently applied in your view.
And/Or
When adding multiple filters you can use and/or statements at the end of each filter. This allows you to choose which filters you would like to apply and when.
Filter Lines
In Apps with Lines, you will also see the ‘Lines’ fields in the available fields. They are easy to spot as they include the field name and right below the Line name for your reference.
Just follow the same steps described above.
Remove Filter Conditions
To remove applied filters, click “Filter”, make sure you are under the ‘Filter’ tab and then click the ‘-‘ (minus) icon right next to the filter you want to remove. Then click “Apply” to save your changes.
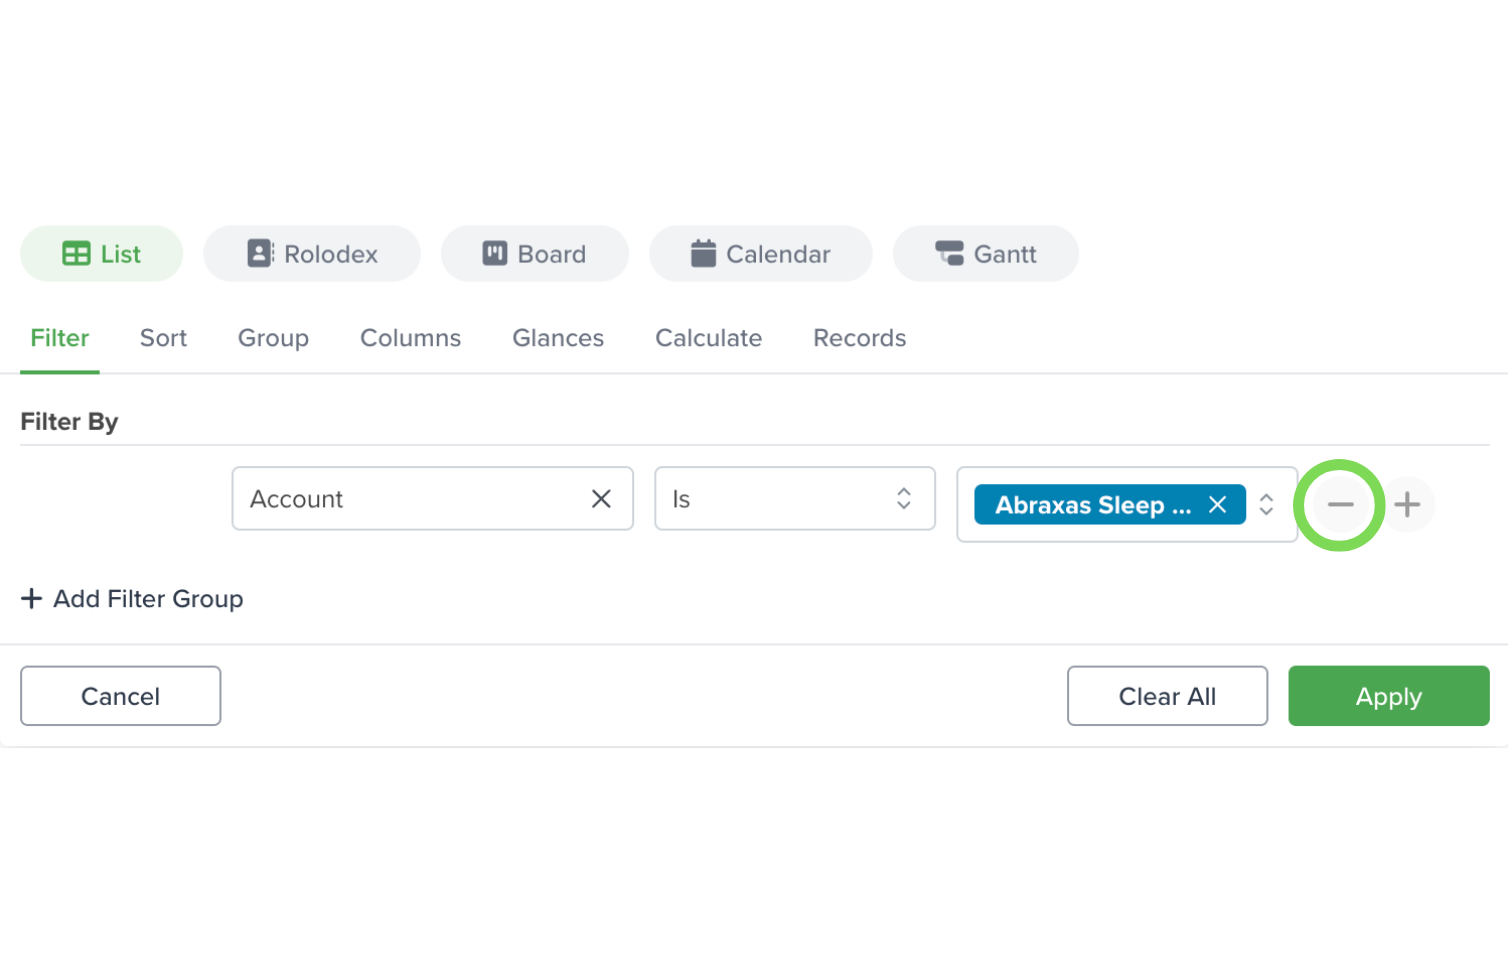
If you want to remove all your applied filters, click the “Clear All” button.
Filter Groups
You can use Filter Groups to build more powerful filters into your reports. For example, you could see all Opportunities where the Stage is Closed Won that closed in the Last Quarter.
To use Filter Groups, click the + Add Filter Group button.
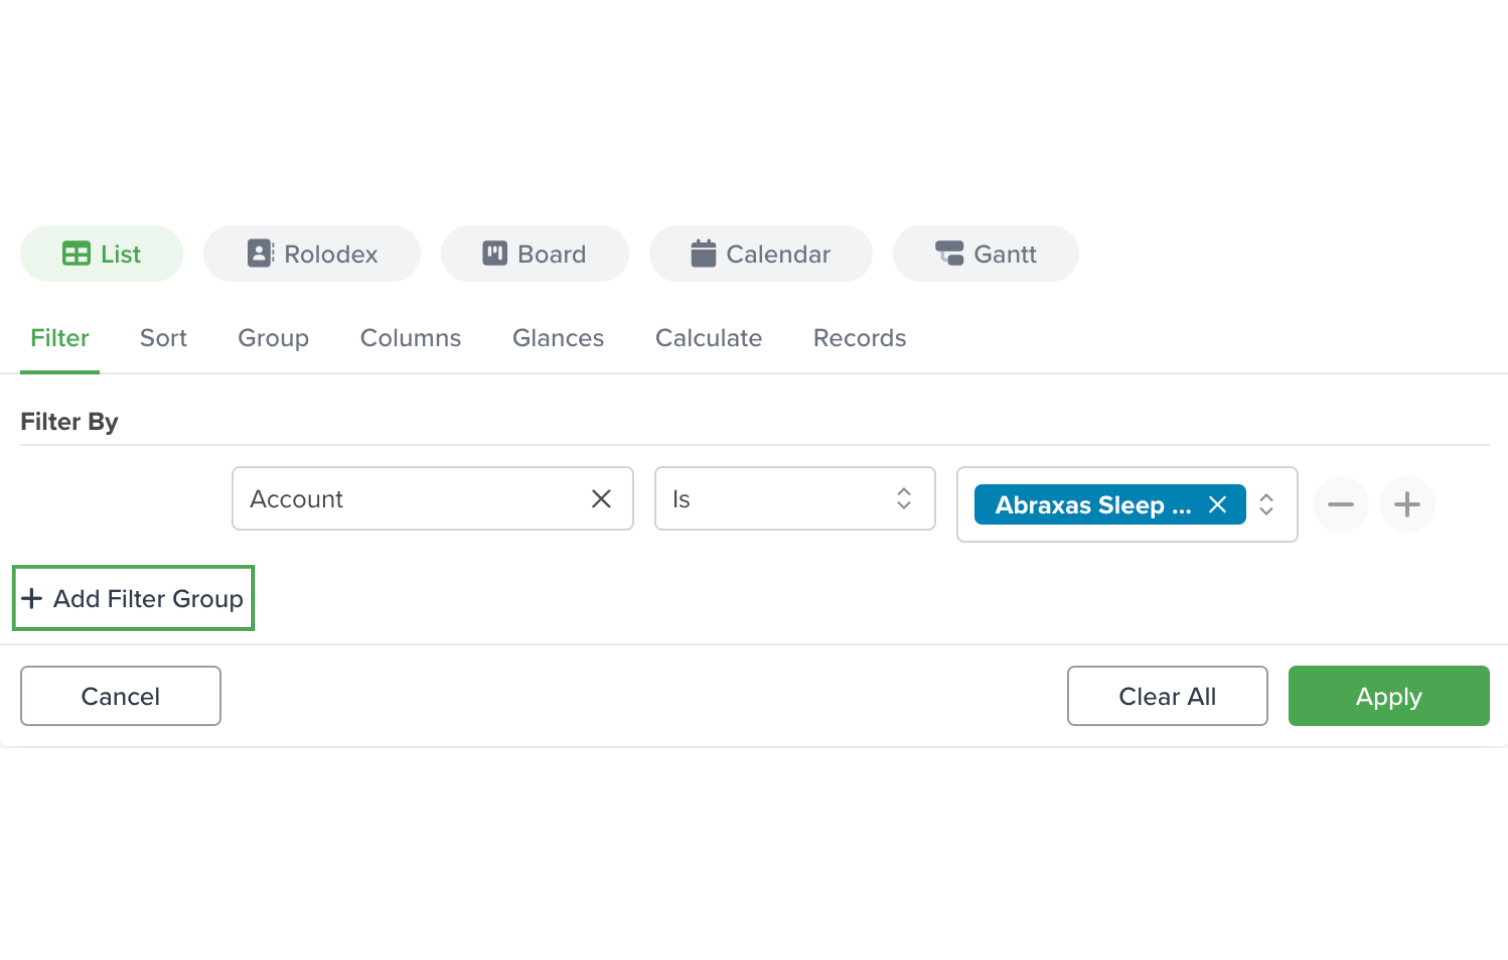
From here you can create the Filter as you would any other Filter. Click the ‘+’ button on the right hand side to add another row to the group. Click the ‘-‘ button to remove a row.
Filter Operators
The different Operators available are:
| Operator | Description | Available Fields |
| Is, Is Not |
The selected value is included (IS). Excluded (IS NOT) from the filter results. |
|
| Exists, Does Not Exist |
(Exists) The value exists no matter the number or amount. (Does Not Exist) Value does not exist. |
|
| <=, >= |
Less Than or Equal To; Greater Than or Equal To, will return records that fall above or below the selected value. |
|
| Between |
This will return all the records that fall between a given range of numbers or a range of dates. |
|
| Period |
Returns the records for a specified period, such as Last Week or This Month. |
|
| Rolling |
This will filter results over a period of time from the current date. For example, 0 to 365 days ago will filter from today to one year ago. |
|
| After / Before |
All the records, before or after the specified date. |
|
Learn more about every available operator in servis.ai in this dedicated article.
Sort
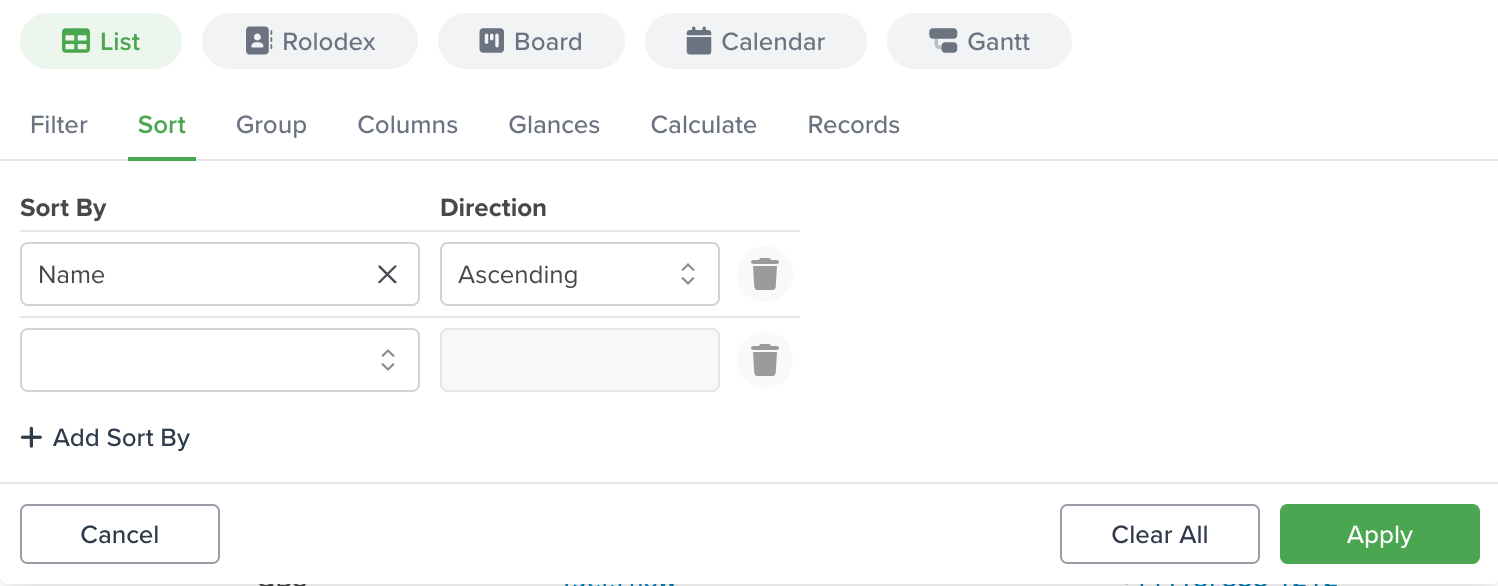
Sort is available in every view across all Apps in servis.ai, under ‘Filter, Sort & More’.
Here you can specify the sorting for your view. Make sure you are under the ‘Sort’ tab. This capability allows you to select which field you want to sort by and specify whether the sorting should be ascending or descending.
It is possible to select multiple sorting rules, just click ‘Add Sort by’ and select the desired field. Once you are ready, click the ‘Apply‘ button.
This is especially helpful to organize your data.
Columns
Available for the List and Board views.

Add Column
To add a column, click the dropdown to start typing the field name, you can also scroll down the list and click the one you want to add. It will be added at the end of the column’s list.
All Columns
The All Columns feature is a time-saver for users who want to add multiple fields without selecting them one by one. It gives you all the available options at once, making it easy to tweak your setup to match your needs.
Updating the columns in the List view has been made more user-friendly with the latest changes.
If you want to know more about this feature please visit: All Columns – Feature Overview
Dot.walking
When a Reference field is available in your App, you will be able to add columns to your list view based on fields from the App you are referencing. To get a full list of all the fields available, type in the App’s name followed by a dot, for example, ‘account. ‘
Then you just need to select the desired field and it will be added to your List view columns.
To learn more about Dot.walking, please visit the following tutorial:
Remove Column
To remove a column from the view, just click the ‘X’ to the right side of the column name.
Rearrange Columns
You can also rearrange the columns in a way that best fits your needs by dragging and dropping the column to the desired spot.
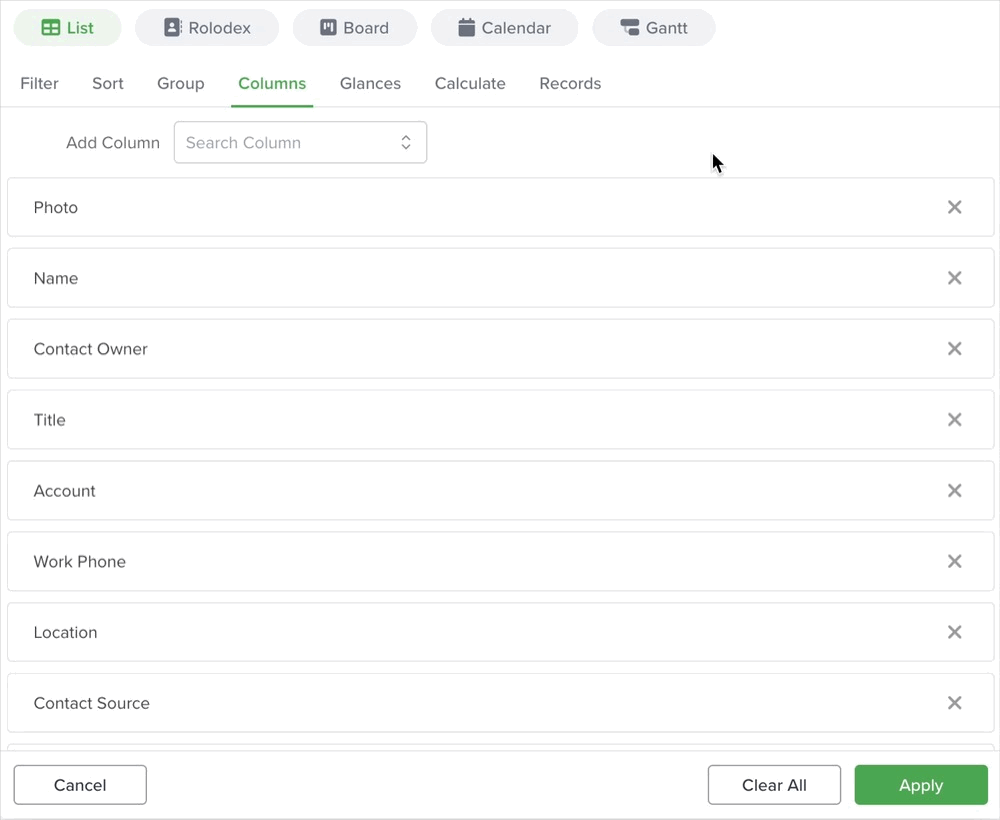
Once you are done managing your columns, click the ‘Apply’ button to show those changes to your view.
Group
Available for the List and Board views.
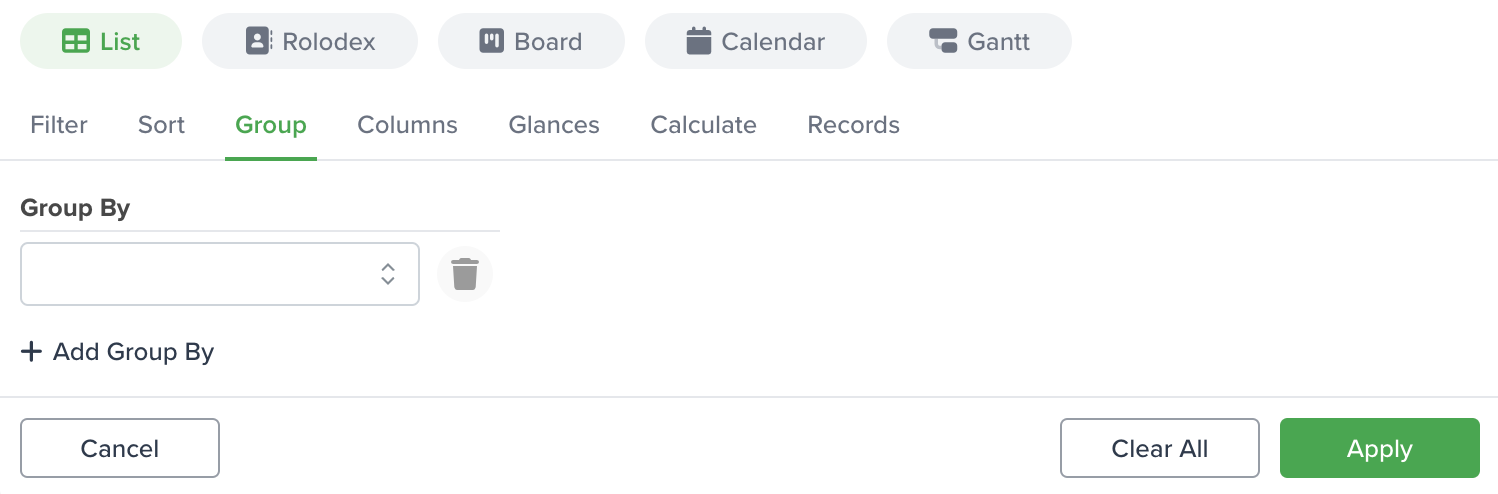
It allows you to select among your fields to group your information. This option allows you to improve your views organization and when combined with calculations, it increases their visibility.
Just select the field you want to use to ‘Group By’. Then click Apply.
To add a secondary ‘Group By’ field in your list view, click ‘Add Group by’ and select the desired field. Apply your changes.
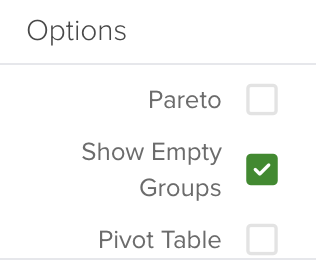
Here you can also enable ‘Pivot Table’.
When setting up a ‘Group By’ for a Board View where you wish to use future dates, you will also need to set a filter for the date field to find these dates. This will ensure that the future dates are properly grouped within the view.
Glances
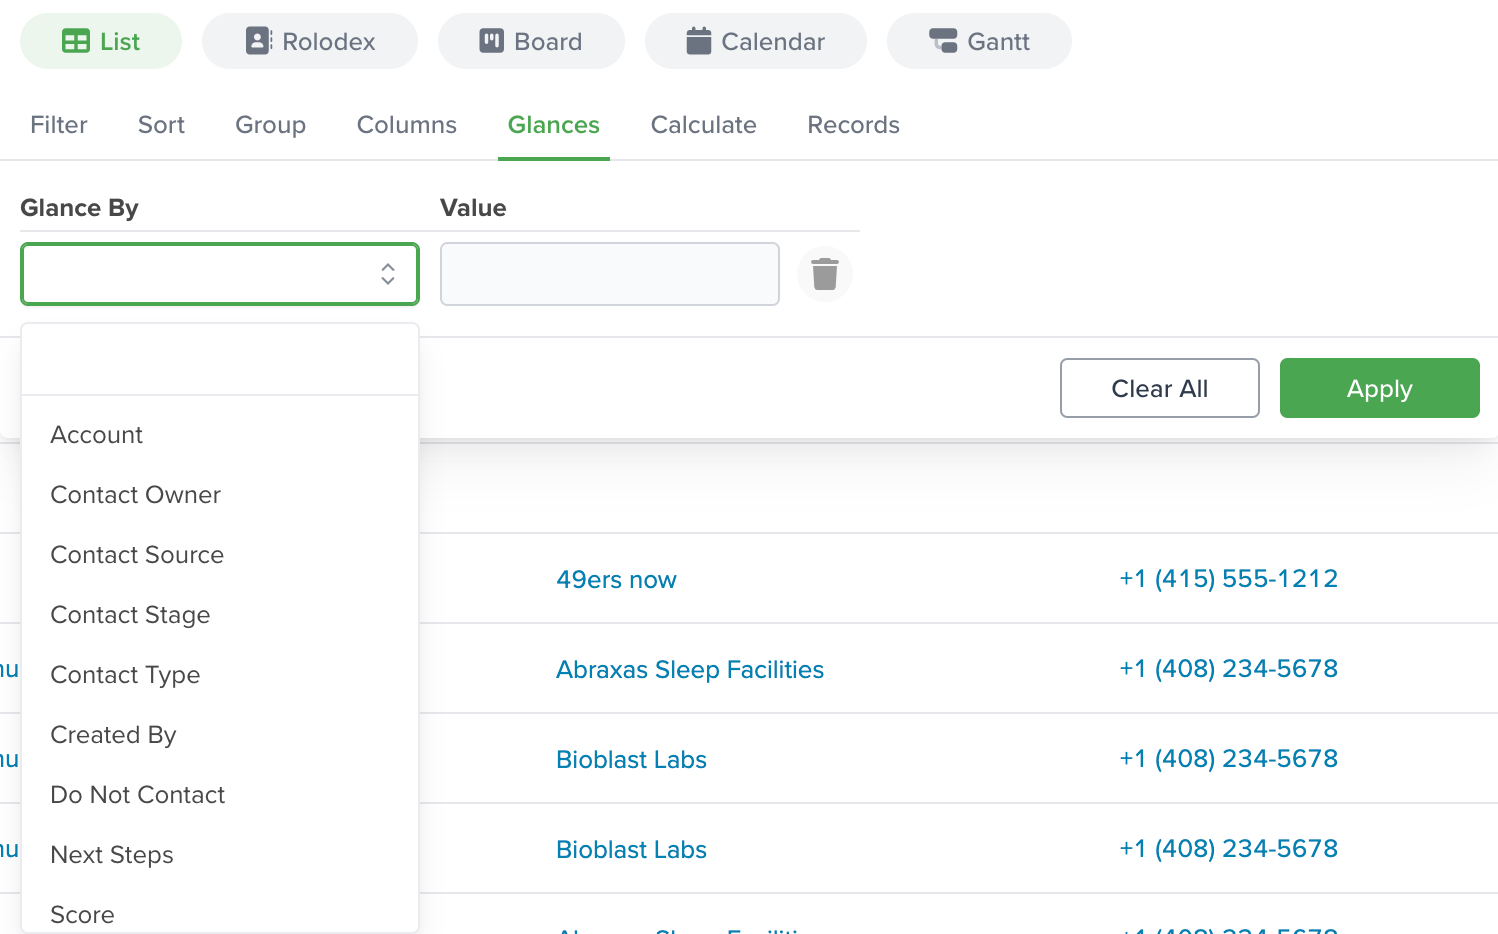
Glances give you the option to slice views by choice list and reference fields with the click of a button to “Glance” your information. This new segmenting capability offers a new way to subset data for prompt analysis and will help you reduce the number of Saved Views you need to create to visualize your data.
It is available in every view across all Apps in servis.ai, under ‘Filter, Sort & More’.
Select the desired field from the options available in the dropdown, then choose for which values you want to create a “Glance”. Then click the ‘Save’ button.
Once you do, you will notice tabs with the names of the values you selected for your ‘Glance’. Thanks to them you can move from one view to the next all on the same page.
Calculate
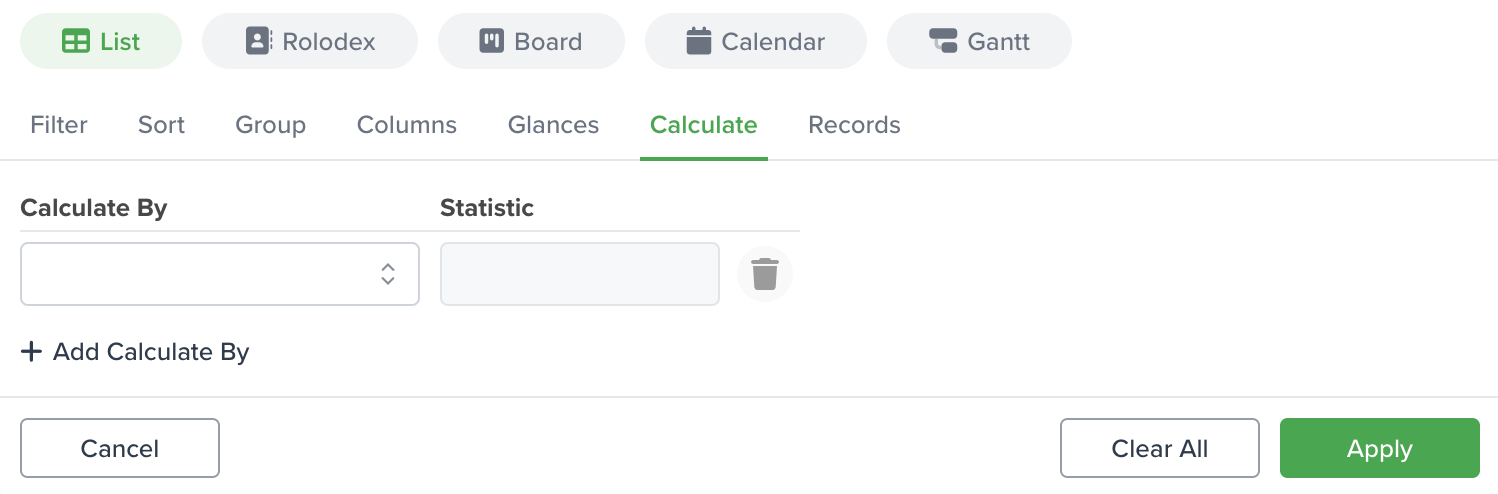
Calculate is available in every view across all Apps in FreeAgent CRM, under ‘Filter, Sort & More.
To create calculations you just need to select any of your existing numeric fields, such as currency, percentage, and number, and define the statistic you want to use, there are 5 different options: count, average, max, min, and sum.
You can add multiple calculations. Once you are done, click the ‘Apply’ button to add them to your view.
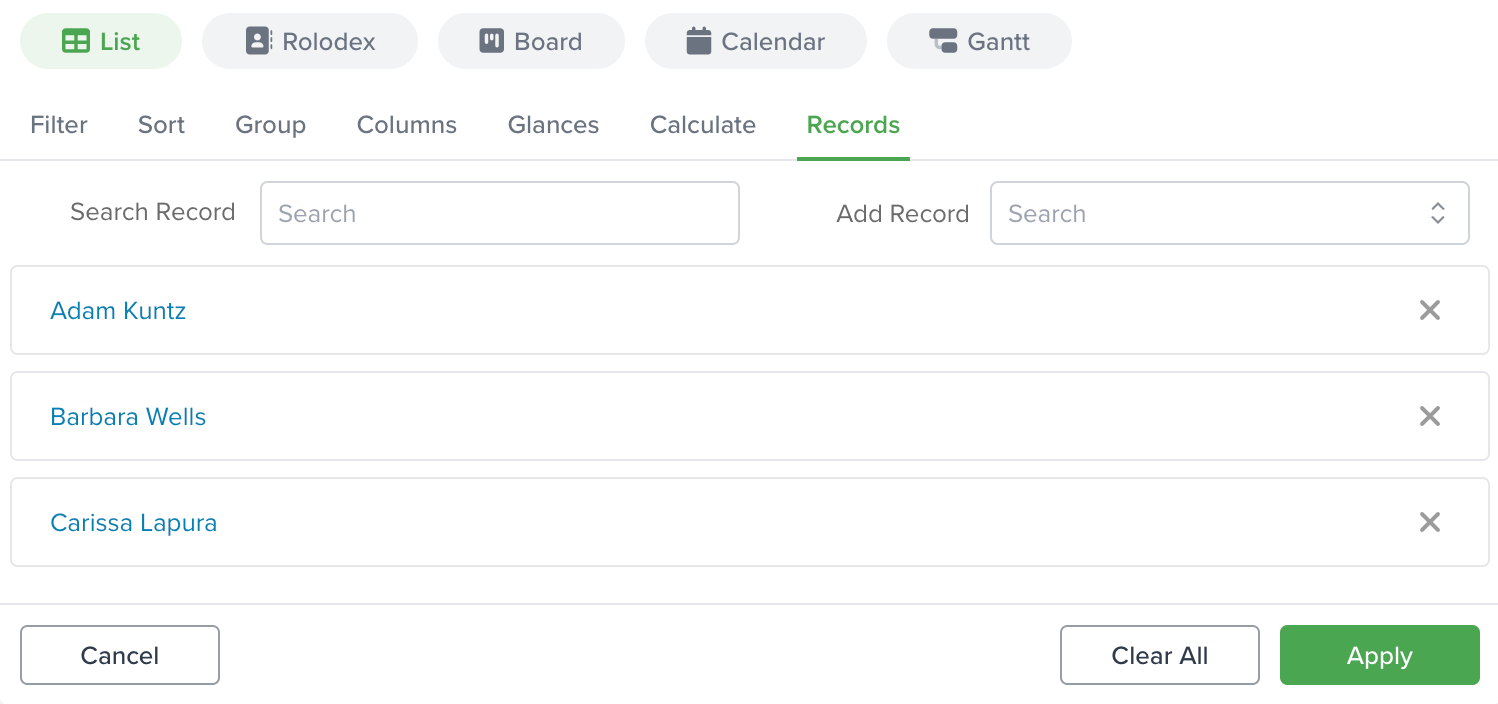
Record
The Record feature allows you to collect, store, and organize data across different apps, enhancing your productivity and simplifying your workflow.
Add Records
To get started with Record, navigate to the Record tab. From here, you can add records from any app. Use the search bar on the left to find and manage your previously added records. Select the records you want and click Save to store them. Once saved, your selected records will appear in the view.
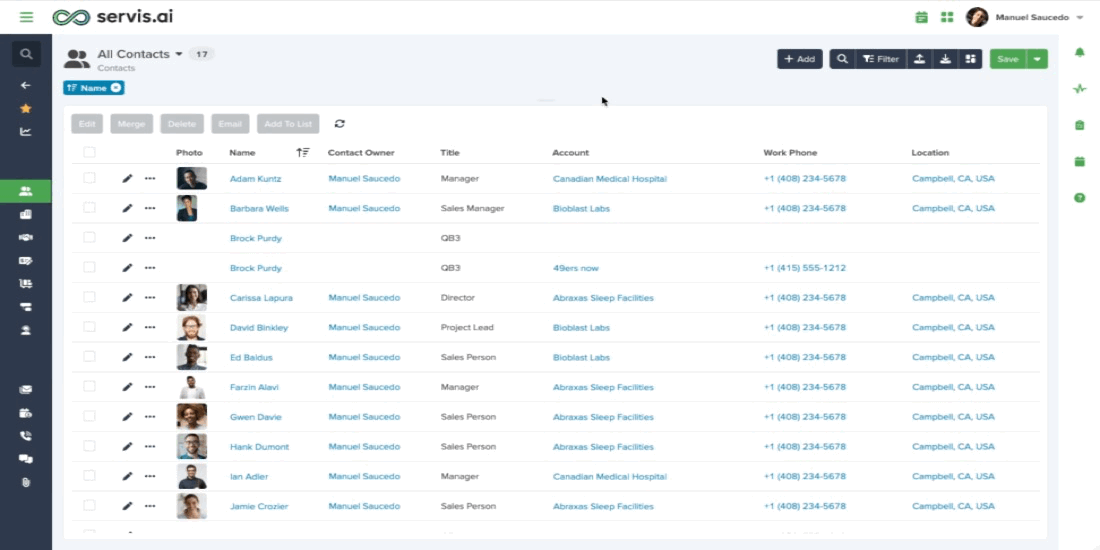
Add to List
If you’re working with multiple records, for example, from All Contacts, select the records and click the Add to List button. You’ll then have the option to choose which app the list will be displayed in. You can also:
•Check the Create New View box to create a new view with the selected records.
•Select an existing view to overwrite it with the new records.
Save and Confirmation
When you click Save, a pop-up will appear to confirm your action. It will indicate whether a new view has been created or an existing view has been updated.
Access Records via Filter
To access your previously selected records, go to Filter, then navigate to the Record section. Here, you’ll find all your saved records, ready for further use.
Period Operator Available Fields
The system provides various date-based filters to help you quickly locate records based on specific time frames. Below is an overview of these fields and how they work:
Daily Filters
- Today: Displays records with dates falling within the current day (12:00 AM – 11:59 PM).
- Yesterday: Shows records from the previous day (12:00 AM – 11:59 PM).
- Tomorrow: Includes records scheduled for the next calendar day (12:00 AM – 11:59 PM).
Weekly Filters
- This Week: Covers records from the start of the current week (Sunday, 12:00 AM) to its end (Saturday, 11:59 PM).
- Last Week: Displays records from the previous week, beginning on Sunday at 12:00 AM and ending the following Saturday at 11:59 PM.
- Next Week: Includes records scheduled for the upcoming week, running from Sunday (12:00 AM) to Saturday (11:59 PM).
Monthly Filters
- This Month: Retrieves records from the beginning of the current month (1st, 12:00 AM) to the last day of the month (11:59 PM).
- Last Month: Displays records from the entire previous month, covering all dates from the 1st to the last day.
- Next Month: Includes records dated within the entirety of the upcoming month.
Quarterly Filters
- Last Quarter: Shows records from the previous three-month quarter, covering its full duration.
- This Quarter: Displays records from the current quarter, from its start to the last day.
- Next Quarter: Includes all records scheduled within the next three-month quarter.
Yearly Filters
- This Year: Retrieves records from January 1st through December 31st of the current year.
- Last Year: Displays records from the entire previous year (January 1st – December 31st).
- Next Year: Includes all records dated within the next calendar year.
