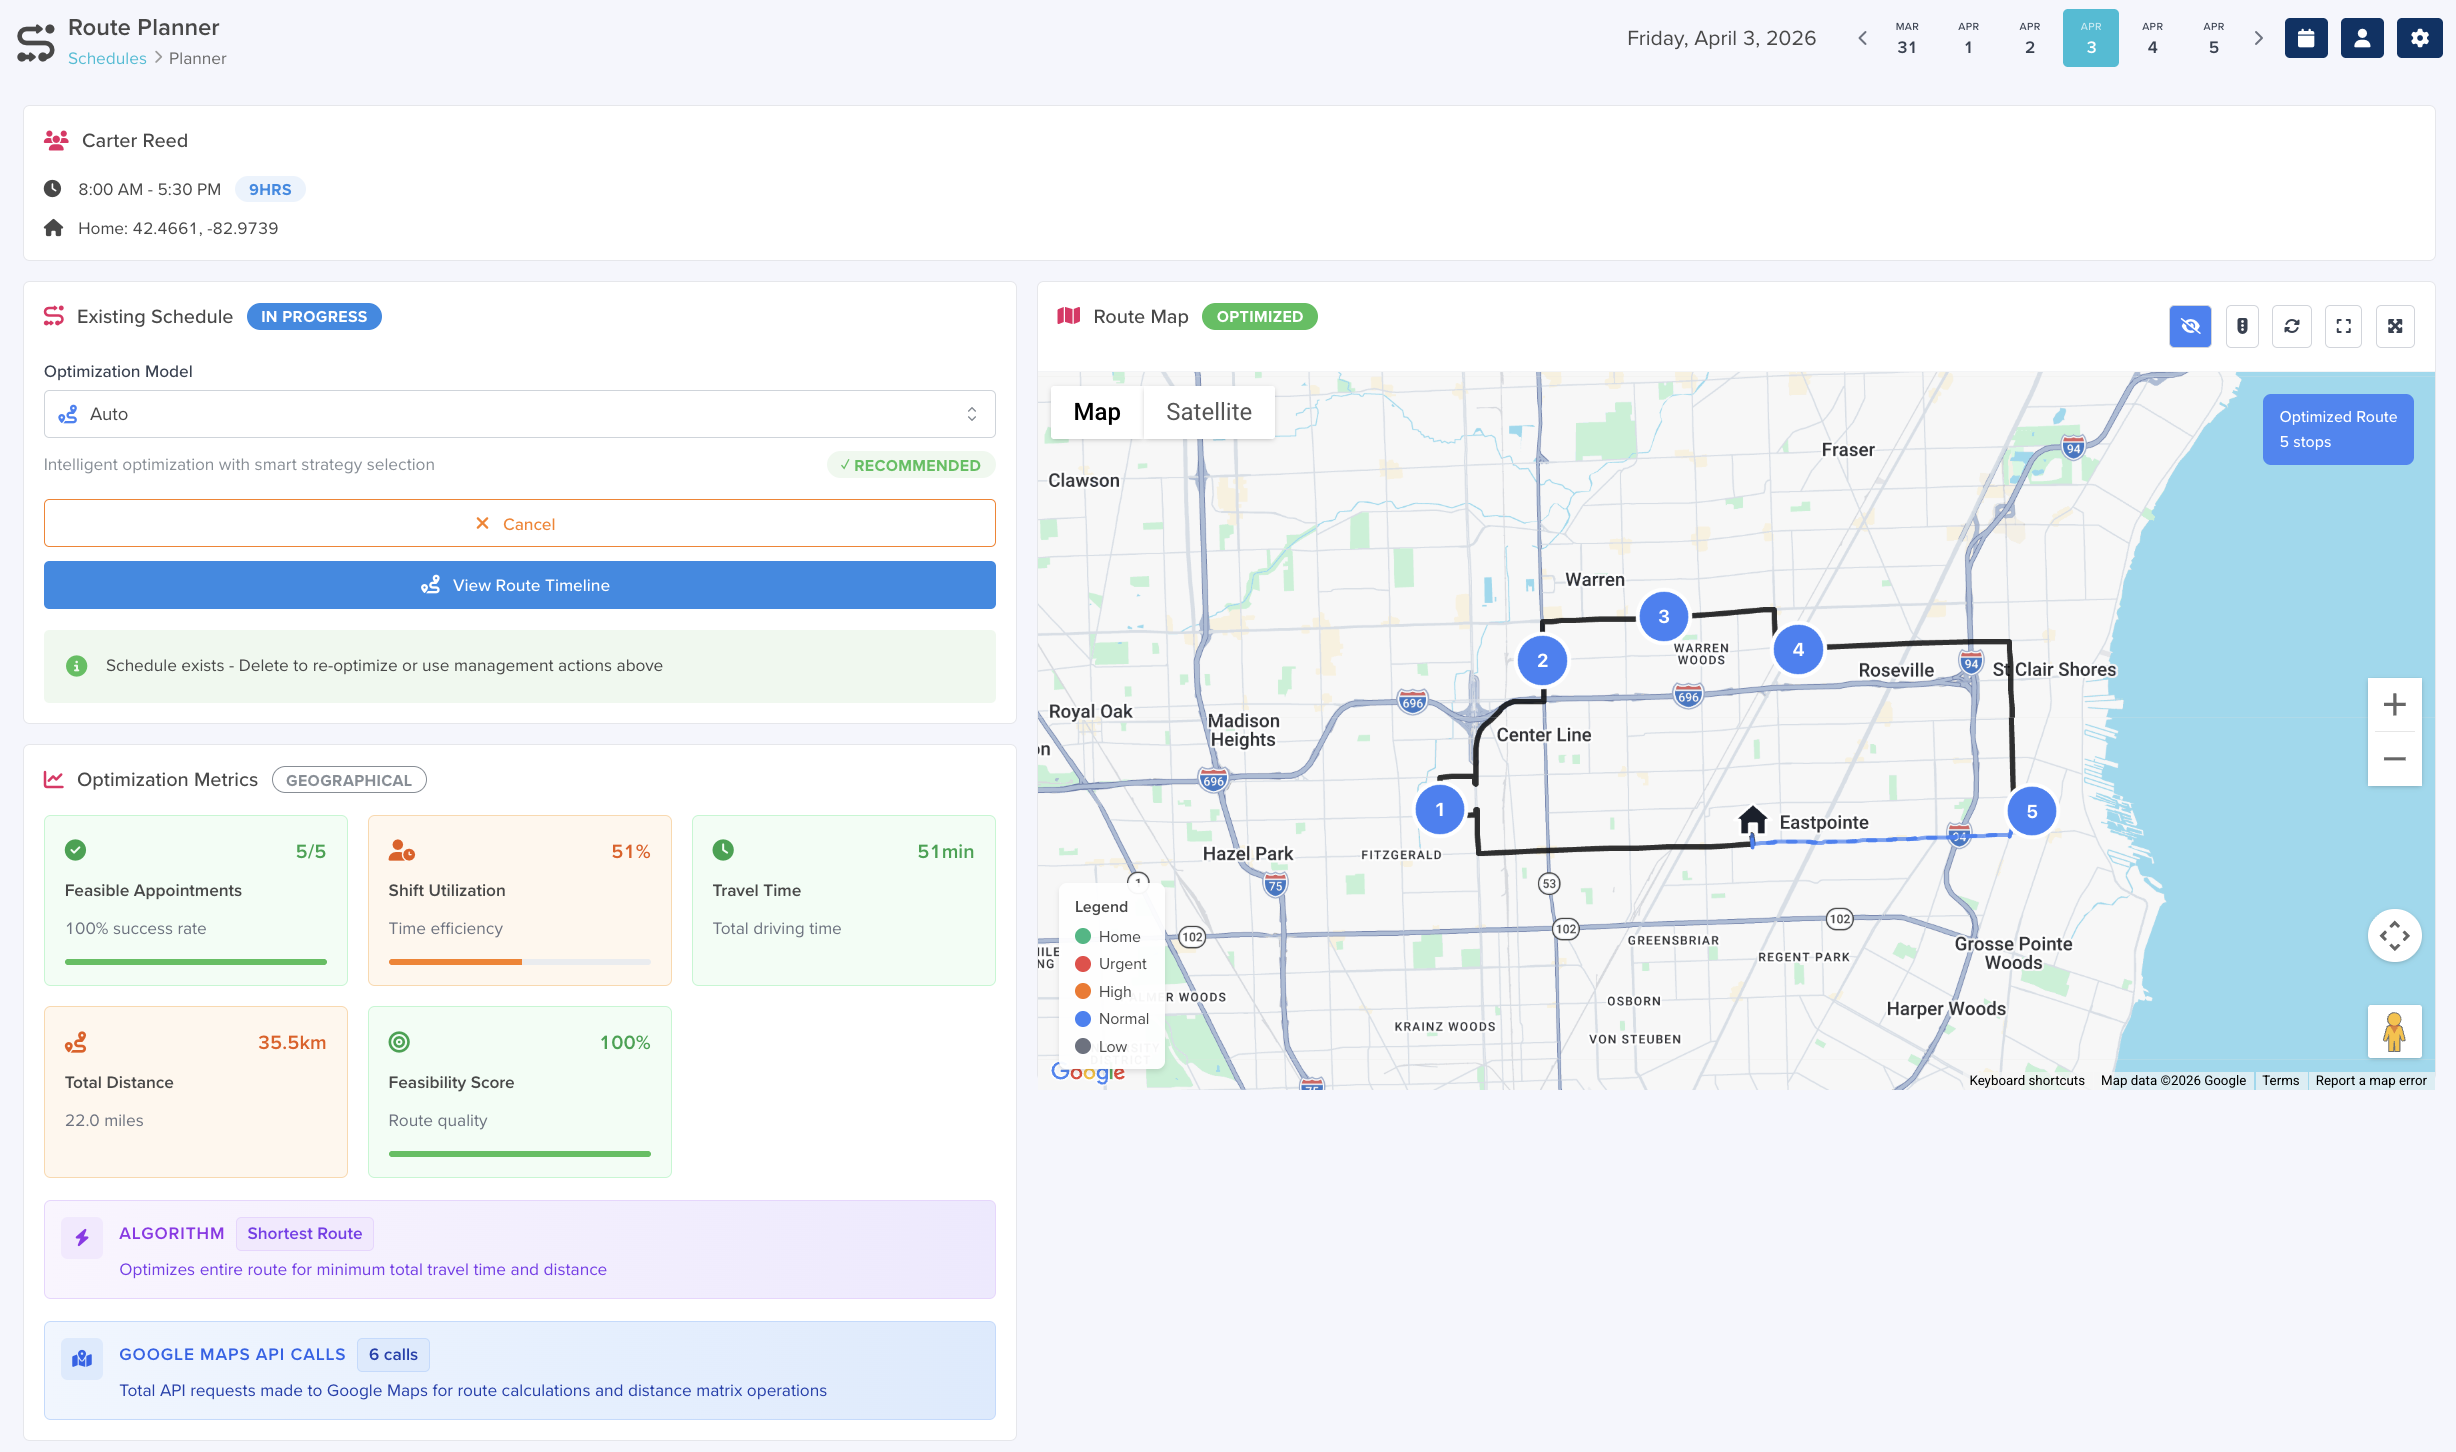
This guide walks you through every step — from initial setup to day-of execution and post-route review — so you can use the Scheduler confidently from start to finish.
Key Concepts
Before you begin, here are the main terms used throughout the Scheduler:
| Term | What It Means |
|---|---|
| Rep | A field representative — the person performing visits. This could be a caregiver, nurse, technician, or any employee who travels to customer locations. |
| Customer | The person receiving the visit or service — such as a patient, client, or resident. |
| Appointment Pool | A visit request that is ready to be scheduled. Each appointment represents a service that needs to happen at a specific location on a specific date. |
| Follow-up Request | A request for a future visit. Follow-up Requests start in “Open” status and, once approved, are converted into Appointment Pool records. |
| Appointment Profile | A template that defines a type of service — including its name, duration, and whether it is virtual or in person. |
| Event | A blocked time period on a rep’s schedule, such as a training session, internal meeting, or break. |
| Schedule | A complete planned daily route for a rep. It contains all the appointments, travel segments, breaks, and events for that day. |
| Schedule Item | An individual segment within a Schedule — for example, a single appointment, a travel leg, a break, or a home base departure. |
| Visit Telemetry | A timestamp record of rep actions during a visit, such as check-in, check-out, or no-show. |
| Route Planner | The main interface where you select a rep, choose a date, optimize a route, and apply it as a Schedule. |
| Route Agenda | A time-slot view that shows daily appointments and events for one or more reps side by side. |
| Route Calendar | A monthly or weekly calendar view that gives an overview of all appointments, events, and schedules across your team. |
| Route Timeline | A detailed, chronological timeline of a published Schedule used during execution — where reps start the route, check in, check out, and mark no-shows. |
| Optimization | The process by which servis.ai calculates the most efficient visit order, travel times, and break placement for a rep’s route. |
Part 1: Initial Setup
Setting up the Scheduler involves a few one-time configuration steps. Once these are complete, your team can begin using the Scheduler every day without repeating them.
Step 1: Enable the Scheduler Feature
Before anyone can use the Scheduler, an administrator must enable it.
-
Navigate to Settings in the left-hand sidebar.
-
Under the Company section, look for the Advanced card.
-
Enable the Scheduler.
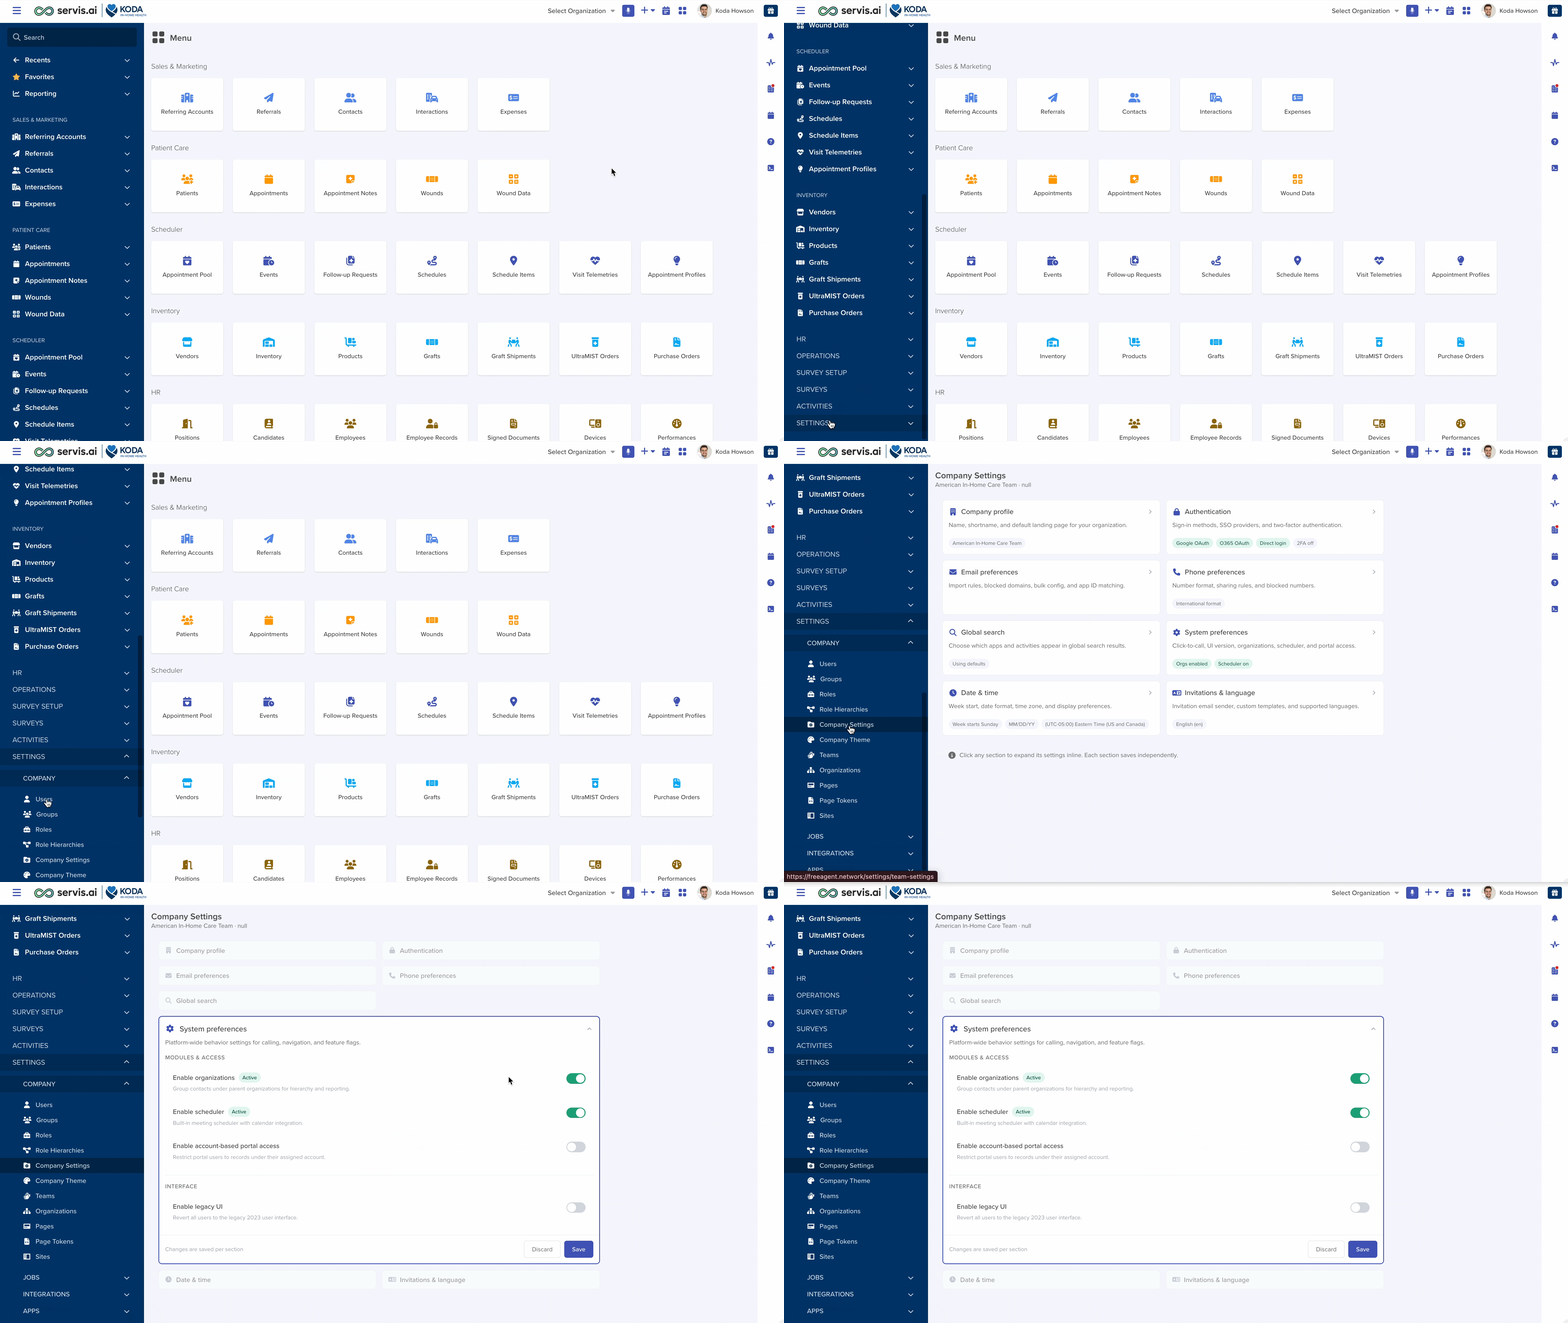
Once the Scheduler is enabled, the following items appear in your platform:

- The Scheduler settings page (where you map your apps and fields).
- A set of Scheduler-related apps in your app menu:
- Appointment Pool — Visit requests ready to be scheduled.
- Follow-up Requests — Requests that may become appointments.
- Events — Blocked rep time for meetings, training, and breaks.
- Schedules — Planned daily routes.
- Schedule Items — Individual segments within a schedule.
- Visit Telemetry — Timestamps for rep visit actions.
Note: If you do not see the Scheduler option under Settings, the feature may not be enabled for your account.
Step 2: Configure Scheduler Settings
The Scheduler Settings page is where you tell servis.ai which of your existing apps represent your reps and your customers, and which fields store the data the Scheduler needs.
To access Scheduler Settings:
- Go to Settings > Advanced >Scheduler.
You will see a form with two main sections:
Rep App Section
| Field | What to Do | Required |
|---|---|---|
| Rep App | Select the app in your account that stores your reps (for example, “Employees,” “Caregivers,” or “Nurses”). | Yes |
| Display Name | Choose the field that stores each rep’s name. | Yes |
| Latitude | Choose the field that stores each rep’s home base latitude. | Yes |
| Longitude | Choose the field that stores each rep’s home base longitude. | Yes |
| Shift Start | Choose the field that stores the rep’s shift start time. | Auto-created |
| Shift End | Choose the field that stores the rep’s shift end time. | Auto-created |
| Skills | Choose the field that stores the rep’s skills or certifications. | Auto-created |
Customer App Section
| Field | What to Do | Required |
|---|---|---|
| Customer App | Select the app that stores your customers (for example, “Patients” or “Clients”). | Yes |
| Full Name | Choose the field that stores each customer’s name. | Yes |
| Latitude | Choose the field that stores the customer’s visit location latitude. | Yes |
| Longitude | Choose the field that stores the customer’s visit location longitude. | Yes |
| Notes | Choose a field for extra context (such as room number, floor, or special instructions). | Yes |
-
After filling in all fields, click the Save button at the top or bottom of the form.
What happens next: Once you save, servis.ai automatically creates scheduler-specific fields on your Rep App — including Shift Start, Shift End, and Skills. These fields become available in your rep records so you can enter shift times and skill information for each rep.
Step 3: Prepare Your Rep Records
After the Scheduler Settings are saved, you need to fill in the relevant information for each rep.
- Open your Rep App (for example, Employees, Caregivers, or Nurses) from the app menu.
- Open each rep’s record and fill in the following fields:
| Field | Description | Example |
|---|---|---|
| Name | The rep’s full name. | Amelia Rodriguez |
| Latitude | The latitude of the rep’s home or starting base. | 33.7490 |
| Longitude | The longitude of the rep’s home or starting base. | -84.3880 |
| Shift Start | The time the rep begins their workday. | 9:00 AM |
| Shift End | The time the rep ends their workday. | 5:00 PM |
| Skills | The services the rep is qualified to perform. | Physical Therapy, Diabetes Care |
- Save each rep’s record.
Note: Make sure the latitude and longitude are accurate — the Scheduler uses these coordinates to calculate driving distances and route order. An incorrect location will produce a poor route.
Step 4: Prepare Your Customer Records
Each customer record must have a valid location so the Scheduler can plan visits.
- Open your Customer App (for example, Patients or Clients) from the app menu.
- Open each customer’s record and fill in the following fields:
| Field | Description | Example |
|---|---|---|
| Name | The customer’s full name. | Maria Chen |
| Latitude | The latitude of the customer’s visit location. | 33.7550 |
| Longitude | The longitude of the customer’s visit location. | -84.3900 |
| Notes | Additional context such as floor, room number, or access instructions. | “Patient is in Room 302, second floor. Use the east entrance.” |
- Save each customer’s record.
Step 5: Set up Appointment Profiles
Appointment Profiles define the types of services you offer. Before creating any Follow-up Requests or appointments, create at least one Appointment Profile.
Note: Appointment Profiles are managed as records within servis.ai (typically using a catalog or choice list for Service Types). Your implementation consultant may have already created these for you. Check your existing choice lists for “Scheduler – Service Type.”
Common examples:
| Profile Name | Duration | Virtual? |
|---|---|---|
| Physical Therapy | 60 minutes | No |
| Telehealth Visit | 30 minutes | Yes |
| Wound Care | 45 minutes | No |
| Medication Management | 30 minutes | No |
| Personal Care Assistance | 45 minutes | No |
Each Appointment Profile specifies:
- What service is being performed.
- How long the visit takes.
- Whether it is a physical or virtual visit.
- What skills may be required from the rep.
- Billing or classification details (optional).
Part 2: Creating Visit Request
Once your setup is complete, the day-to-day workflow begins with creating visit requests.
Step 6: Create a Follow-up Request
A Follow-up Request is the starting point for scheduling a visit. It captures all the details about what the customer needs.
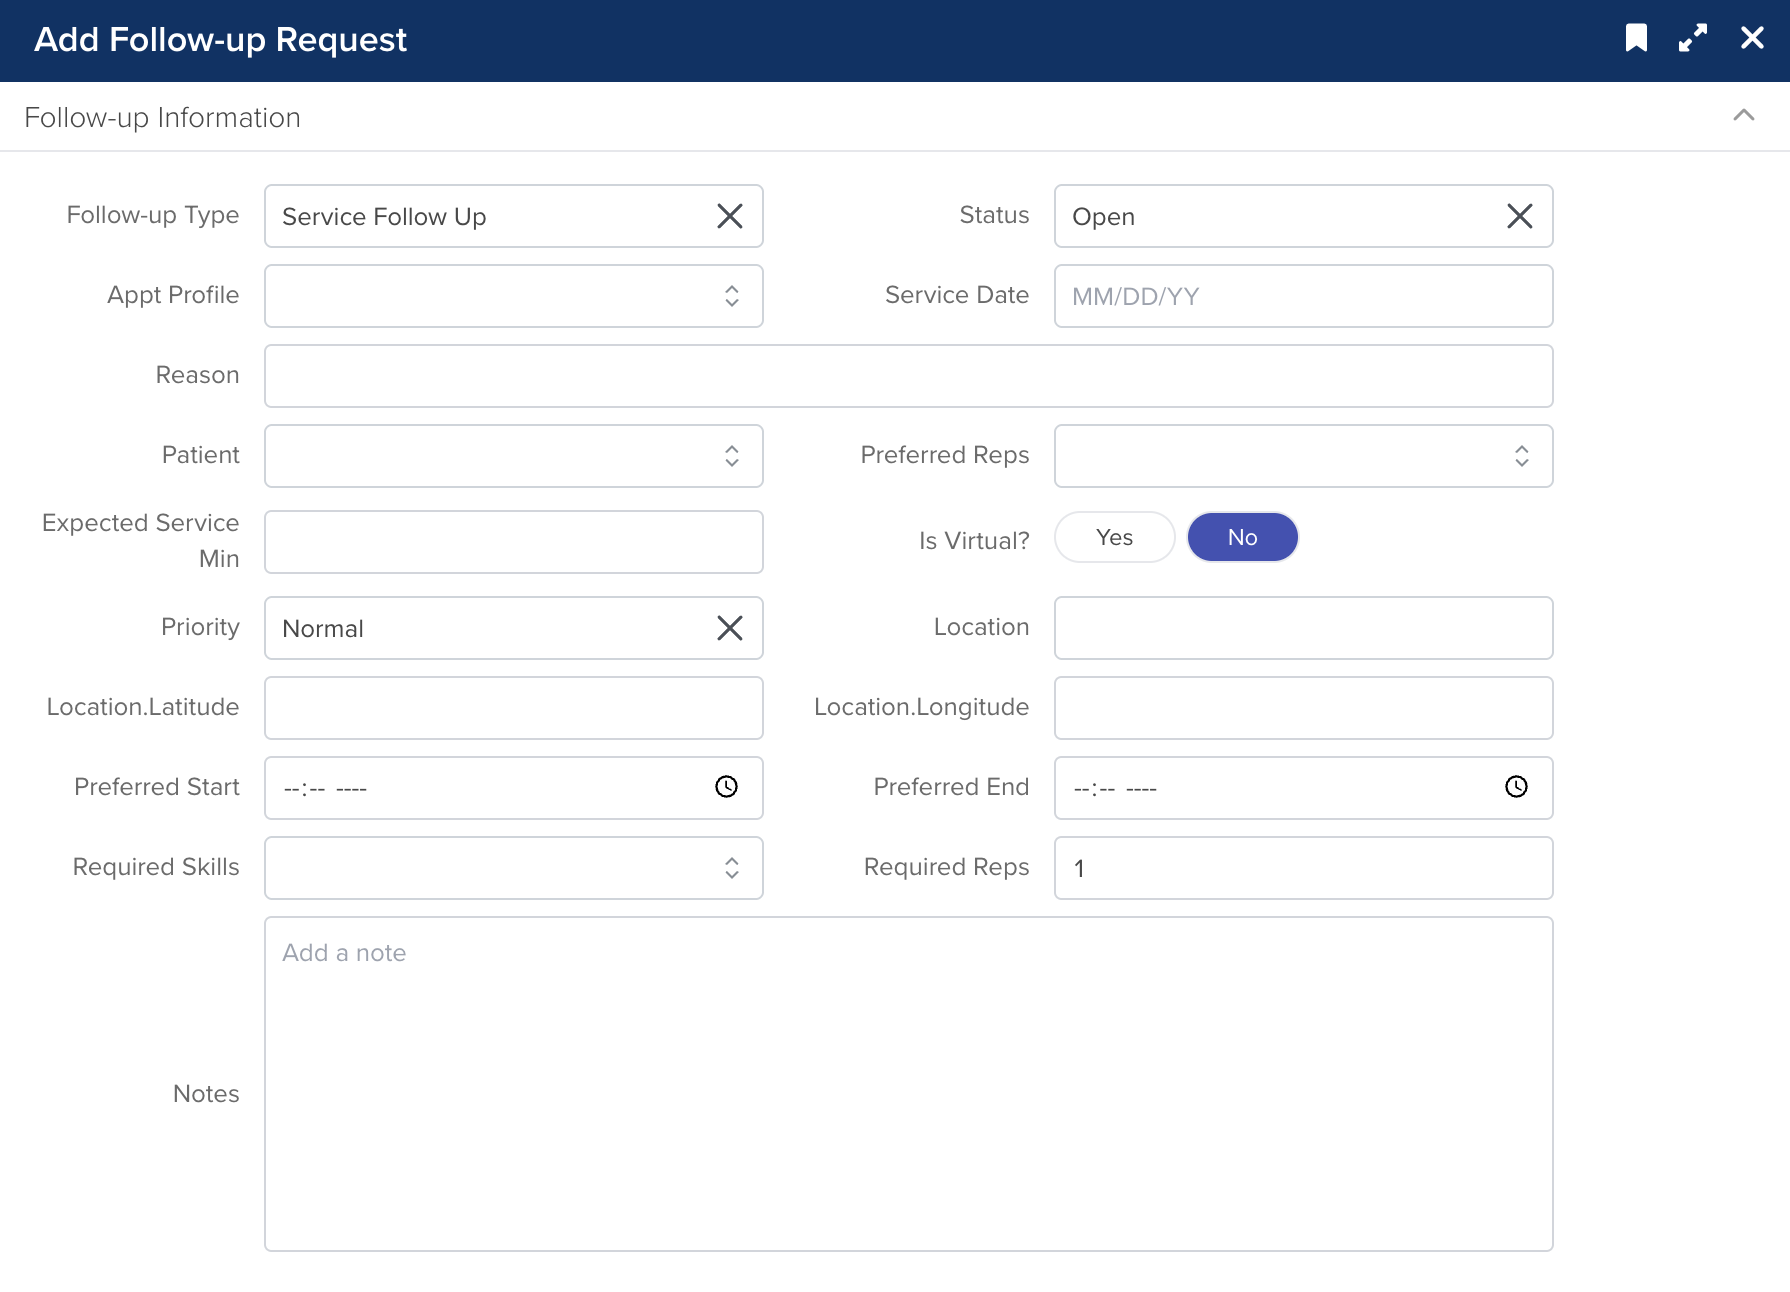
To create a Follow-up Request:
- Open the Follow-up Requests app from your app menu.
- Click the Add or + New button to create a new record.
- Fill in the following fields:
| Field | Description | Example |
|---|---|---|
| Follow-up Type | The category of the request. Options include Service, Cancellation, or No Show. | Service |
| Status | The current status of the request. Starts as Open. | Open |
| Service Type | The type of service needed (from your Appointment Profiles). | Physical Therapy |
| Suggested Service Date | The date the visit should happen. | May 5, 2026 |
| Customer | The patient or client who needs the visit. | Maria Chen |
| Preferred Rep | (Optional) A specific rep you would like to assign. | Amelia Rodriguez |
| Expected Service Min | How long the visit is expected to take. | 60 |
| Virtual | Whether the visit is virtual (online) or in person. | No |
| Priority | How urgent the request is: Urgent, High, Normal, or Low. | High |
| Location | The visit address. | 123 Main St, Atlanta, GA |
| Preferred Start / Preferred End | (Optional) A preferred time window for the visit. | 10:00 AM – 12:00 PM |
| Required Reps | The number of reps needed for this visit. | 1 |
| Required Skills | The skills required from the assigned rep. | Physical Therapy |
| Notes | Any extra context. | “Patient prefers morning visits.” |
- Click Save.
Step 7: Approve the Follow-up Request
Once a Follow-up Request is reviewed and approved, it is automatically converted into an Appointment Pool record — a visit that is ready to be scheduled.
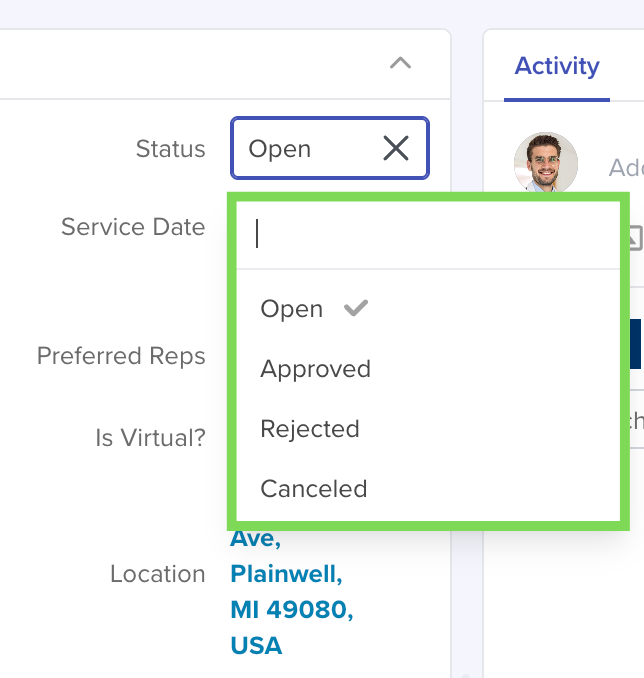
To approve a Follow-up Request:
-
Open the Follow-up Requests app.
-
Find the request with a status of Open.
-
Review the details.
-
Change the Status field to Approved (or use the approval action button if configured).
-
Save the record.

What happens next: The system creates a new Appointment Pool record. This record stores all the visit details — the customer, service date, duration, priority, location, required skills, preferred rep, preferred time window, and whether the visit is virtual or in person. This appointment is now available for route planning.
Step 8: Create Events (Optional)
Events are used to block time on a rep’s schedule. When the Scheduler optimizes a route, it accounts for these blocked periods and will not schedule appointments during them.
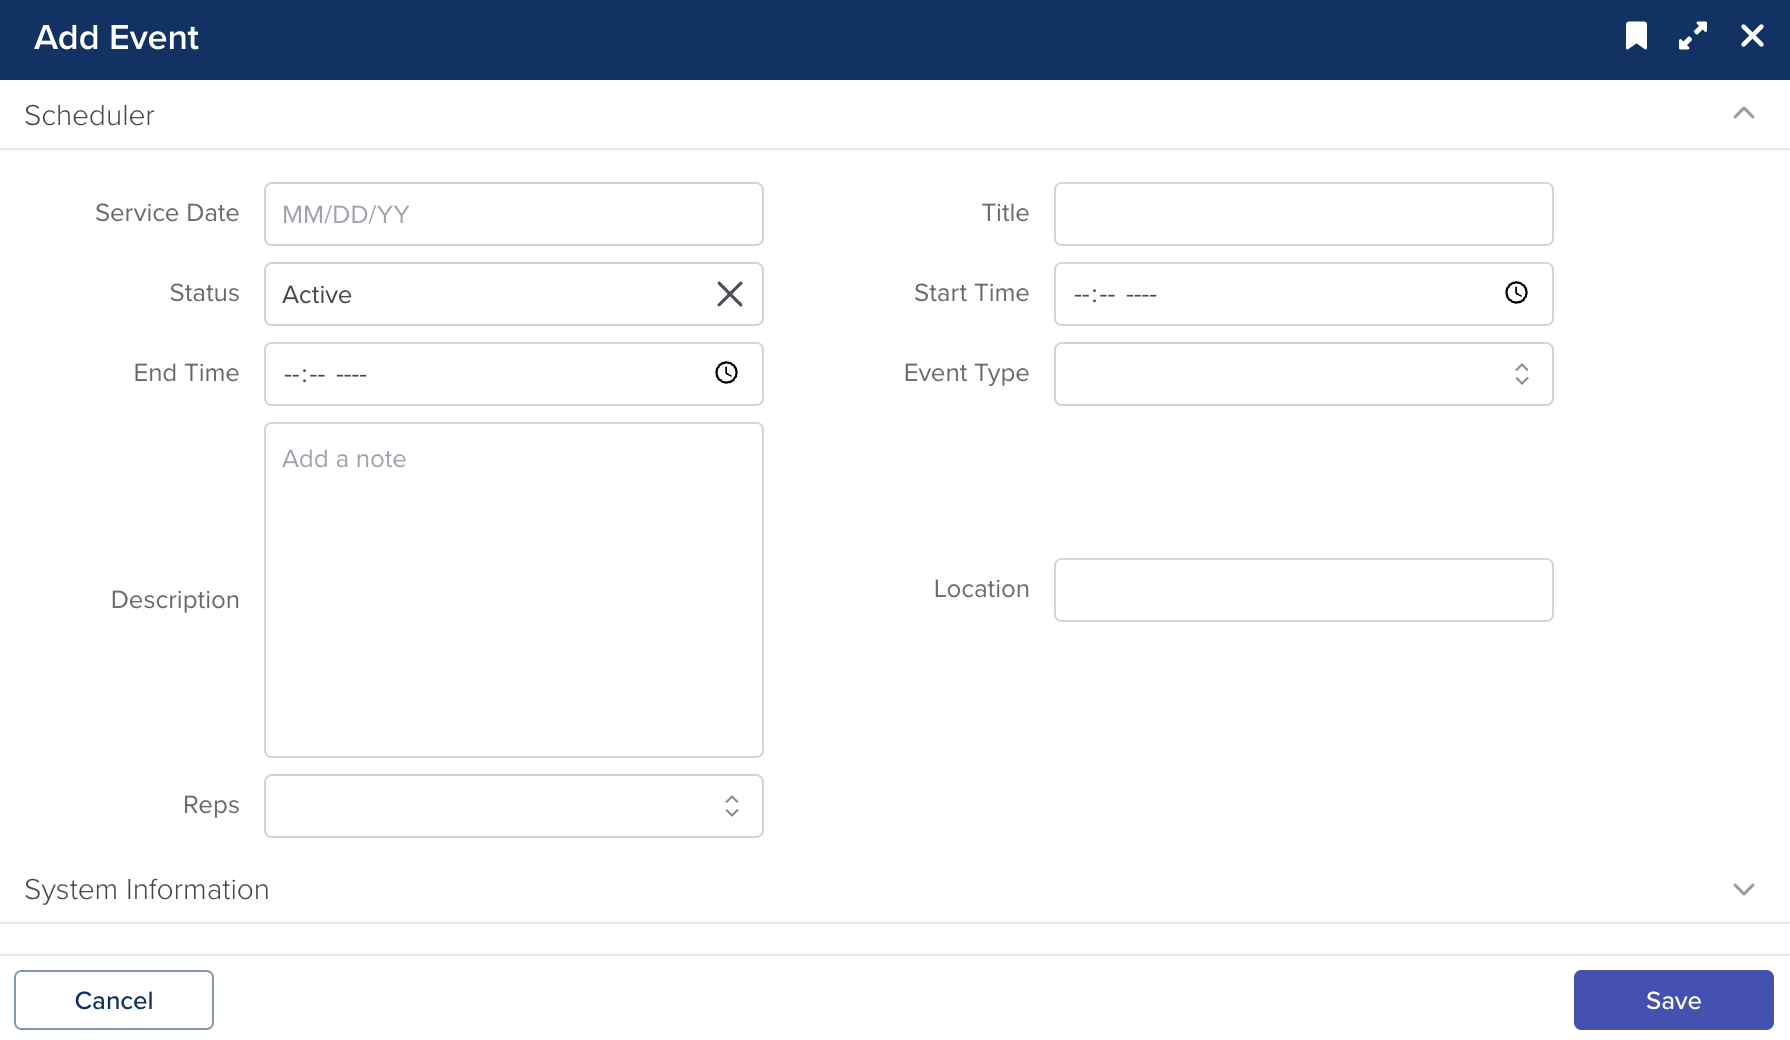
To create an Event:
- Open the Events app from your app menu.
- Click Add or + New to create a new record.
- Fill in the following fields:
| Field | Description | Example |
|---|---|---|
| Reps | Which rep(s) this event applies to. | John Doe |
| Title | A name for the event. | Zoom Training Session |
| Type | The type of event (Meeting, Training, Break, Admin, etc.). | Meeting |
| Start Time | When the event begins. | 2:00 PM |
| End Time | When the event ends. | 3:00 PM |
| Location | Where the event takes place (physical address or “Zoom”). | Zoom |
| Date | The date of the event. | May 5, 2026 |
- Click Save.
Common examples of Events:
- Zoom training session
- Certification session
- Team standup meeting
- Lunch break
- Admin time
- Maintenance window
Part 3: Planning and Optimizing Routes
With appointments in the pool and reps configured, you are ready to build optimized routes.
Step 9: Open the Route Planner
The Route Planner is where you select a rep and a date, review suggested appointments, optimize the route, and apply it as a Schedule.
To open the Route Planner:
- From the main navigation, go to the Schedules app.
- Click the Route Planner action button (or navigate directly to
/route-planner).
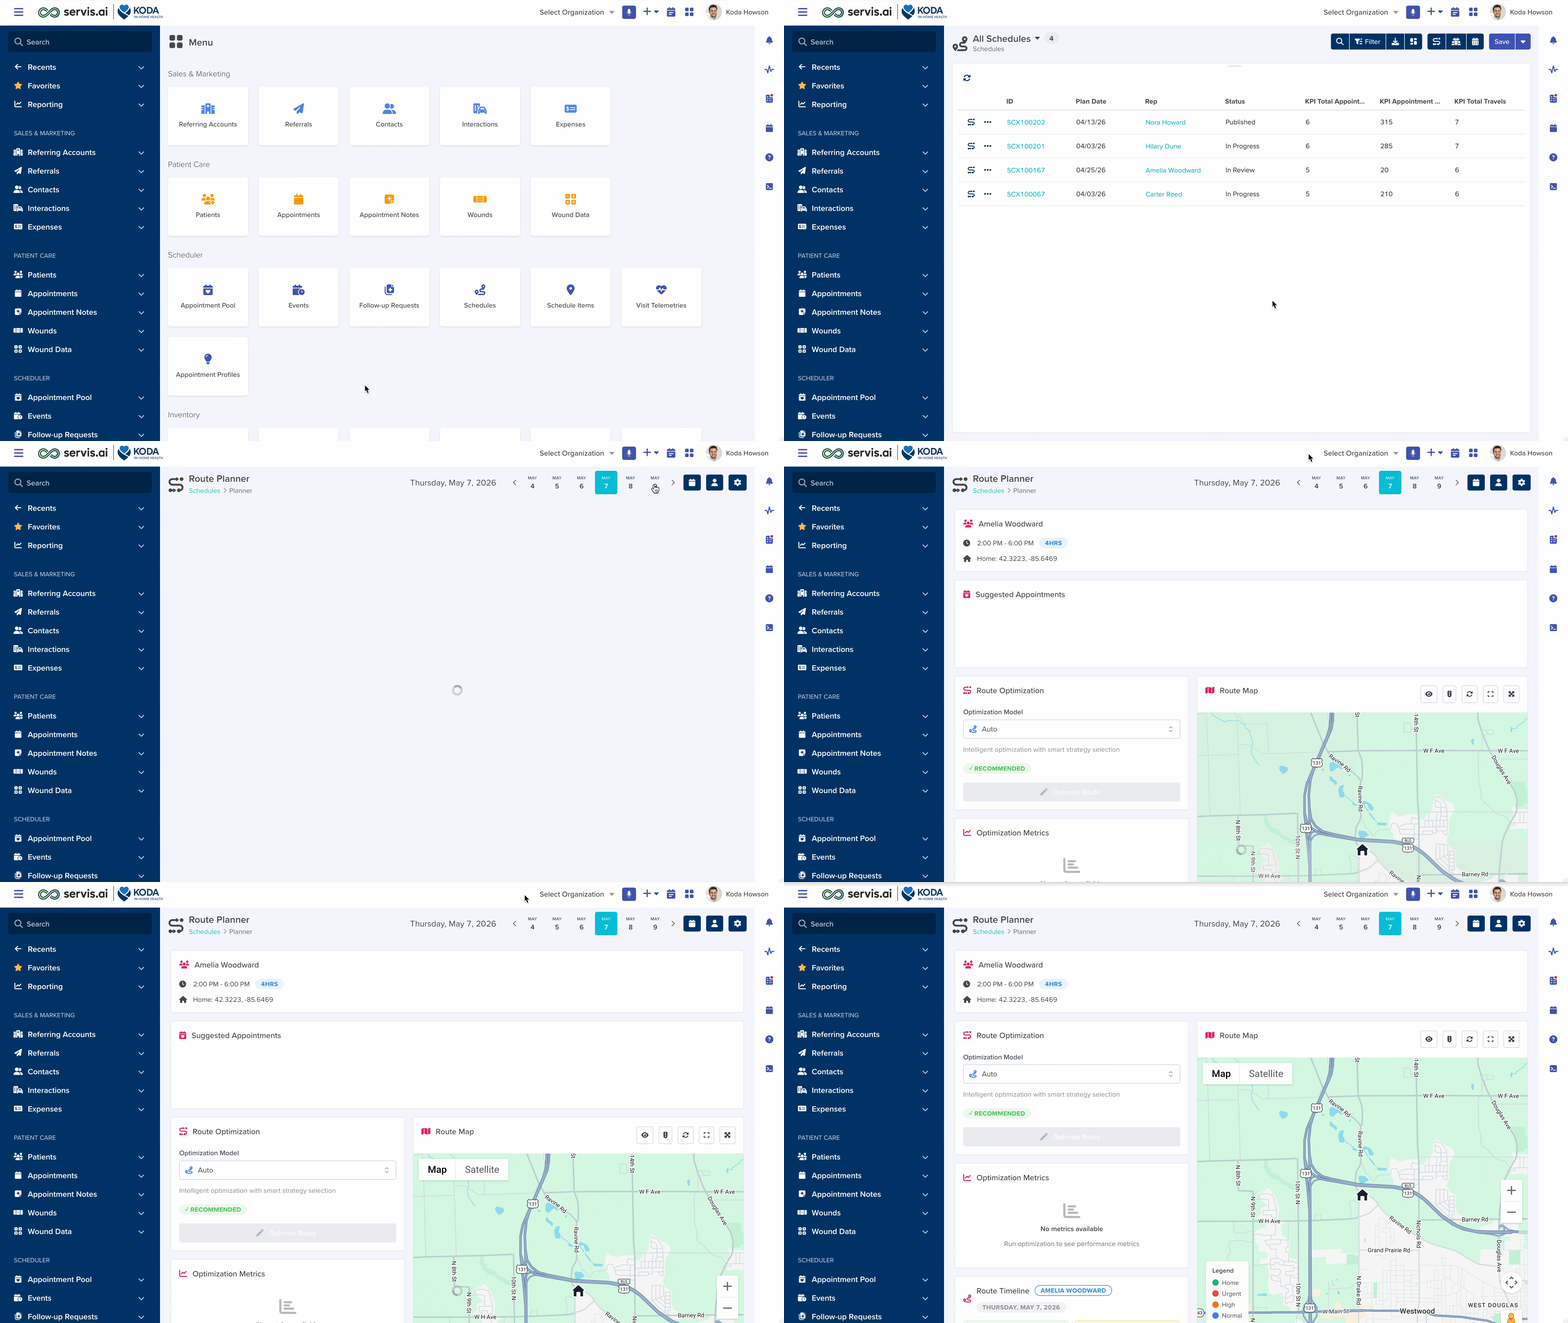
The Route Planner has four main areas:
| Area | What It Shows |
|---|---|
| Toolbar (top bar) | Date display, mini calendar, calendar picker, rep selector button, and the settings gear button. |
| Suggestions Panel (left side) | A list of appointment suggestions for the selected rep and date. |
| Map (center) | A Google Maps view showing appointment locations and the optimized route. |
| Control Panel (right side) | The optimization model selector, the Optimize Route button, and the Apply Optimized Route button. |
Step 10: Use the Toolbar

The toolbar at the top of the Route Planner contains several important controls:
Date Display
- The current date is displayed in the format Monday, May 5, 2026 on the left side of the toolbar.
Mini Calendar
- A horizontal strip of date buttons showing 6 consecutive days.
- Click any day to select it as the service date.
- The currently selected date is highlighted.
Calendar Picker Button
- Click the calendar icon button to open a full monthly calendar.
- Use the calendar to jump to any date.
- Today’s date is marked with a red dot indicator.
- Click a date to select it and close the calendar.
Rep Selector Button
- Click the user icon button (or press Ctrl+K on your keyboard) to open the rep search spotlight.
- A search bar appears at the top of the screen with the placeholder “Search representatives…”.
- Type a rep’s name to filter the list.
- Each result shows the rep’s name.
- Click a rep to select them.
- Press Escape to close the search without selecting.
Settings Button
- Click the gear icon button on the right side of the toolbar to open the Optimization Settings modal.
- This button has a tooltip that reads “Optimization Settings”.
Step 11: Review the Suggestions Panel
Once you select a rep and a date, the Suggested Appointments panel on the left side of the Route Planner populates with appointment suggestions.
Each suggestion card shows:
| Element | Description |
|---|---|
| Rank Number | A circled number indicating the suggestion rank (e.g., 1, 2, 3). |
| Service Type | The type of service (e.g., “Physical Therapy”). |
| Patient Name | The name of the customer, displayed with a user icon. |
| Duration | How long the visit takes (e.g., “60 min”), shown with a clock icon. |
| Priority Badge | A colored badge showing the priority level — Urgent (red), High (purple), Normal (blue), or Low (gray). Each badge includes a small icon: exclamation triangle for Urgent, trend-up arrow for High, star for Medium, clock for Low. |
| Virtual Badge | If the visit is virtual, a purple badge with a video icon labeled Virtual appears. |
| Preferred Time | If the appointment has a preferred time window, it is displayed (e.g., “10:00 AM – 12:00 PM”) with a map-marker icon. |
| Fit Score | A score out of 100 showing how well this appointment matches the rep’s skills and schedule. |
| Confidence Badge | A colored badge indicating confidence level: Very High (green), High (blue), Medium (yellow), or other (gray). |
| Reasoning Items | A list of text explanations for why this appointment was suggested and scored the way it was. |
| Edit Button | When you hover over a suggestion card, a pencil icon button appears in the top-right corner. Click it to edit the appointment record directly. |
The panel header shows:
- A heart-calendar icon and the title “Suggested Appointments”.
- A count badge showing the total number of suggestions.
Empty states:
- If no rep is selected: “Select a rep to view suggested appointments” with a lightbulb icon.
- If no suggestions are available: “No appointment suggestions available” with a lightbulb icon.
- While loading: A spinner animation.
Step 12: Configure Optimization Settings
Before running optimization, you can fine-tune the settings. Click the gear icon button in the toolbar to open the Optimization Settings modal.
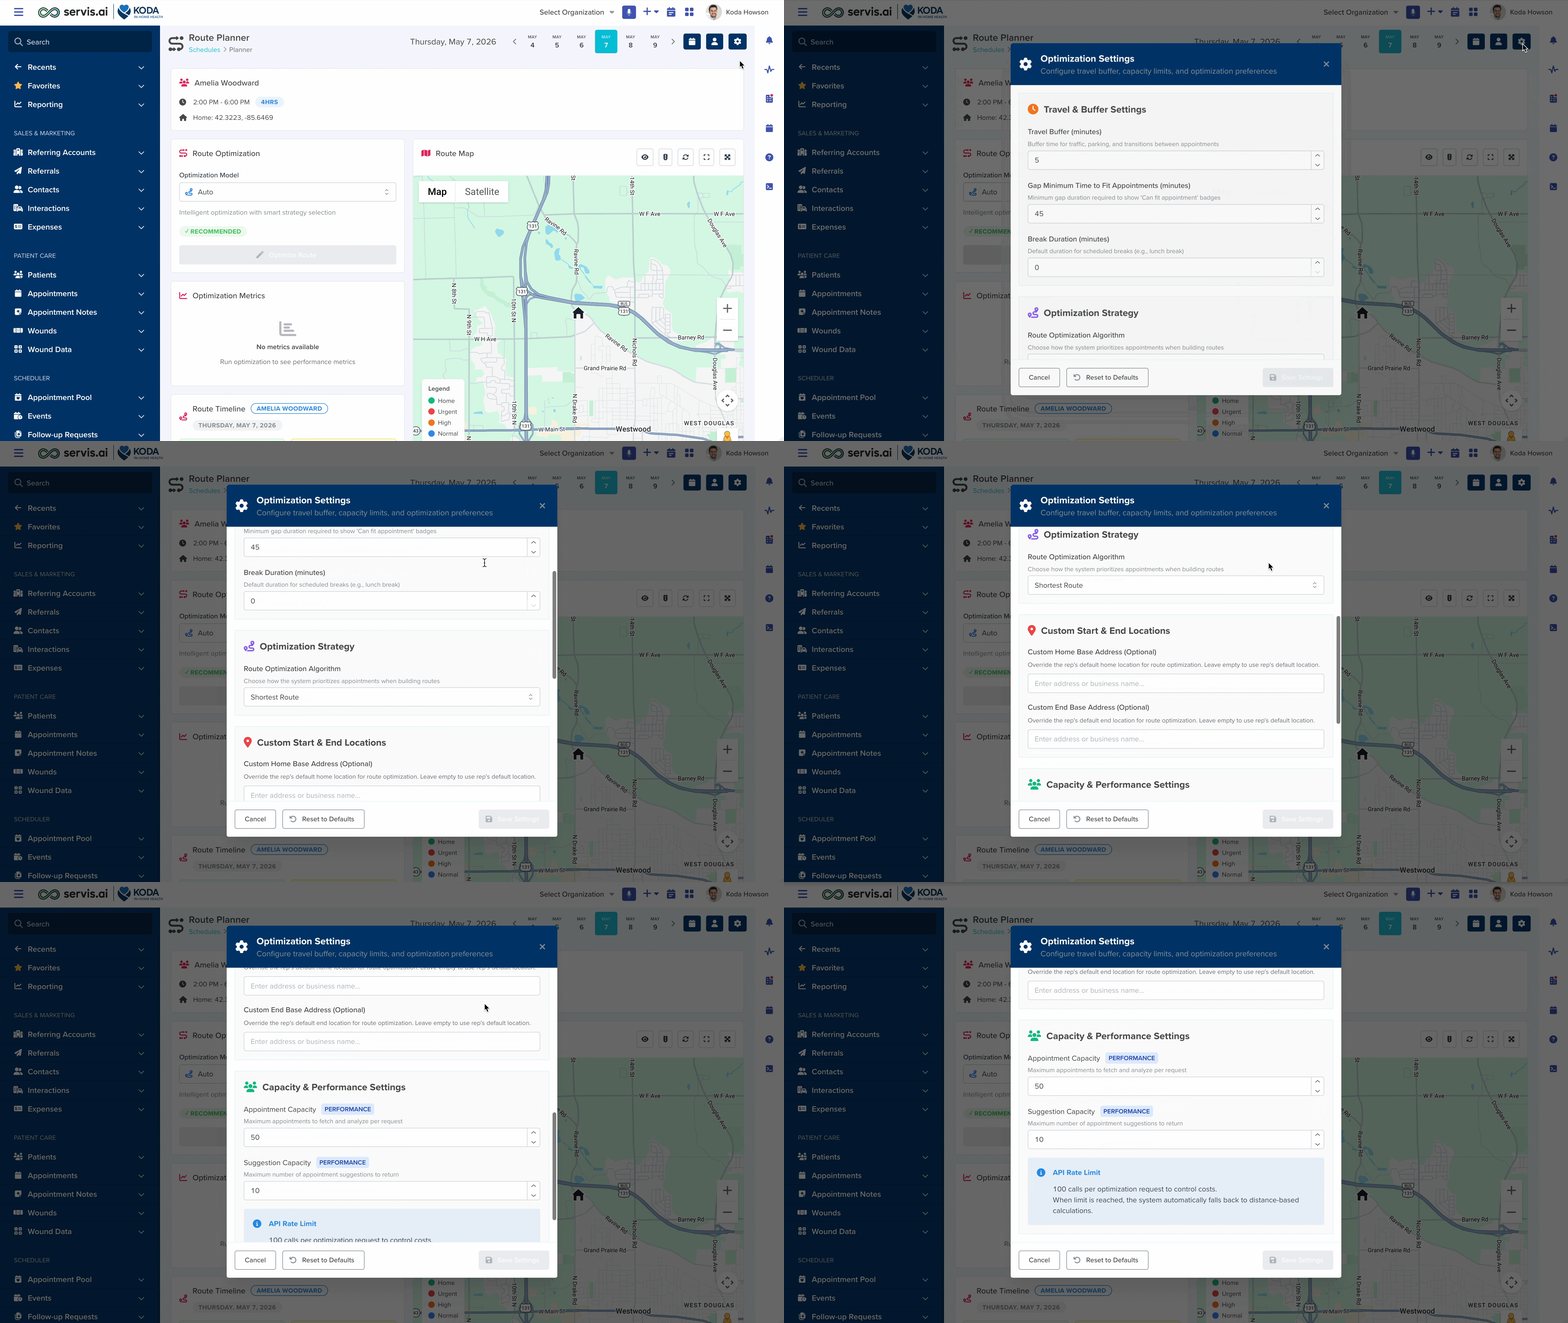
The modal has a header with a gear icon and the title “Optimization Settings”, with the subtitle “Configure travel buffer, capacity limits, and optimization preferences.”
The modal contains four sections:
Travel & Buffer Settings (orange clock icon)
| Setting | Description | Range | Default |
|---|---|---|---|
| Travel Buffer (minutes) | Extra time added between visits for traffic, parking, and transitions. | 0–30 | 5 |
| Gap Minimum Time to Fit Appointments (minutes) | The minimum gap duration required for the system to show “Can fit appointment” badges on gaps. | 15–120 | 45 |
| Break Duration (minutes) | The default duration for scheduled breaks (for example, a lunch break). Set to 0 for no break. | 0–120 | 0 |
Optimization Strategy (purple route icon)
| Setting | Description | Options |
|---|---|---|
| Route Optimization Algorithm | How the system builds the route. | Shortest Route — Optimizes the entire route for minimum total travel time and distance. Nearest Neighbor — Selects the closest unvisited location at each step. Farthest Neighbor — Starts with the farthest appointment, then works back selecting the nearest. |
Custom Start & End Locations (red map-marker icon)
| Setting | Description |
|---|---|
| Custom Home Base Address | (Optional) Override the rep’s default home location for route start. Type an address or business name and select from the autocomplete results. Leave empty to use the rep’s default location. |
| Custom End Base Address | (Optional) Override the rep’s default end location for route finish. Type an address or business name and select from the autocomplete results. Leave empty to use the rep’s default location. |
Both address fields use a location autocomplete that suggests addresses as you type.
Capacity & Performance Settings (green users icon)
| Setting | Description | Range | Default |
|---|---|---|---|
| Appointment Capacity | Maximum number of appointments to fetch and analyze per optimization request. | 10–200 | 50 |
| Suggestion Capacity | Maximum number of appointment suggestions to return. | 1–50 | 10 |
An API Rate Limit info box explains that each optimization uses up to 100 Google Maps API calls. When the limit is reached, the system automatically falls back to distance-based calculations.
Modal Footer Buttons
| Button | What It Does |
|---|---|
| Cancel | Discards changes and closes the modal. |
| Reset to Defaults | Restores all settings to their default values. |
| Save Settings | Saves your changes. This button is disabled if no changes have been made, or if there is an active schedule. |
Note: If a schedule already exists for the selected rep and date, the settings fields are disabled. You must delete the existing schedule before modifying optimization settings. A yellow “Schedule in Place” warning banner appears to explain this.
Step 13: Optimize the Route
Once you have selected a rep, chosen a date, and configured your settings, you are ready to optimize.
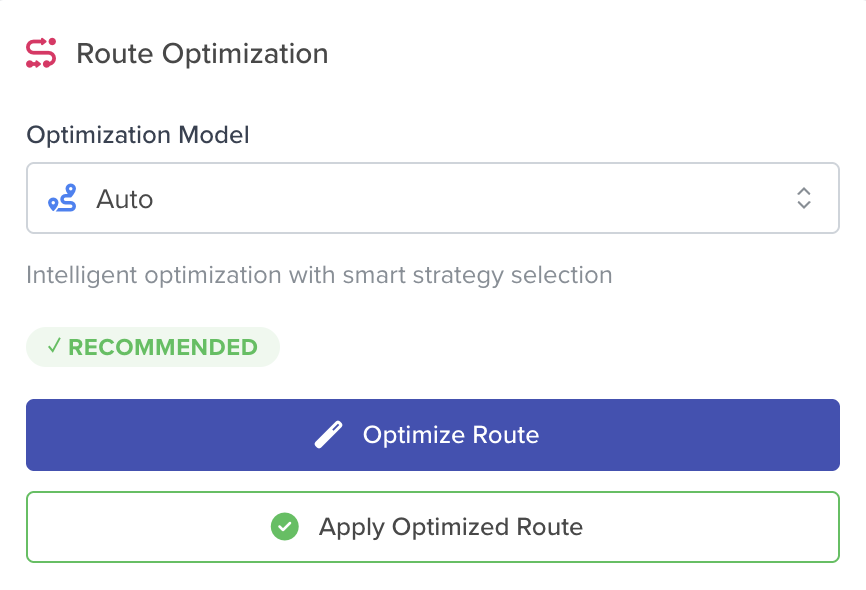
To optimize the route:
-
In the Control Panel on the right side of the Route Planner, confirm that the Optimization Model is set to Auto (recommended). The Auto model shows the description “Intelligent optimization with smart strategy selection” and a green ✓ Recommended badge.
-
Click the Optimize Route button (with a magic-wand icon).
-
Wait for the optimization to complete.
What the Scheduler Calculates
During optimization, servis.ai determines:
- Which appointments fit within the rep’s shift.
- The best visit order.
- Travel time between each stop.
- Travel buffer time between appointments.
- Break placement.
- Gaps (unused time) in the schedule.
- Fixed events that cannot be moved.
- Route feasibility (whether the route is realistic given time constraints).
The Map After Optimization
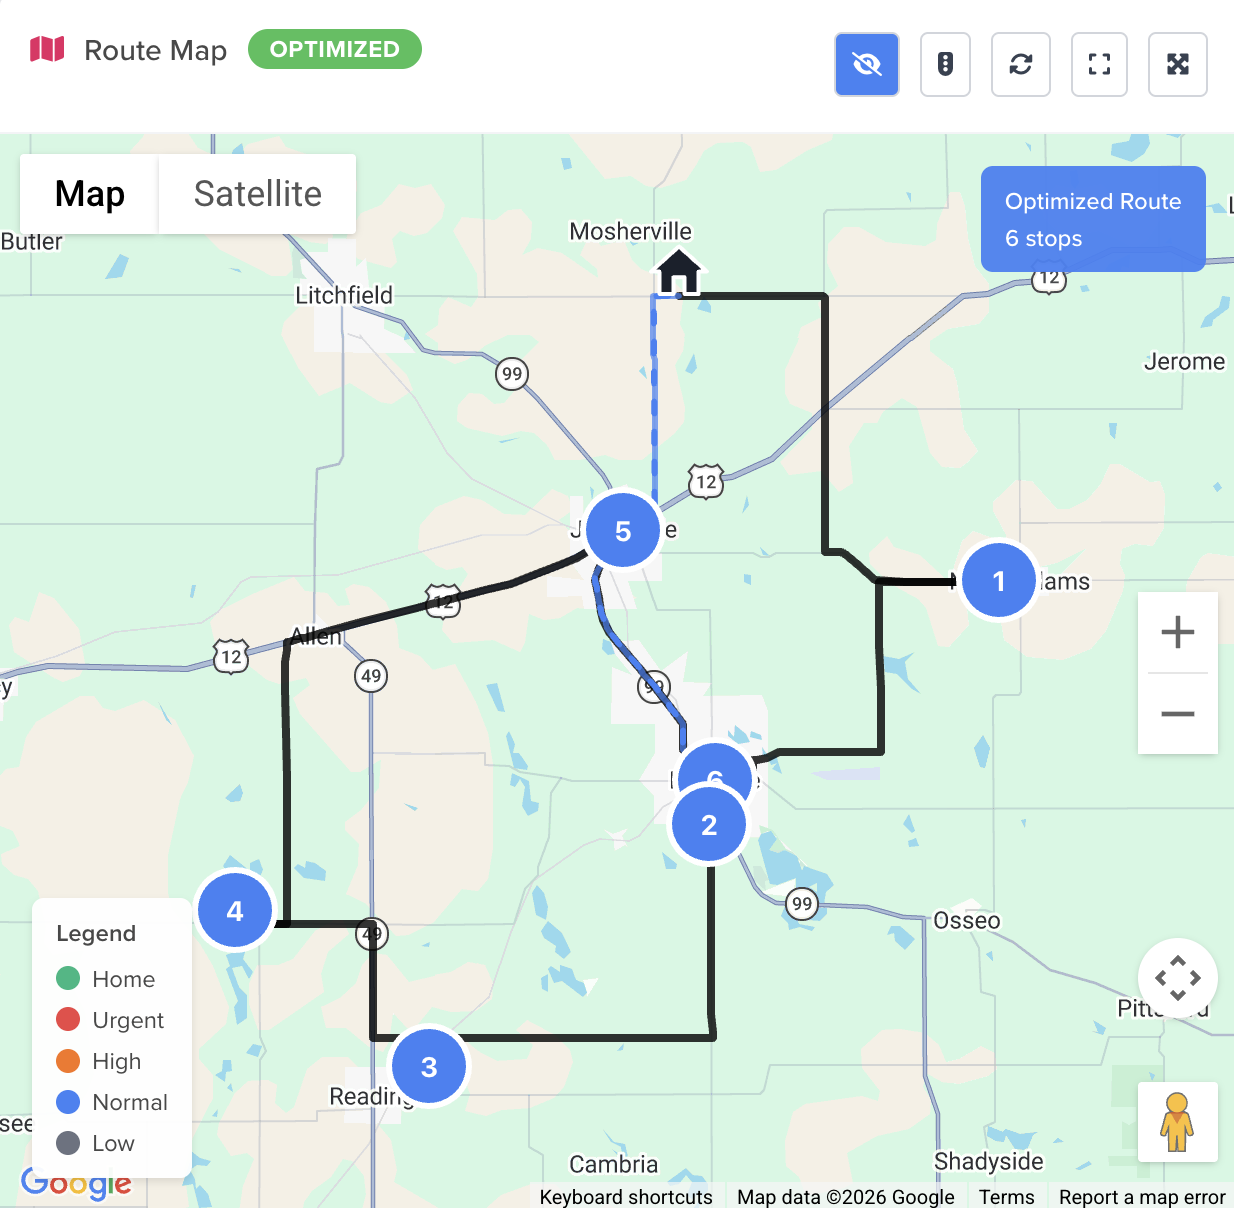
After optimization completes, the map updates to show:
| Element | Description |
|---|---|
| Home Marker | A dark house icon at the rep’s home or starting base. Click it to see the rep’s name and “Start Location” in an info popup. |
| Appointment Markers | Numbered circles at each appointment location. Colors match priority: Urgent (red), High (orange), Normal (blue), Low (gray). |
| Route Line | A black line connecting the stops in optimized order (the outbound route). |
| Return Route | A dashed blue line from the last appointment back to home base. |
| Optimized Route Badge | A blue label in the top-right corner of the map showing “Optimized Route” and the number of stops. |
| Legend | A small legend in the bottom-left corner showing color codes for Home, Urgent, High, Normal, and Low priority. |
Map Controls
Several control buttons appear along the top edge of the map:
| Button | Icon | What It Does |
|---|---|---|
| Show/Hide Route | Eye / Eye-slash | Toggles the route line on and off. When the route is visible, the button is blue; when hidden, it is white. |
| Traffic | Traffic light | Toggles real-time traffic overlay on the map. When active, the button is yellow/orange. |
| Refresh | Sync arrows | Refreshes the map data. |
| Expand | Expand | Expands the map to fill the viewport area. Click again (compress icon) to return to normal. |
| Fullscreen | Expand arrows | Opens the map in browser fullscreen mode. Press Escape or click again to exit. |
Clicking an Appointment Marker
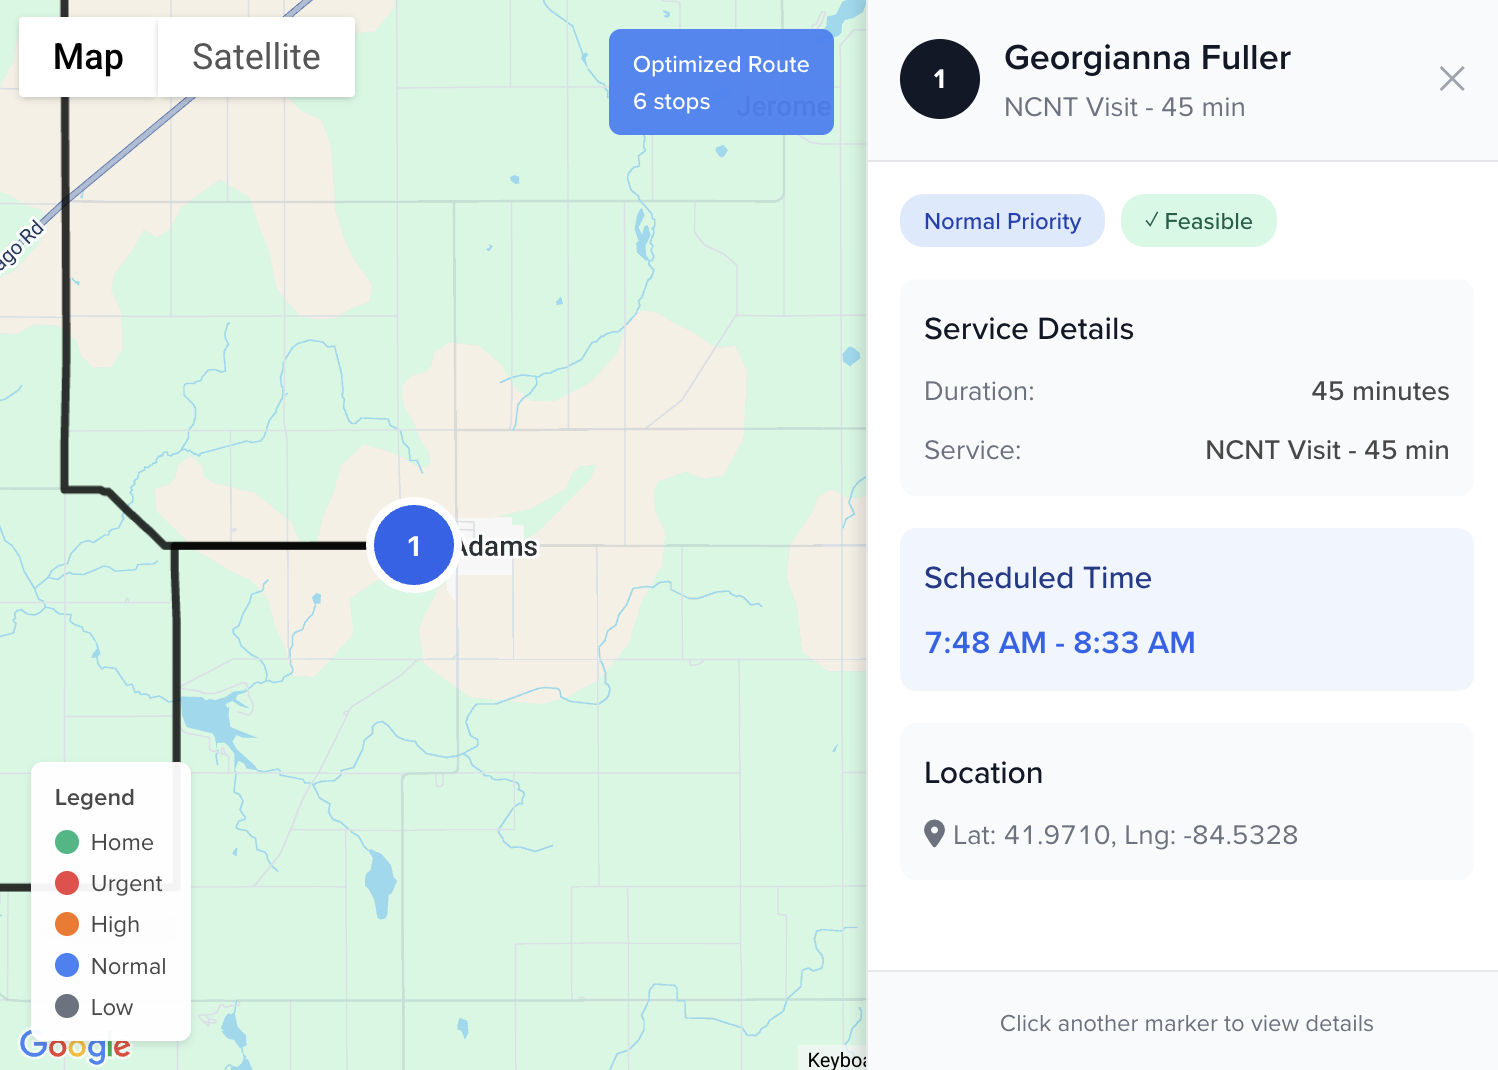
When you click an appointment marker on the map:
- The marker turns blue and enlarges slightly.
- A detail drawer slides in from the right side of the map showing:
| Section | Details |
|---|---|
| Header | The appointment number in a dark circle, the patient’s name, and the service type. A ✕ button closes the drawer. |
| Status Badges | Colored badges for priority (e.g., “High Priority” in orange) and feasibility (e.g., “✓ Feasible” in green or “✗ Infeasible” in red). Virtual visits show a purple Virtual badge with a video icon. |
| Service Details | Duration in minutes and the service type. |
| Preferred Time | If set, the preferred time window (e.g., “10:00 AM – 12:00 PM”) on a purple background. |
| Scheduled Time | The actual scheduled time window after optimization (e.g., “9:15 AM – 10:15 AM”) on a blue background. |
| Location | Latitude and longitude coordinates with a map-marker icon. |
- Click another marker to switch the drawer, or click the ✕ button to close it.
Step 14: Review Optimization Metrics
After optimization, the Optimization Metrics panel (below or beside the map) displays key performance indicators.
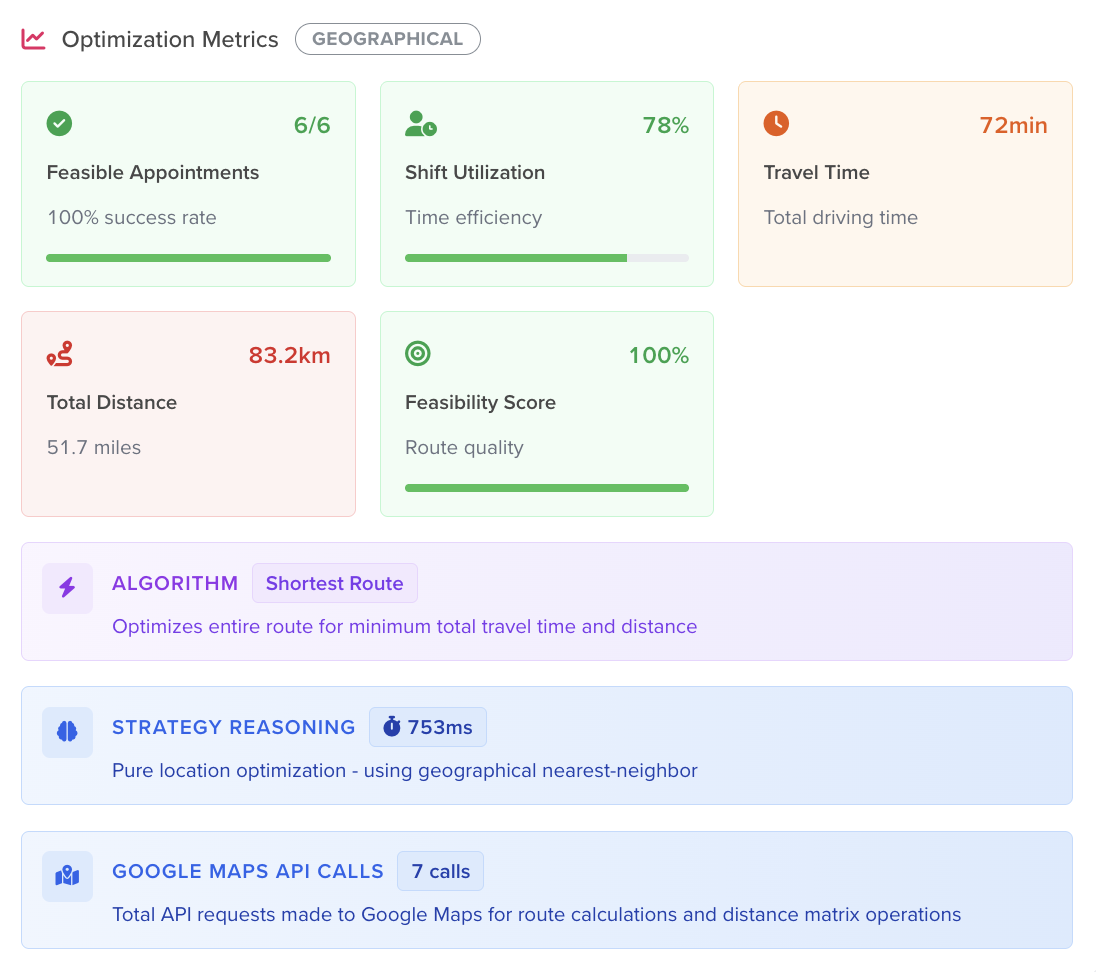
The panel header shows a chart-line icon, the title “Optimization Metrics”, and a badge with the selected strategy name.
Key Metric Cards
| Metric | Description | Color Coding |
|---|---|---|
| Feasible Appointments | Shows how many appointments were successfully scheduled out of the total (e.g., “8/10”) with a success rate percentage and a progress bar. | Green (≥80%), Orange (≥60%), Red (<60%) |
| Shift Utilization | How much of the rep’s total workday is used by appointments and travel. Shown as a percentage with a progress bar. | Green (≥70%), Orange (≥50%), Red (<50%) |
| Travel Time | The total driving time in minutes. | Green (≤60 min), Orange (≤90 min), Red (>90 min) |
| Total Distance | The total route distance in kilometers with miles shown as a subtitle. | Green (≤30 km), Orange (≤50 km), Red (>50 km) |
| Feasibility Score | A percentage indicating how realistic and achievable the route is. Shown with a progress bar. | Green (≥90%), Orange (≥70%), Red (<70%) |
Algorithm Display
A purple panel shows the algorithm used:
- Shortest Route — Optimizes entire route for minimum total travel time and distance.
- Nearest Neighbor — Selects closest unvisited location at each step.
- Farthest Neighbor — Starts with the farthest appointment, then works back selecting nearest.
Strategy Reasoning
If available, a blue panel displays the reasoning behind the strategy selection, along with the analysis time in milliseconds.
Google Maps API Calls
A blue panel shows the total number of Google Maps API calls used during the optimization.
Infeasible Appointments Warning
If any appointments could not be scheduled, an orange warning banner appears: for example, “2 appointments couldn’t be scheduled — Check time constraints, skills, or shift capacity.”
Step 15: Apply the Route
Once you are satisfied with the optimization results, apply the route to create a Schedule.
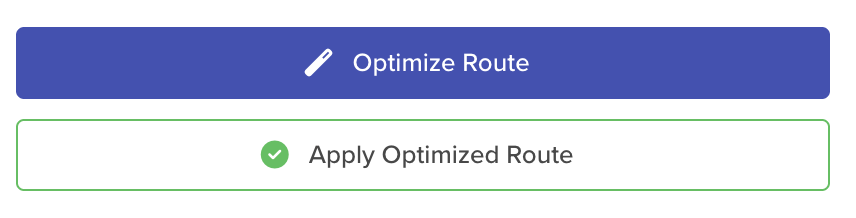
To apply the route:
-
In the Control Panel, click the Apply Optimized Route button (green outline, with a check-circle icon).
-
The system creates a Schedule record in Draft status and generates all the associated Schedule Items.
What Gets Created
The Schedule contains the following types of Schedule Items:
| Item Type | Description | Icon Color |
|---|---|---|
| Home Base | Departure from the rep’s starting location. | Blue |
| Travel | Driving segment between two stops. Shows from/to, distance, duration, and travel mode. | Yellow |
| Travel Buffer | A safety margin of time for traffic and parking. | Blue |
| Appointment | The actual visit. Shows patient name, service type, duration, priority, and preferred time. | Green |
| Break | A scheduled break period. | Orange |
| Fixed Block | A pre-scheduled event (from the Events app). Shows title, event type, and description. | Purple |
| Gap | Unused time between items. Gaps that can fit additional appointments show a green “Can fit appointment” badge. | Gray |
After applying, the Control Panel switches to Existing Schedule mode and shows a green “Schedule exists” info alert.
Step 16: Review the Route Timeline
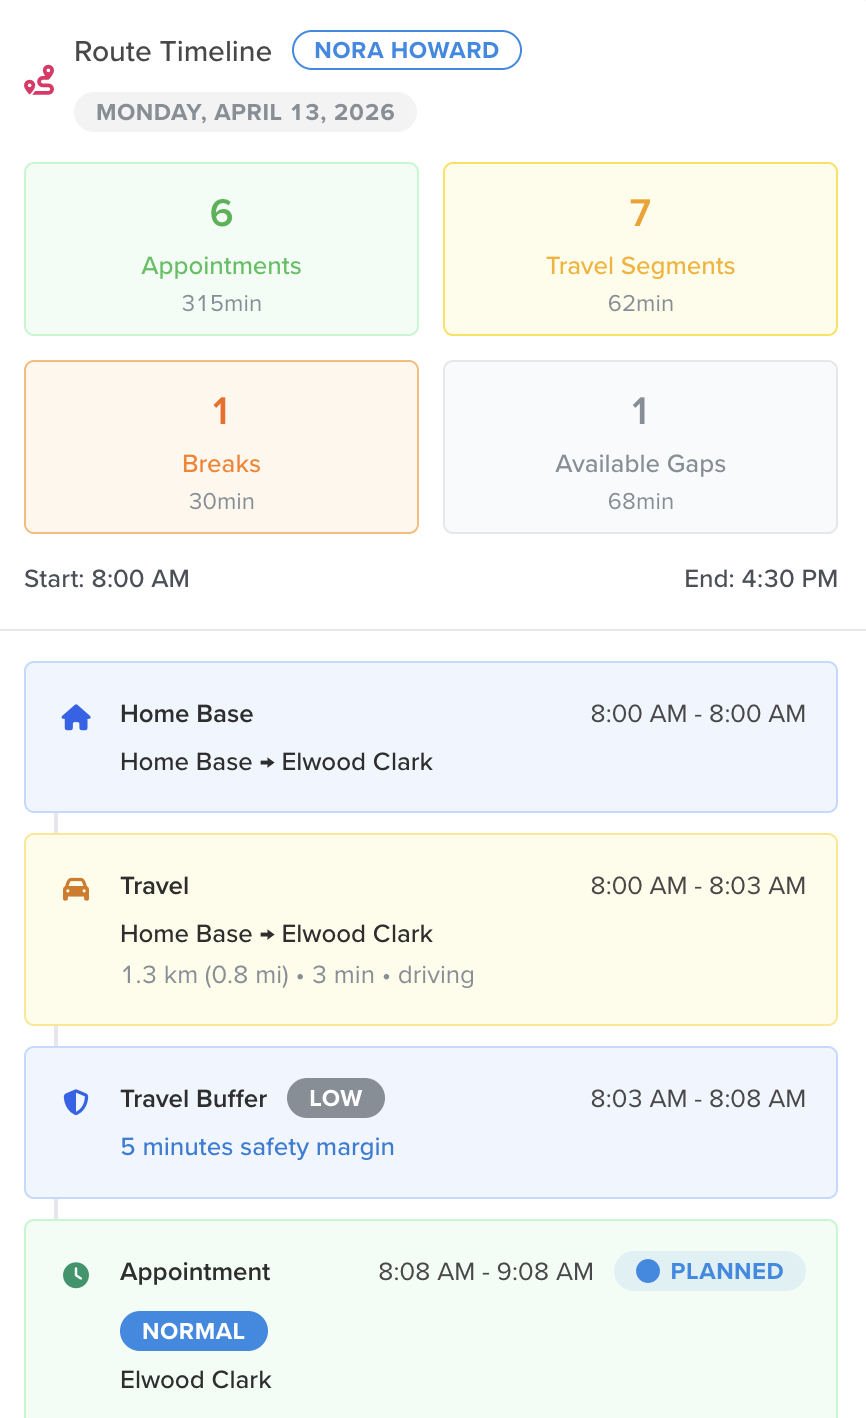
After applying the route, the Route Timeline panel appears (below the map and metrics). This timeline shows every segment of the day in chronological order.
Timeline Header
The header shows:
- A route icon and the title “Route Timeline”.
- The rep’s name in a blue badge.
- The selected date.
- The total number of items.
Summary Cards
Four summary cards appear at the top:
| Card | What It Shows |
|---|---|
| Appointments (green) | Total count and total appointment minutes. |
| Travel Segments (yellow) | Total count and total travel minutes. |
| Breaks (orange) | Total count and total break minutes. |
| Available Gaps (gray) | Total count and total gap minutes. |
Start and End Times
Below the summary cards, the route start and end times are displayed.
Timeline Items
Each item is displayed as a card with:
- A vertical timeline line connecting all items.
- A colored icon on the left.
- The item type label (e.g., “Appointment,” “Travel,” “Break,” “Gap,” “Home Base,” “Fixed Block”).
- For appointments: patient name, service type, duration, priority badge, virtual badge (if applicable), preferred time, and time compliance status (MATCH or ADJUSTED).
- For travel: from/to locations, distance (in km and miles), duration, and travel mode.
- For gaps: available minutes, gap type (e.g., “Between Appointments,” “End of shift gap”), and a “Can fit appointment” badge if applicable.
- For breaks: duration and title.
- For fixed blocks: title, event type badge, description, and location.
- Time range on the right (e.g., “9:00 AM – 10:00 AM”).
- Visit status badge for appointments (Planned, En Route, Arrived, Completed, No Show).
Part 4: Managing Schedules
Step 17: Publish the Schedule
Once the route looks correct in Draft status, publish it so the rep can begin working.
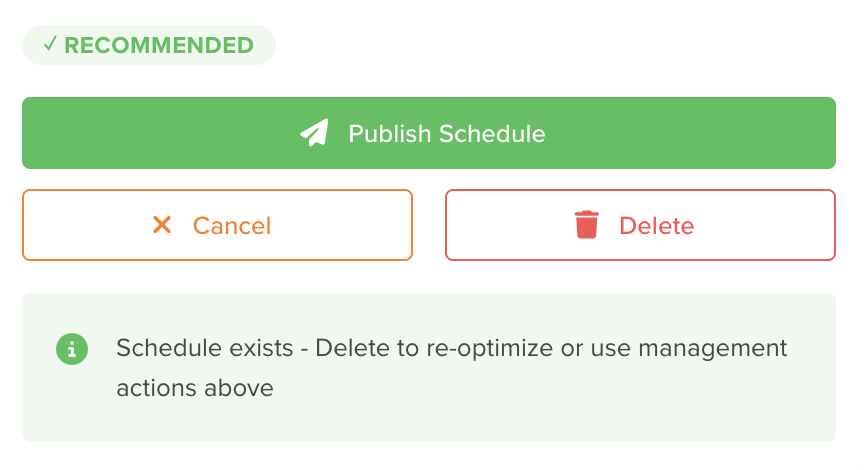
To publish:
-
In the Control Panel (now showing “Existing Schedule” mode), click the Publish Schedule button (green, with a paper-plane icon).
-
The Schedule status changes from Draft to Published.
Note: If any appointment in the schedule requires more than one rep and not all required reps have been assigned, the system prevents publishing until the assignments are complete.
Schedule Statuses
| Status | Description |
|---|---|
| Draft | The route has been applied but is not yet shared with the rep. |
| Published | The route is finalized and ready for the rep to start. |
| In Progress | The rep has started the route. |
| In Review | All items have been completed, missed, or handled. Awaiting review. |
| Completed | The schedule has been reviewed and closed. |
| Canceled | The schedule has been canceled. |
Step 18: View the Route Timeline
After publishing, you can open the full Route Timeline view for detailed management.
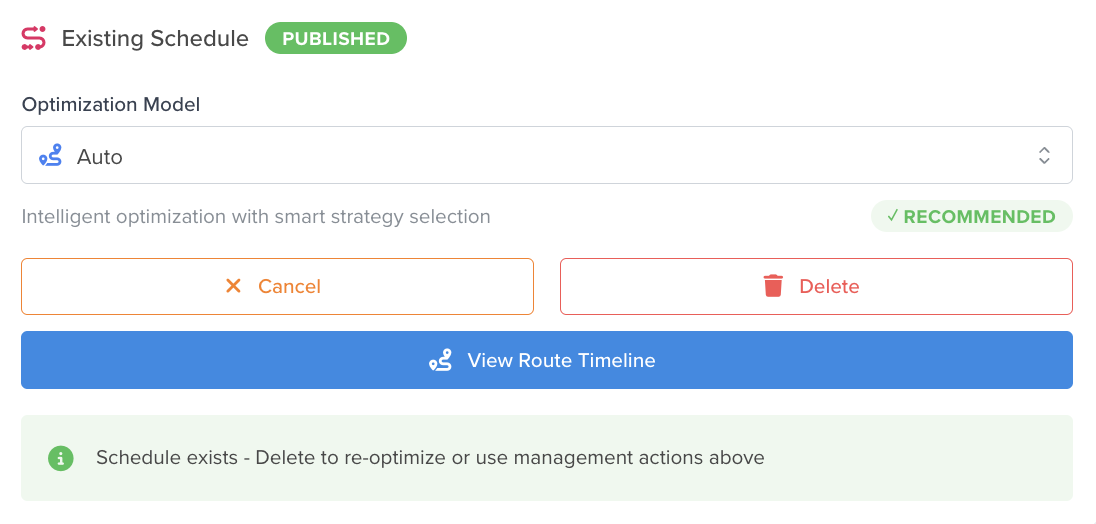
To open the Route Timeline:
- In the Control Panel (for a published, in-progress, or in-review schedule), click the View Route Timeline button (blue, with a route icon).
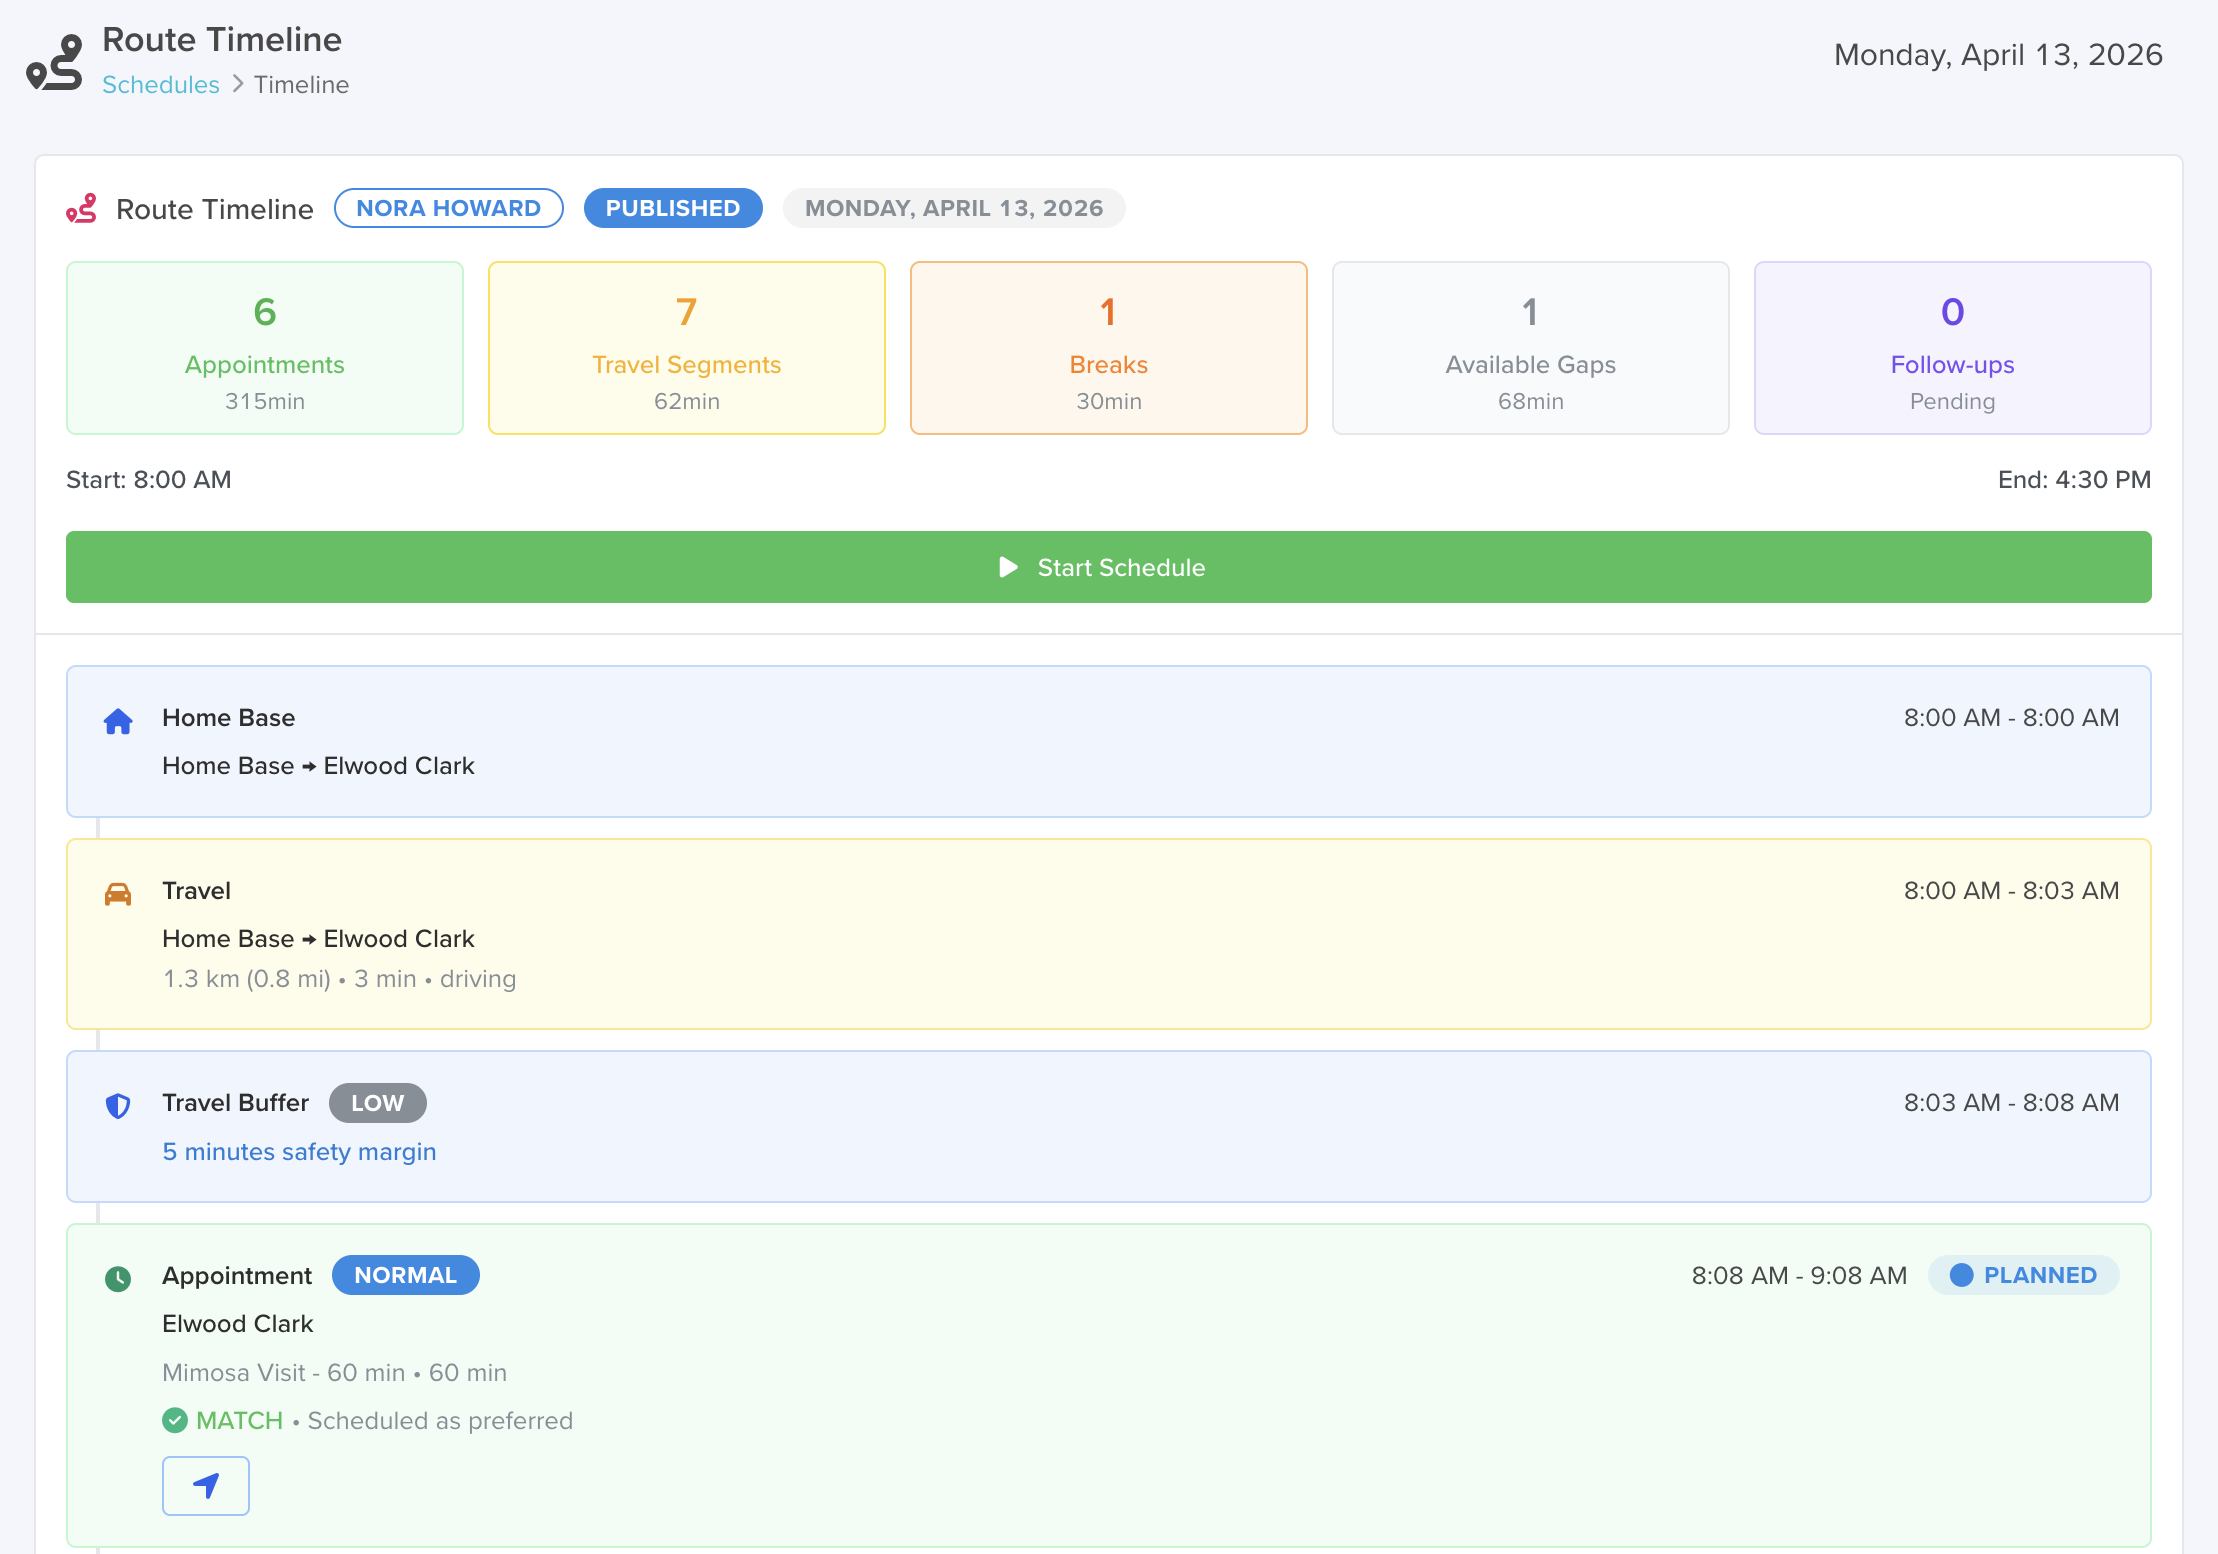
This opens a dedicated page showing:
- A toolbar at the top with the service date displayed.
- The full Route Timeline with all items.
- A Start Schedule button (green, with a play icon) at the top when the schedule is in Published status.
- Visit action buttons on each appointment item.
Step 19: Cancel a Schedule
If needed, you can cancel a schedule that is in Draft or Published status.
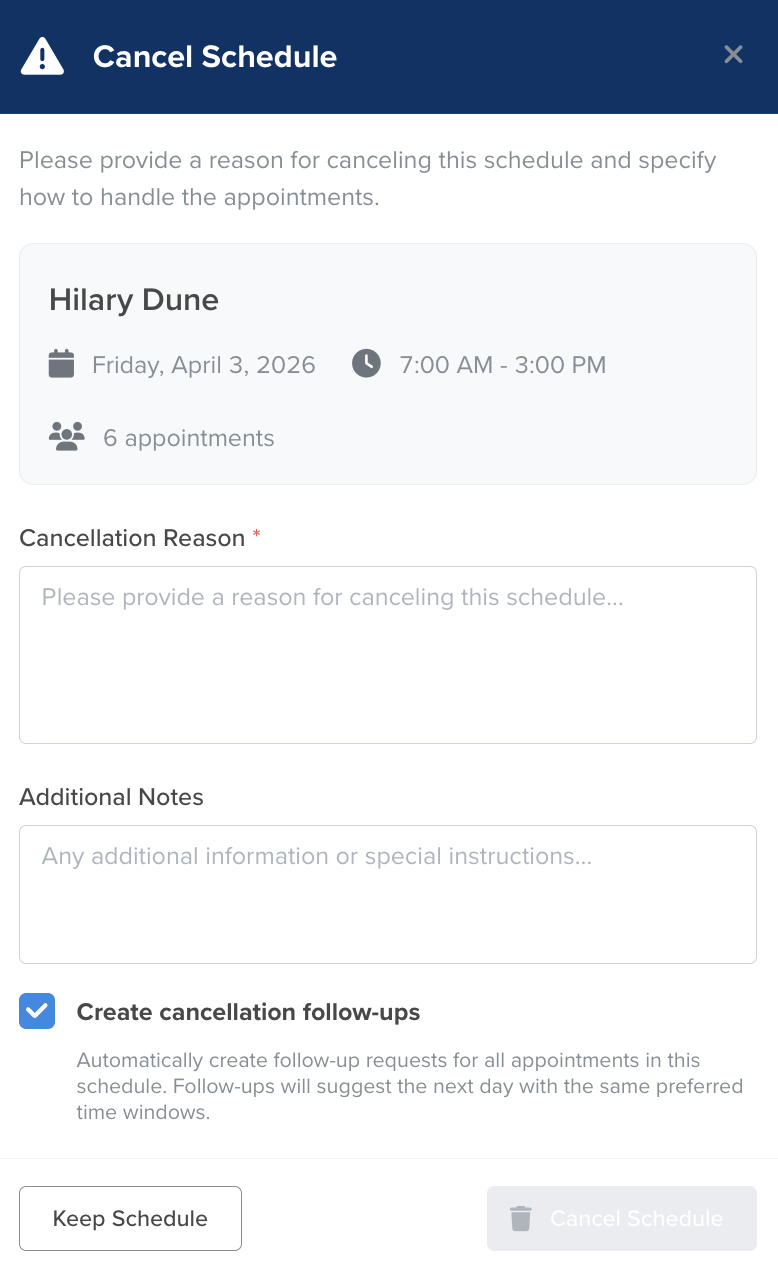
To cancel:
-
In the Control Panel, click the Cancel button (orange outline, with an X icon).
-
A Cancel Schedule modal opens. It displays:
- The rep’s name and schedule date.
- The shift time range.
- The number of appointments.
- A Cancellation Reason text field (required — marked with an asterisk).
- An Additional Notes text field (optional).
- A “Create cancellation follow-ups” checkbox (checked by default). When enabled, the system automatically creates Follow-up Requests for all appointments in the canceled schedule.
-
Fill in the reason and optionally adjust the notes and checkbox.
-
Click the Cancel Schedule button (red, with a trash icon) to confirm.
-
Or click Keep Schedule to abort.
Step 20: Delete a Schedule
You can permanently delete a schedule in Draft, Published, or Canceled status.
To delete:
-
In the Control Panel, click the Delete button (red outline, with a trash icon).
-
Confirm the deletion when prompted.
Note: Deleting a schedule is irreversible. All associated schedule items are removed.
Part 5: Executing Routes
Once a schedule is published, the rep works through the route.
Step 21: Start the Schedule
To start the route (as a rep or on behalf of a rep):
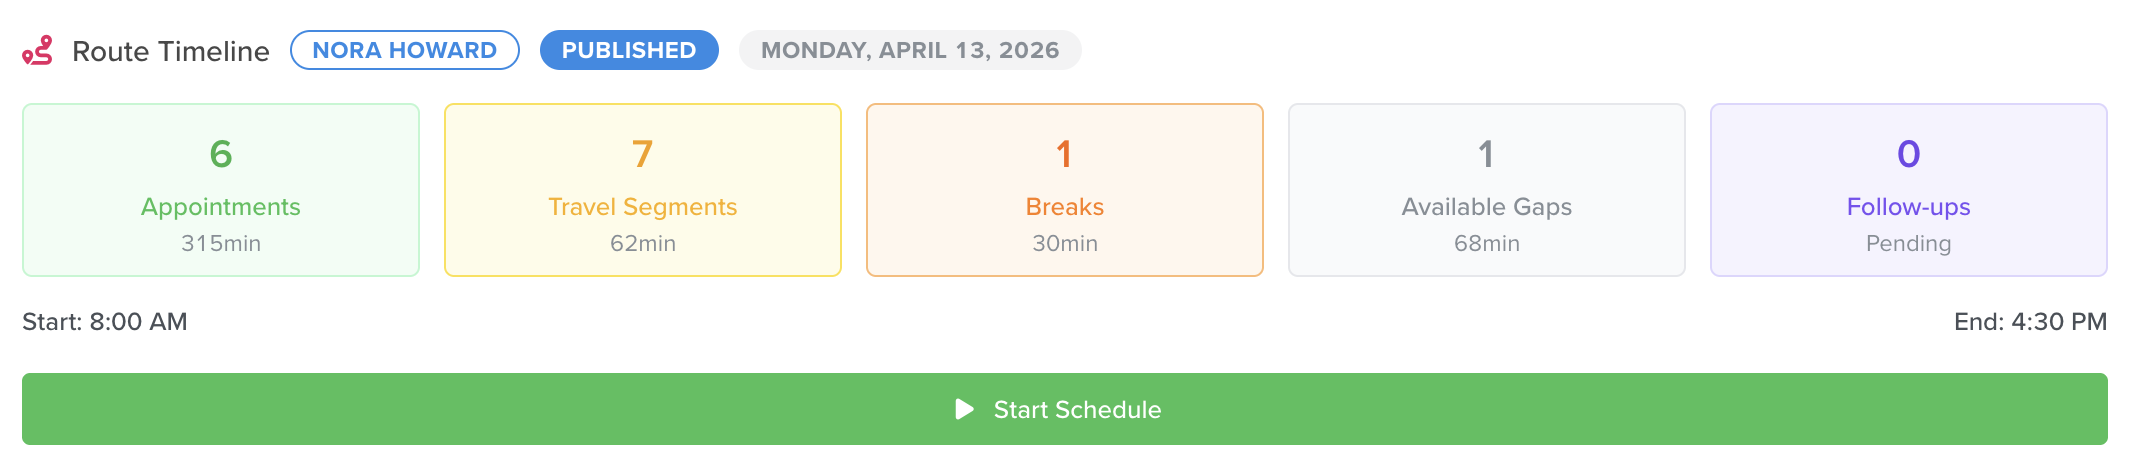
-
Open the Route Timeline view for the published schedule.
-
Click the Start Schedule button (green, with a play icon) at the top of the timeline.
-
The schedule status changes to In Progress.
-
The first Schedule Item changes from Planned to En Route.
Step 22: Work Trhough Appointments
For each appointment in the timeline, the following action buttons appear:
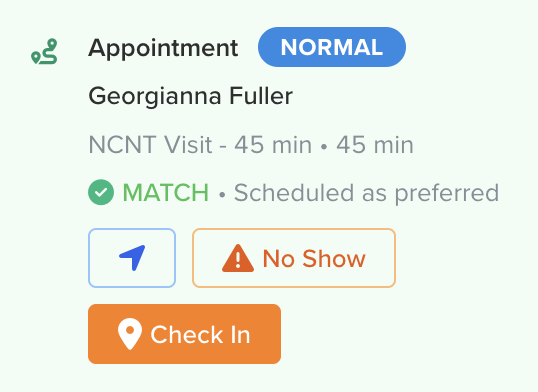
Directions Button
- A location-arrow icon button (blue outline) that opens Google Maps directions to the appointment location in a new browser tab.
Check In
- Available when the appointment status is En Route.
- Click Check In (orange, with a map-marker icon) to mark the rep as arrived.
- After check-in, the status changes to Arrived, and a ✓ Checked In button appears (disabled) to confirm the status.
- The system creates a Visit Telemetry record with the arrival timestamp.
Check Out
- Available after check-in, when the status is Arrived.
- Click Check Out (green, with a check-circle icon) to complete the visit.
- The system creates a Visit Telemetry record with the completion timestamp.
- The system can automatically create a new Service Follow-up Request for a follow-up visit (if configured).
No Show
- Available when the appointment status is En Route.
- Click No Show (orange outline, with an exclamation-triangle icon) to mark that the customer was unavailable.
- The system creates a Visit Telemetry record with the no-show timestamp.
- The system can automatically create a No Show Follow-up Request for rescheduling.
Follow-up Buttons
- If a follow-up request has been created from this appointment, a file-text icon button appears (blue outline).
- Click it to view the follow-up request details.
- Multiple follow-ups show individual icon buttons (up to 3), with a “+X” indicator if there are more.
Step 23: Re-optimize a Gap
During route execution, if you find a gap (unused time) that could fit another appointment, you can re-optimize it.
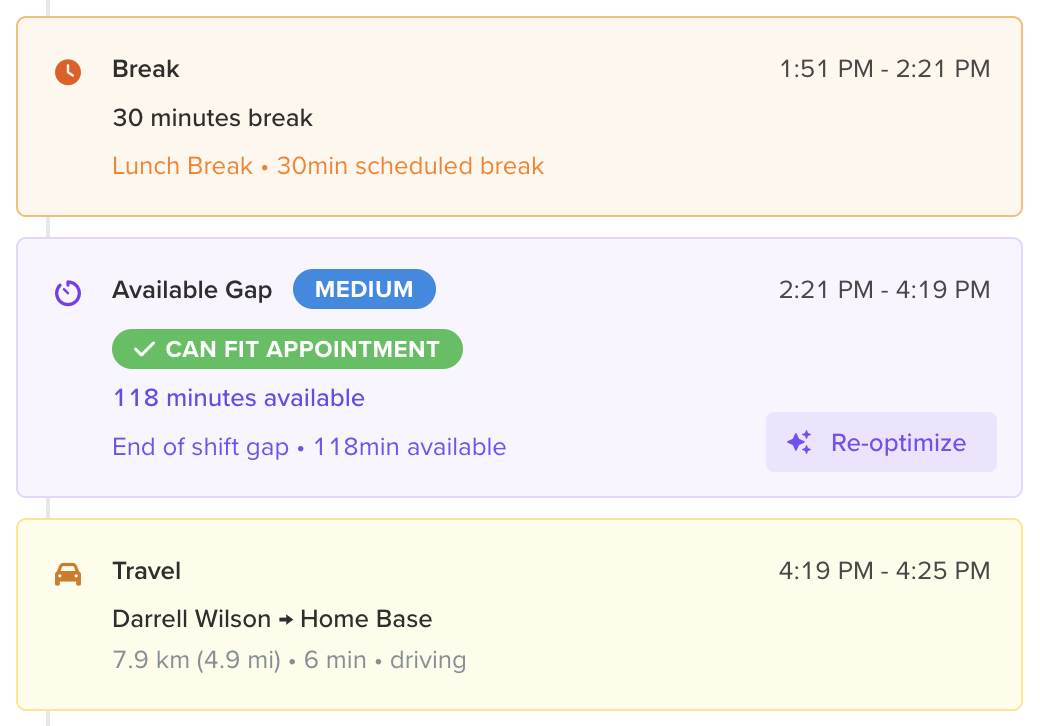
To re-optimize a gap:
- In the Route Timeline, find a gap item that shows a “Can fit appointment” badge.
- Click the Re-optimize button (purple, with a sparkles icon) in the bottom-right corner of the gap card.
- A Gap Re-optimization modal opens with the title “Gap Re-optimization” and subtitle “Optimizing gap with chronological strategy.”
The modal displays:
- An Impact Analysissection showing:
- New Appointments — How many appointments would be added.
- Utilization Improvement — The percentage gain in efficiency.
- Original Gap — The original gap duration.
- Remaining Gap — Time left after re-optimization.
- Optimization Metrics — The same metrics as the main route optimization.
- Route Timeline — A preview of the new timeline segment.
- Route Map — A map showing the re-optimized segment.
-
Review the results and click Apply Reoptimization to insert the new appointments into the schedule.
-
Or click Cancel to close without changes.
Step 24: Complete All Schedule Items
The rep continues through the route until all items are handled:
- Appointments are completed (done), marked as no-show, or canceled.
- Travel, breaks, and events are processed.
Once all appointments reach a terminal status (done, no-show, or canceled), the Schedule automatically moves to In Review status.
Note: There is no separate “Complete Route” button. The transition happens automatically.
Part 6: Review and Close
Step 25: Review the Completed Route
Once the schedule is In Review, an operations user or scheduler reviews the results.

To review:
- Open the Schedules app from the app menu.
- Find the schedule with In Review status.
- Open the schedule record to view:
| Field | Description |
|---|---|
| Rep | The assigned rep’s name. |
| Plan Date | The date of the schedule. |
| Status | Current status (In Review). |
| Total Appointments | Number of appointments included. |
| Appointment Time | Total minutes spent on appointments. |
| Total Travel Time | Total driving time in minutes. |
| Total Distance | Total route distance. |
| Shift Utilization | Percentage of the shift that was used. |
| Feasibility | The feasibility score. |
| Related Schedule Items | A list of all items in the schedule. |
- Check the following:
- Which appointments were completed vs. no-shows.
- Any follow-up requests that were created.
- Visit telemetry timestamps for each appointment.
- Route metrics for efficiency analysis.
- Any gaps or exceptions in the schedule.
Step 26: Close the Schedule

After reviewing:
- Change the schedule status to Completed to close the operational loop.
- For any no-show or incomplete visits, check the automatically created Follow-up Requests and begin a new scheduling cycle.
Part 7: Additional Views
The Scheduler offers three additional views beyond the Route Planner for managing your schedules from different perspectives.
Route Agenda
The Route Agenda provides a time-slot-based view showing daily appointments and events for one or more reps side by side.
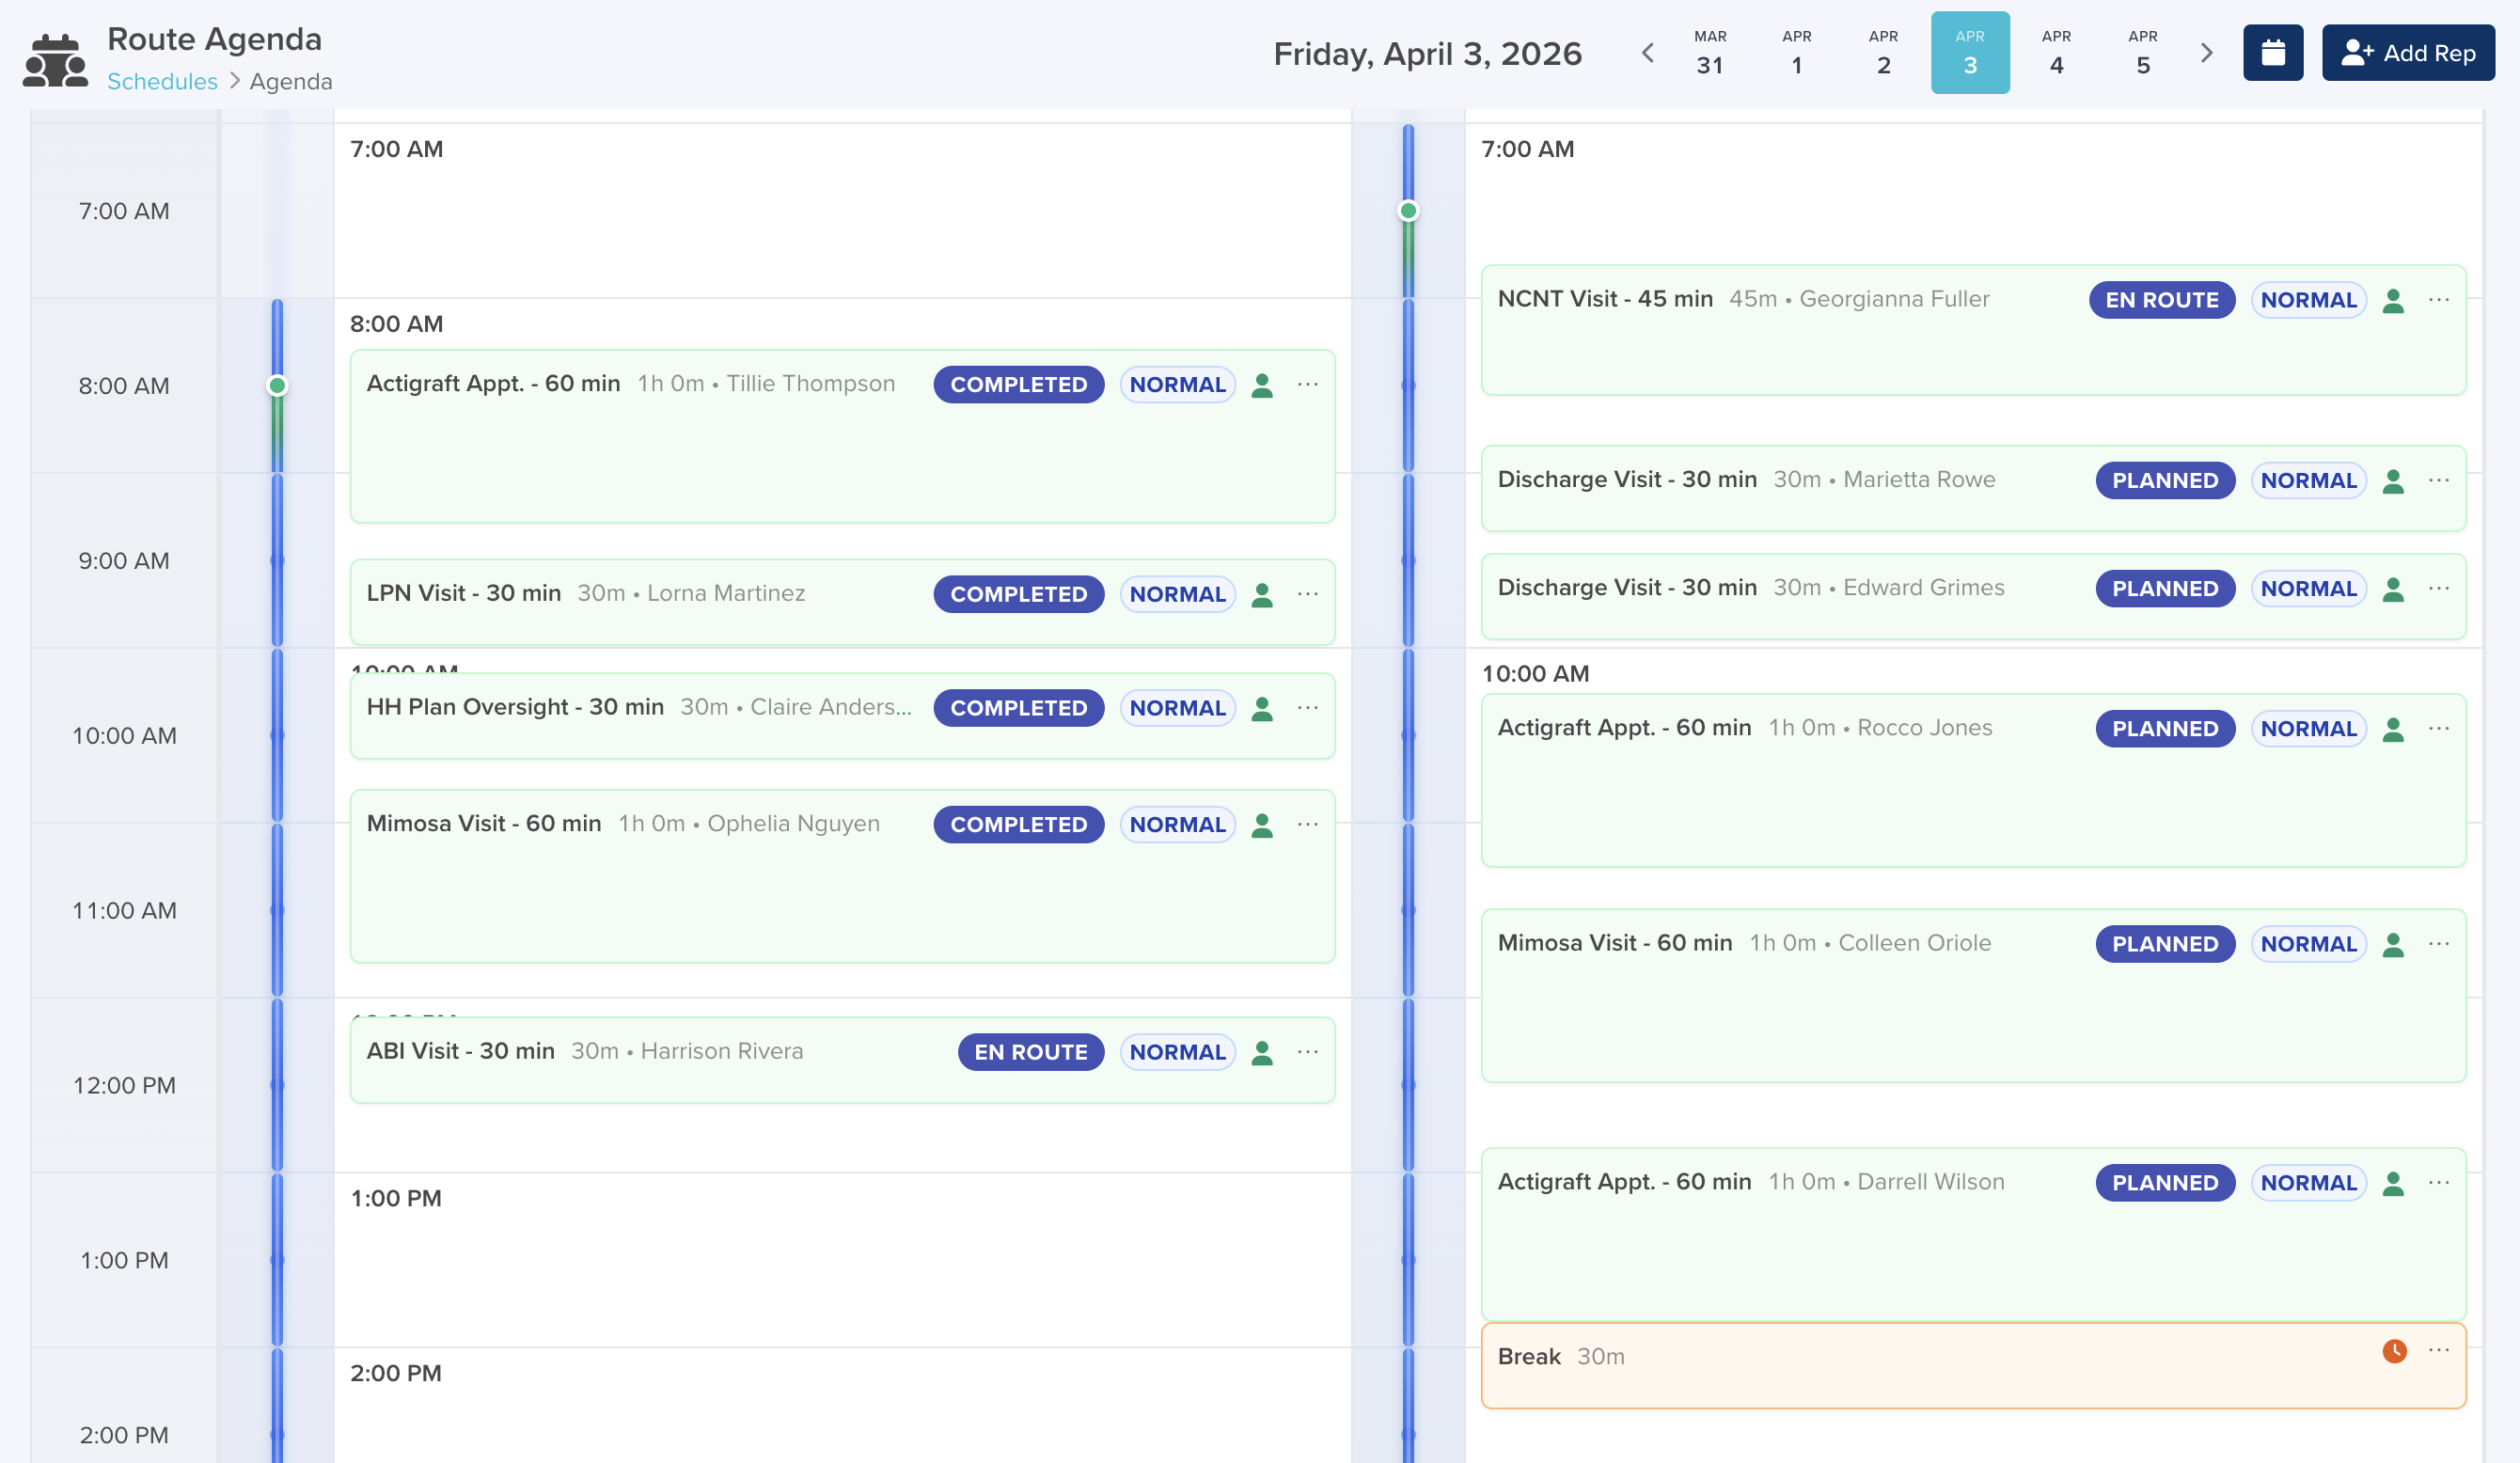
To open: Navigate to /route-agenda or use the Route Agenda action button from the Schedules app.
Toolbar
| Element | Description |
|---|---|
| Date Display | The selected date in the format “Monday, May 5, 2026.” |
| Mini Calendar | A horizontal strip of 6 date buttons. Click a day to select it. |
| Calendar Picker | Click the calendar icon button to open a full monthly calendar. Today’s date is marked with a red dot. |
| Add Rep Button | Click the “Add Rep” button (with a user-plus icon) to open the rep search spotlight. Search and select a rep to add their agenda to the view. |
Reps Bar
- A horizontal row of blue tags, one for each rep whose agenda is displayed.
- Each tag shows the rep’s name and has a remove (×) button to remove that rep from the view.
- Click “Add Rep” or use the search spotlight to add more reps.
Calendar Grid
- A time-based grid with hour slots (12:00 AM through 11:00 PM) along the left side.
- Each rep gets a column showing their events and appointments for the selected date.
- Click an event card to expand it and see more details.
- Click outside the expanded card to collapse it.
Route Calendar
The Route Calendar provides a monthly or weekly overview of all appointments, events, and schedules across your team.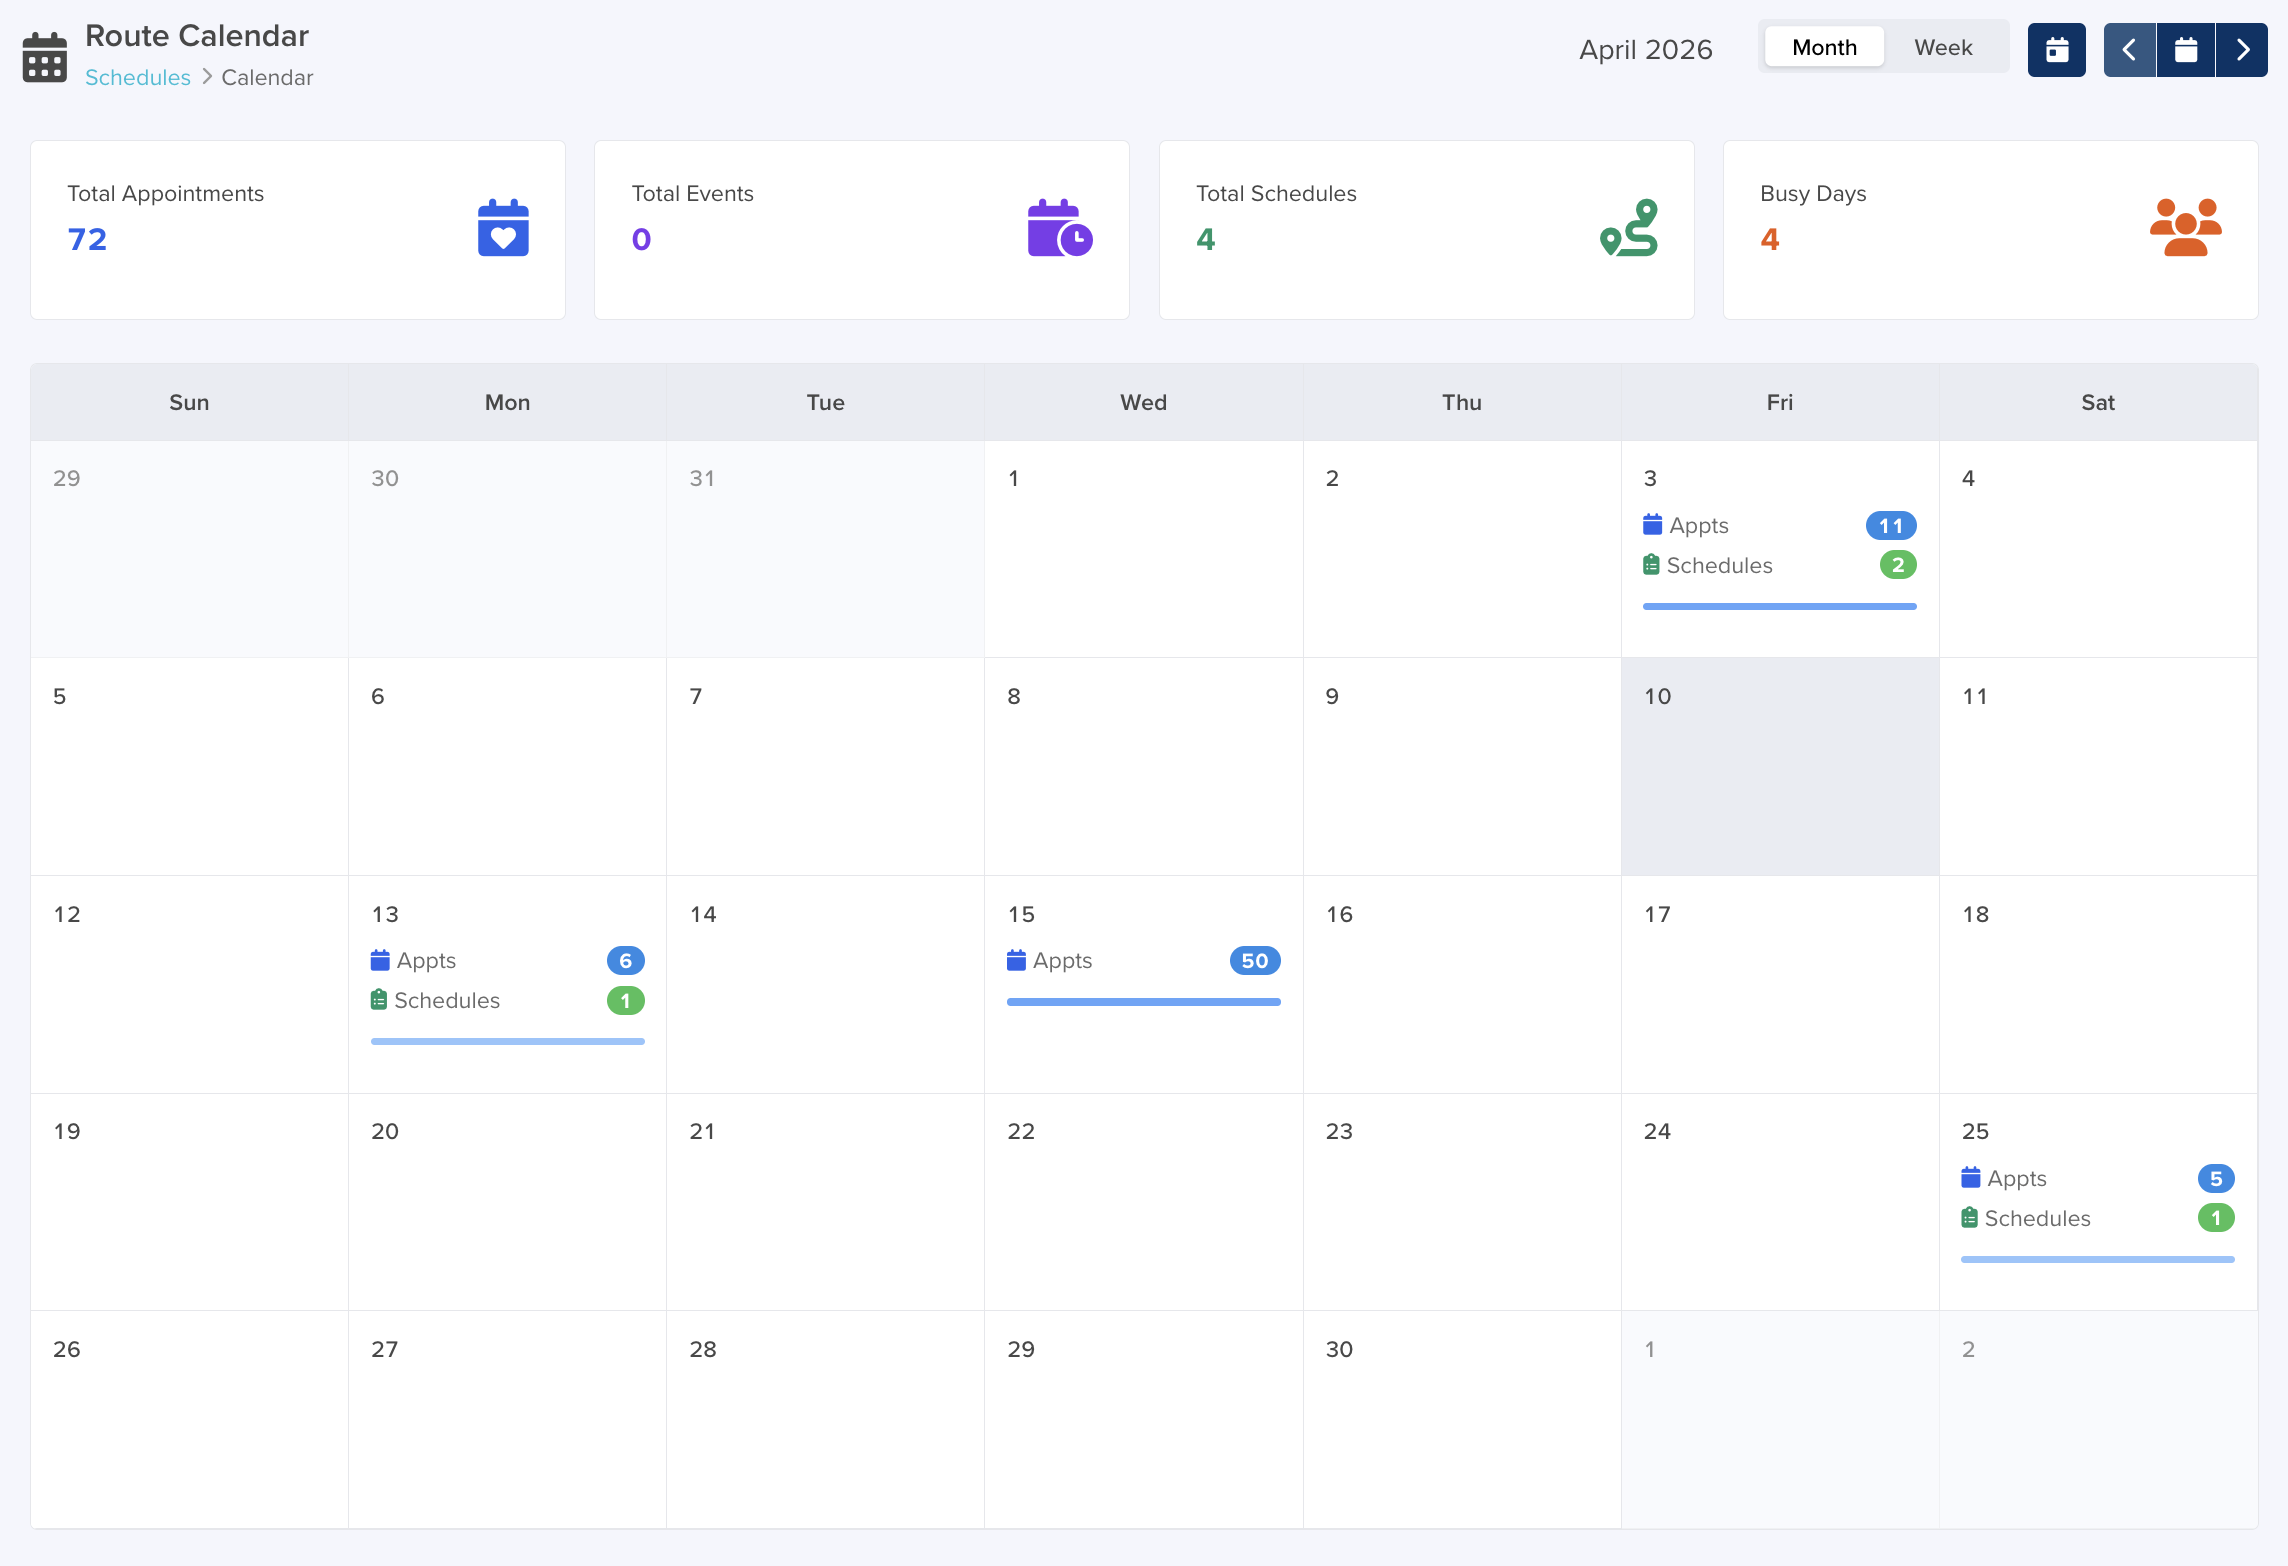
To open: Navigate to /route-calendar or use the Route Calendar action button from the Schedules app.
Toolbar
| Element | Description |
|---|---|
| Month Display | The current month and year (e.g., “May 2026”). |
| View Mode Toggle | A segmented control with two options: Month and Week. Click to switch between month view and week view. |
| Go to Today | Click the calendar-day icon button to jump to today’s date. |
| Previous Month | Click the left-chevron button to go to the previous month or week. |
| Month Picker | Click the calendar icon button between the arrows to open a month picker. Select any month to jump to it. |
| Next Month | Click the right-chevron button to go to the next month or week. |
Summary Stats
Four stat cards appear at the top of the calendar:
| Stat | Icon | Color |
|---|---|---|
| Total Appointments | Calendar-heart icon | Blue |
| Total Events | Calendar-clock icon | Purple |
| Total Schedules | Route icon | Green |
| Busy Days | Users icon | Orange |
Calendar Grid
- A 7-column grid with day headers: Sun, Mon, Tue, Wed, Thu, Fri, Sat.
- Each day cell shows the day number and colored badges for:
- Appts — Number of appointments (blue badge with calendar icon).
- Events — Number of events (violet badge with calendar-check icon).
- Schedules — Number of schedules (green badge with clipboard-list icon).
- An intensity bar at the bottom of each cell visually indicates how busy the day is (lighter blue = fewer, darker blue = busier).
- Days outside the current month are dimmed.
- Today’s date number is highlighted in the primary color.
- Hover over a day to see a subtle background change.
Day Preview
- Click any day cell to open a Day Preview modal.
- The modal title shows the full date (e.g., “Monday, May 5, 2026”).
- Three metric cards at the top:
- Appointments (blue) — Count and item count. Click the card to navigate to the filtered Appointment Pool list for that date.
- Events (purple) — Count and item count. Click to navigate to the filtered Events list.
- Schedules (green) — Count and item count. Click to navigate to the filtered Schedules list.
- Three detail sections below:
- Appointments — Lists up to 5 appointments with patient name, service type, time, priority badge, and assigned rep. An arrow button navigates to the full filtered list. A “View all X appointments” link appears if there are more than 5.
- Events — Lists up to 5 events with title, type, time, and location. An arrow button navigates to the full list.
- Schedules — Lists up to 5 schedules with rep name, status badge, grade badge, appointment count, and utilization percentage. An arrow button navigates to the full list.
- Click OK to close the modal.
Route Timeline (Dedicated View)
The Route Timeline is a dedicated page for a single schedule, used during execution to track and manage the rep’s progress.
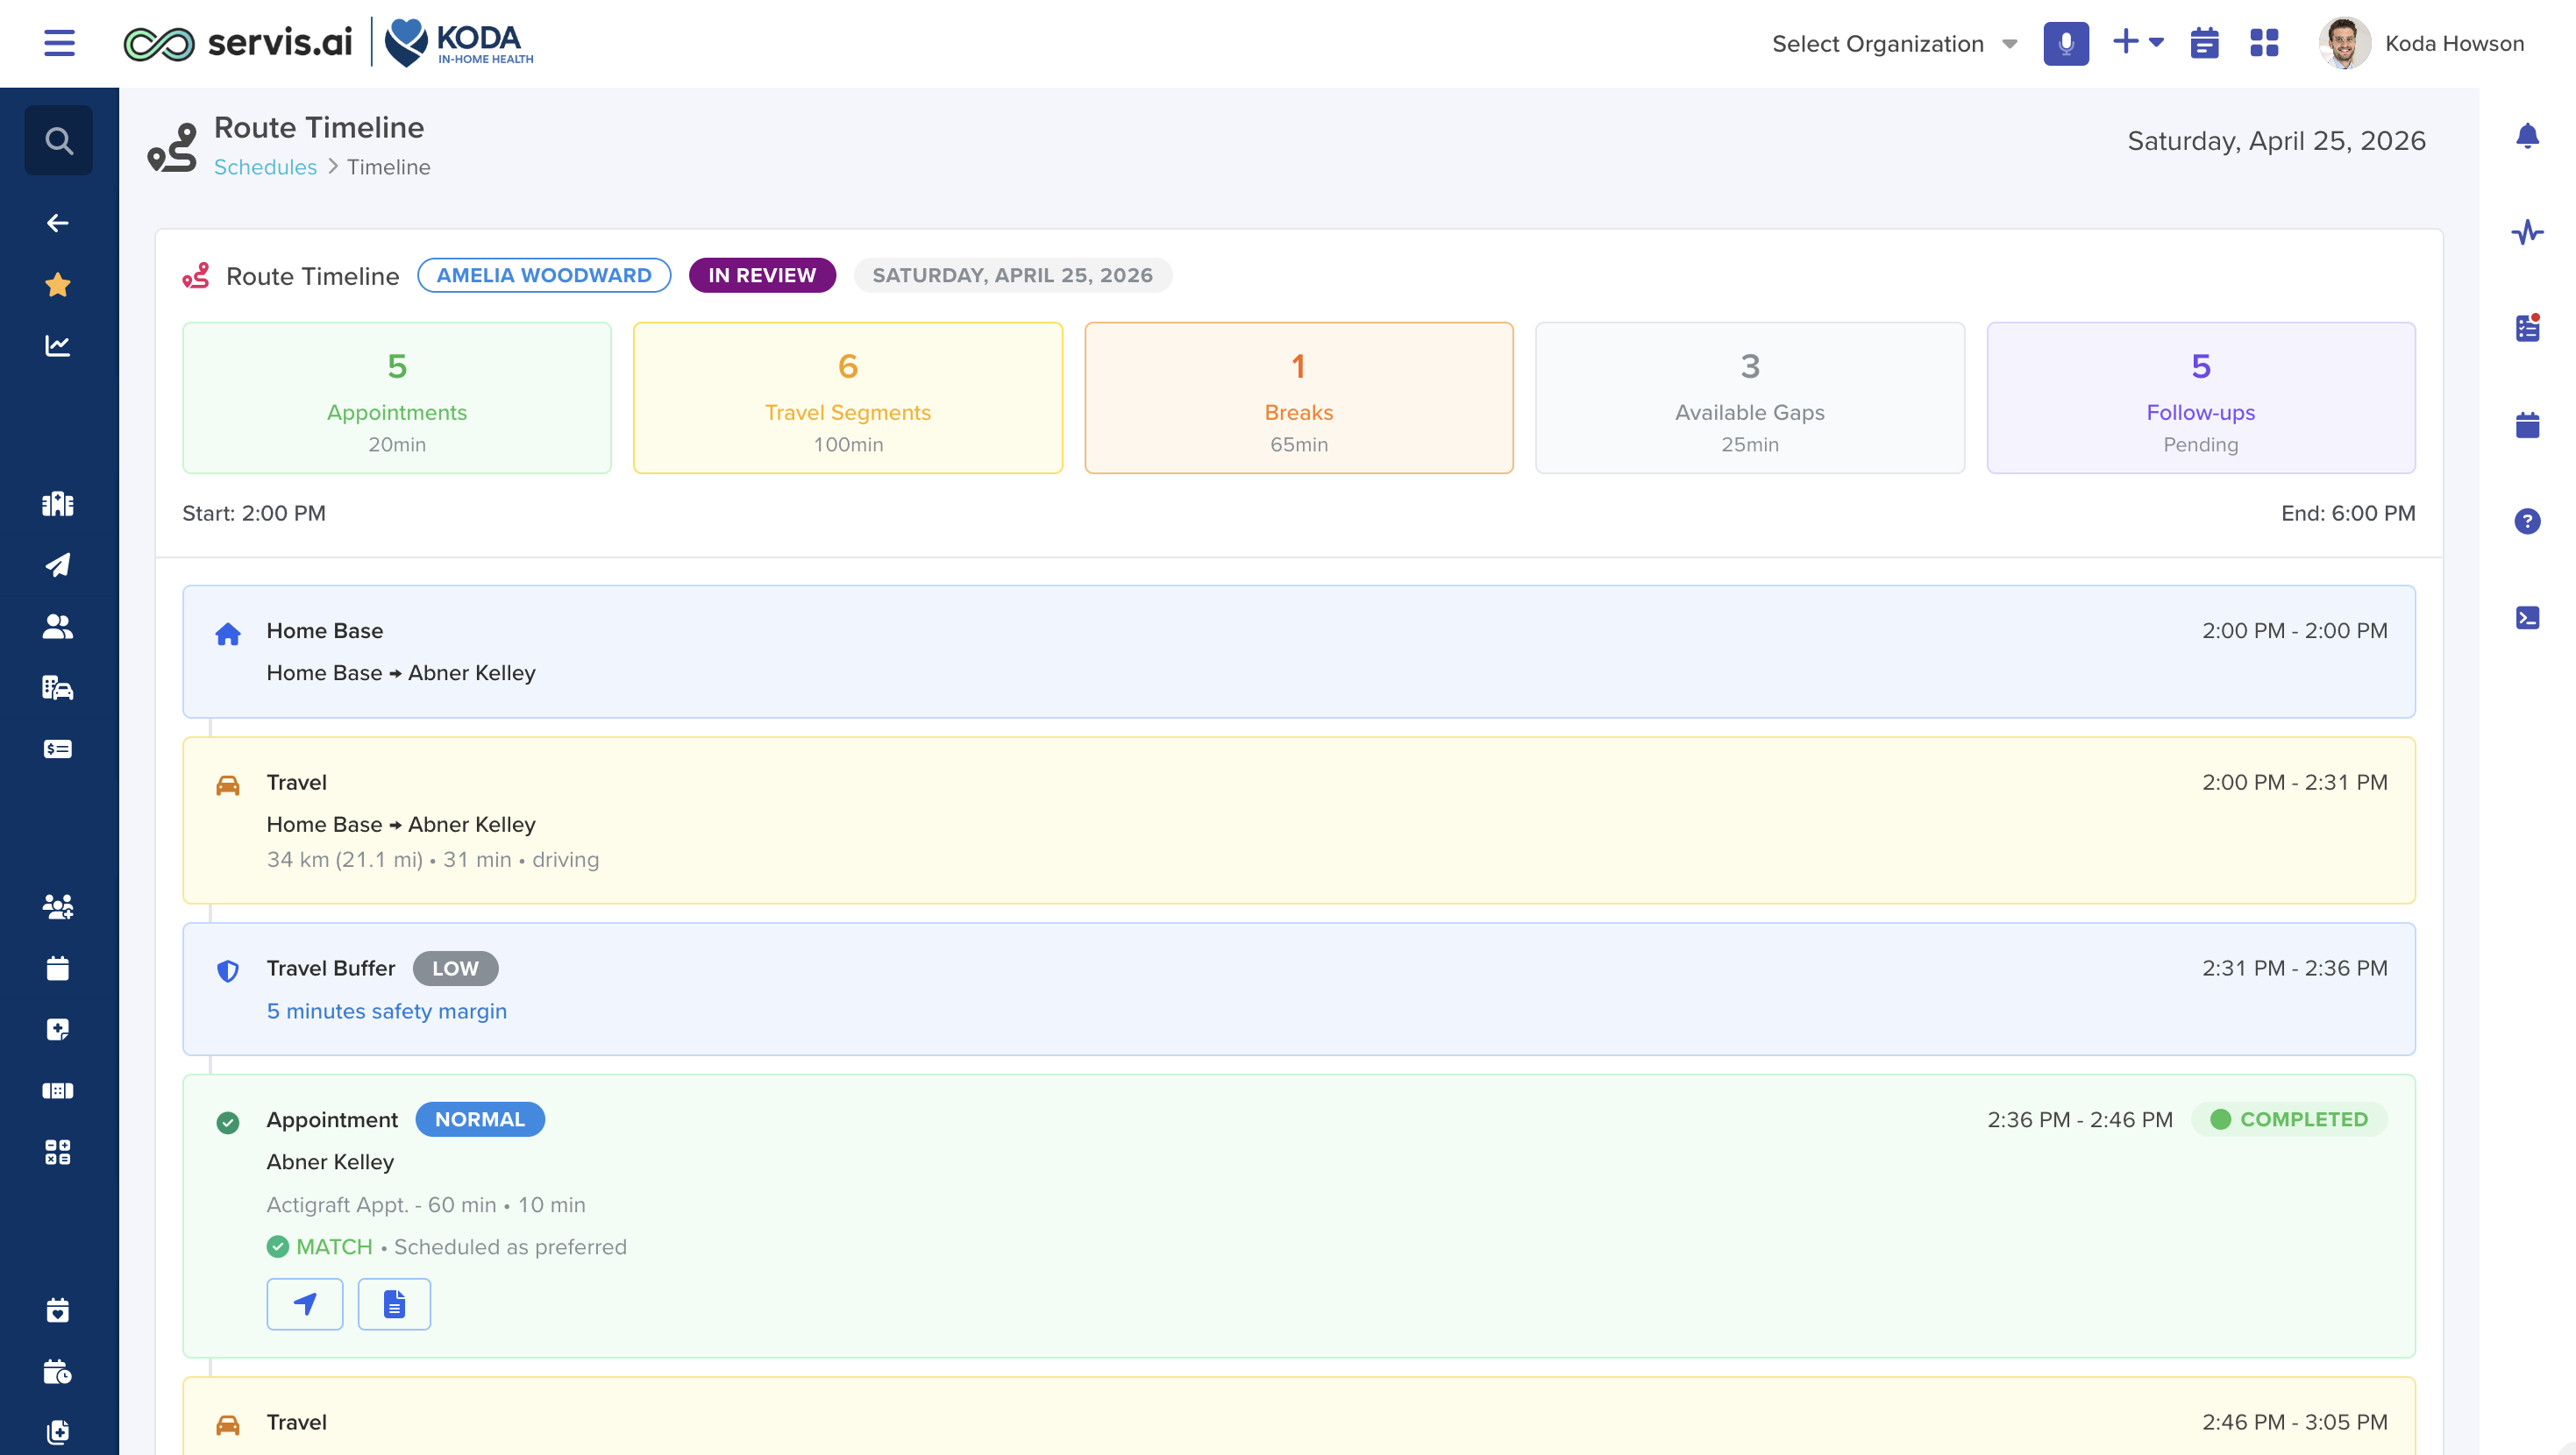
To open: From the Route Planner, click View Route Timeline when a schedule is in Published or later status. Or navigate to /route-timeline/{scheduleId}.
Toolbar
- Displays the service date (e.g., “Monday, May 5, 2026”).
Schedule Control
- When the schedule is Published, a Start Schedule button appears (green, full-width).
- Click it to start the route and move the schedule to In Progress.
Timeline
- Shows the full chronological timeline with all items (Home Base, Travel, Appointments, Breaks, Fixed Blocks, Gaps).
- Each appointment shows its current visit status as a colored badge:
- Planned (blue)
- En Route (yellow)
- Arrived (orange)
- Completed (green)
- No Show (red)
- Canceled (gray)
- Action buttons appear for each appointment based on its status (Directions, Check In, Check Out, No Show, Follow-up icons).
- A Re-optimize button appears on gaps that can fit additional appointments.
- Summary cards at the top show: Appointments, Travel Segments, Breaks, Available Gaps, and Follow-ups (with a count of pending follow-ups).
Part 8: Troubleshooting
| Issue | What to Check |
|---|---|
| No suggestions appear after selecting a rep and date | Verify that Appointment Pool records exist for that date, that their status is active, and that the rep has the required skills and a valid shift. Also check that customer records have valid latitude and longitude. |
| Rep does not appear in the search spotlight | Confirm the rep’s record exists in the mapped Rep App, and that the display name, latitude, and longitude fields are populated. |
| Optimization produces a low feasibility score | Check if appointments have conflicting preferred times, if the rep’s shift is too short, or if required skills are missing. Try adjusting the algorithm type or increasing the appointment capacity in settings. |
| Map does not display route lines | Ensure that appointment locations have valid coordinates. Virtual appointments do not show on the map. |
| Cannot publish the schedule | Check if any appointment requires multiple reps and one is unassigned. All required rep slots must be filled before publishing. |
| Cannot edit optimization settings | Settings are locked when a schedule already exists for the selected rep and date. Delete the existing schedule first. |
| “Schedule exists” message appears | A schedule already exists for this rep and date. Delete it to re-optimize, or use the management actions (Publish, Cancel, View Route Timeline). |
Tips and Best Practices
- Keep locations accurate. Double-check latitude and longitude for both reps and customers. Inaccurate coordinates produce poor routes.
- Set realistic shift times. If a rep’s shift is too narrow, the optimizer may not be able to fit all appointments.
- Use preferred time windows wisely. Setting preferred start and end times on appointments gives the optimizer helpful constraints but can reduce flexibility.
- Start with the Auto optimization model. The Auto model selects the best strategy automatically. Switch to a specific algorithm (Shortest Route, Nearest Neighbor, Farthest Neighbor) only if you have a particular routing preference.
- Review metrics before applying. Always check the feasibility score, shift utilization, and infeasible appointments before applying a route.
- Use Events for predictable blocks. If a rep has a recurring meeting or training, create it as an Event so the optimizer respects that blocked time.
- Re-optimize gaps during execution. If a visit ends early or a customer cancels, use the Re-optimize button on the gap to fill the available time.
- Review completed schedules. After a route is finished, review the telemetry data and follow-up requests to ensure continuity of care or service.