Navigating through vast troves of data and extracting meaningful insights can be a daunting task. This is where the integration of our AI Assistant proves invaluable. By harnessing the capabilities of artificial intelligence, servis.ai users can now find what they need, save time, and unlock hidden opportunities with ease.
User Permissions: Only Admins can authorize this tool.
What can the AI Assistant help with?
Servis.ai’s Assistant is currently trained to take care of the following tasks:
1. Creating records
You can use the AI Assistant to create records.
Example: Create a contact john doe, john@gmail, 555-456-7990
2. Updating records
You can use the AI Assistant to update existing records.
Example: Update Acme deal to stage Closed Won.
3. Navigating to records
You can use the AI Assistant to navigate existing records.
Example: Go to contact record John Doe
4. Reporting
You can use the AI Assistant to create reports.
Example: Show me a bar chart of all contacts grouped by contact stage and contact owner.
5. Deal and Ticket Scoring
You can use the AI Assistant to score Deals and Tickets.
Navigate to AI Assistant
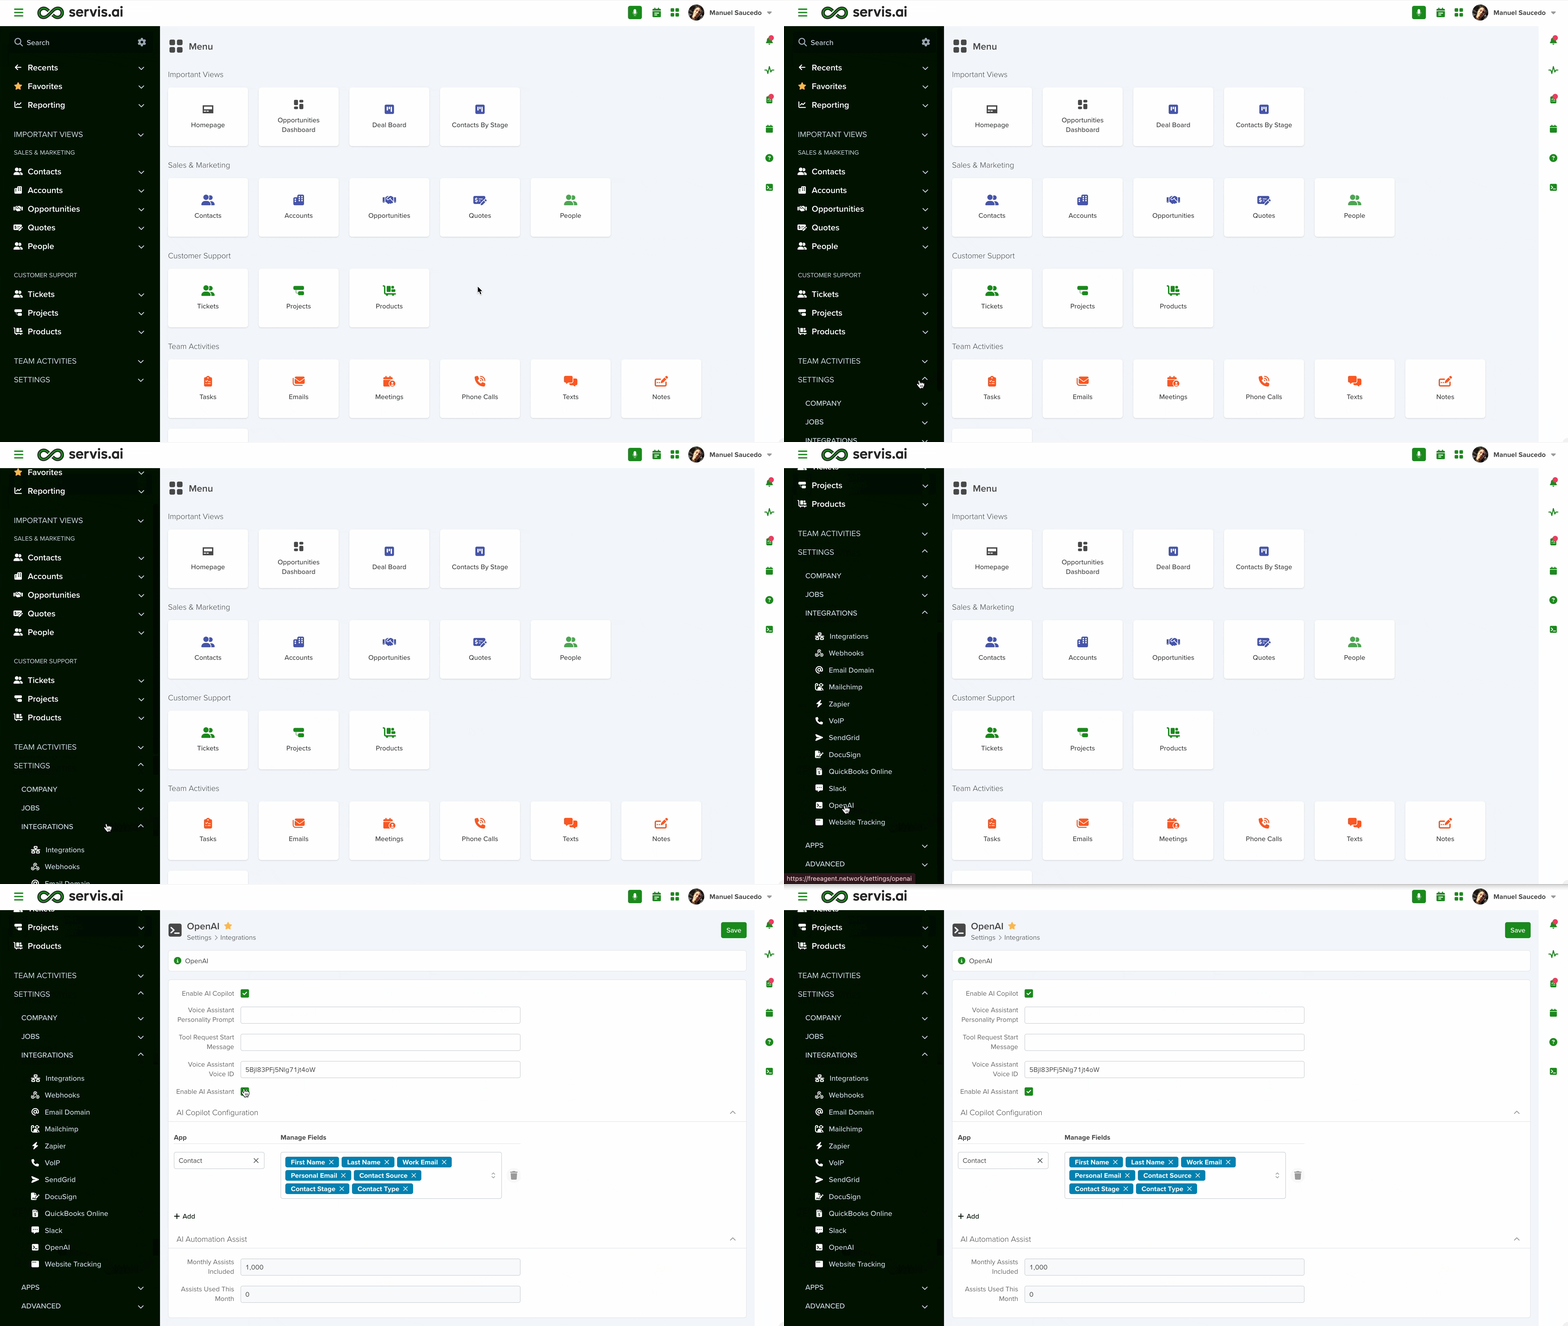
From the Navigation Menu, go to Settings > Integrations > OpenAI.
Enable AI Assistant
Click the Enable AI Assistant checkbox. Next, click on the Save button. Servis.ai will reload automatically and AI Assistant will be enabled.
Configure AI Assistant
Once the AI Assistant is enabled you will need to designate what Apps and fields it has access to. This will determine what information the AI Assistant is allowed to access when performing an action.
For example, if you ask the AI Assistant to create a new Contact record for John Doe, john@gmail, 555-456-7990; the AI Assistant will need access to the First Name and Last Name fields as well as the Email and Phone Number fields in the Contacts App in order to create the record.
To set up your App and fields permissions, start by clicking the + Add button.
Two new fields will appear, App and Manage Fields.
App
The App field is where you will designate what Apps the AI Assistant has access to. The options available are presented as a drop-down menu populated with all your Apps (including custom Apps).
Manage Fields
The Manage Fields field is where you will designate what fields in the selected App the AI Assistant has access to. The options available are presented as a drop-down menu populated with the fields in the App you selected.
Adding and Deleting App/Field Access
You can use + Add button to add another pair of fields. You will need to add a pair of fields for every App you want the AI Assistant to have access to.
To delete a pair of fields, click the Trash icon next to the Manage Fields field.
Configuration Example
Let’s configure the Contacts App.
First, select the Contacts App in the App field. Next, select the fields you would like the AI Assistant to have access to. Remember, the AI Assistant can only perform actions for Apps and fields it has access to. In this example we want to be able to create and update Contact records so we have included all the fields required to do that.
Using the AI Assistant for Creating/Updating New Records/Reports
When using the AI Assistant try to use clear and direct commands. Let’s look at a couple of examples.
Creating a New Contact Record
Let’s use the AI Assistant to create a new Contact record. We’ll provide the following information:
- Name
- Phone
- Title
First, access the AI Assistant by clicking on the icon in the Right-Hand Menu.
As soon as you open the AI Assistant a message will be displayed telling you what the AI Assistant can do, including examples of prompts you can use format your own requests.
Next, input the prompt. Provide all the information you would like to include in the new Contact record in the prompt.
The Assistant will now created the new Contact record. A link to the new Contact record will also be provided.
Click the link to navigate to the new Contact record.
Creating a new Report
Let’s use the AI Assistant to create a new report. Just like with Creating a New Contact Record, start by navigating to the AI Assistant using the Right-Hand Menu. Enter the prompt.
The Assistant will then generate the report and automatically open it.
You can even generate charts using more than one metric.
Using the AI Assistant Deal and Ticket Scoring
You can use the AI Assistant for Deal and Ticket Scoring. To do so, Navigate to AI Assistant and click the Enable Deal Scoring and/or the Enable Ticket Scoring checkboxes located at the bottom of the OpenAI settings page. Once enabled, click the Save button.
Note: The name of Deals App may be different in your servis.ai setup. Opportunities and Leads are common alternative names for the Deals App.
To see the score of a Deal or Ticket, navigate to a specific Deal or Ticket record. Hover over the Options button (…) located above the Related Lists Menu and click the Calculate Score with AI button that appears.

You will receive a score and a short explanation of how the score was calculated.


